Salesforce and NetSuite Integration using Celigo
Streamline Salesforce integration with NetSuite using Celigo for efficient business operations, eliminate data silos, improve visibility, & close deals faster.
Table Of Content
2
3
Overview
Salesforce and NetSuite are two powerful CRM platforms that enhance customer engagement for your business. However, to boost work efficiency, you need to integrate them. Here, Celigo comes into the picture.
Celigo is a renowned integration platform and service (iPaaS) that helps automate primary business processes by allowing anyone to integrate your applications. Whether it is IT or business users, it enables access across businesses to integrate easily. In this blog, we will discuss Salesforce integration with NetSuite using Celigo.
Step-by-step Guide on Salesforce Integration with NetSuite Using Celigo
In this guide, we will implement Salesforce integration with NetSuite using Celigo. First, we will create a new NetSuite customer from a Salesforce account. Below, you can find the step-by-step implementation process.
Creating Required NetSuite Credentials
You must start the Salesforce to NetSuite integration process with the requirement of crucial credentials. Hence, the following NetSuite credentials are needed to make that connection:
- Account ID
- Application ID
- Consumer Key
- Consumer Secret
- Token Id
- Token Secret
However, all should be kept in a secure document while generating the values. When NetSuite Token keys and secrets are made, they will only be displayed once and must be re-generated should they be lost. Also, be very careful with these keys, as they indeed are “keys to the kingdom.” Keep documents safe from access, and do not expose them to prying eyes on screen in a screenshare.
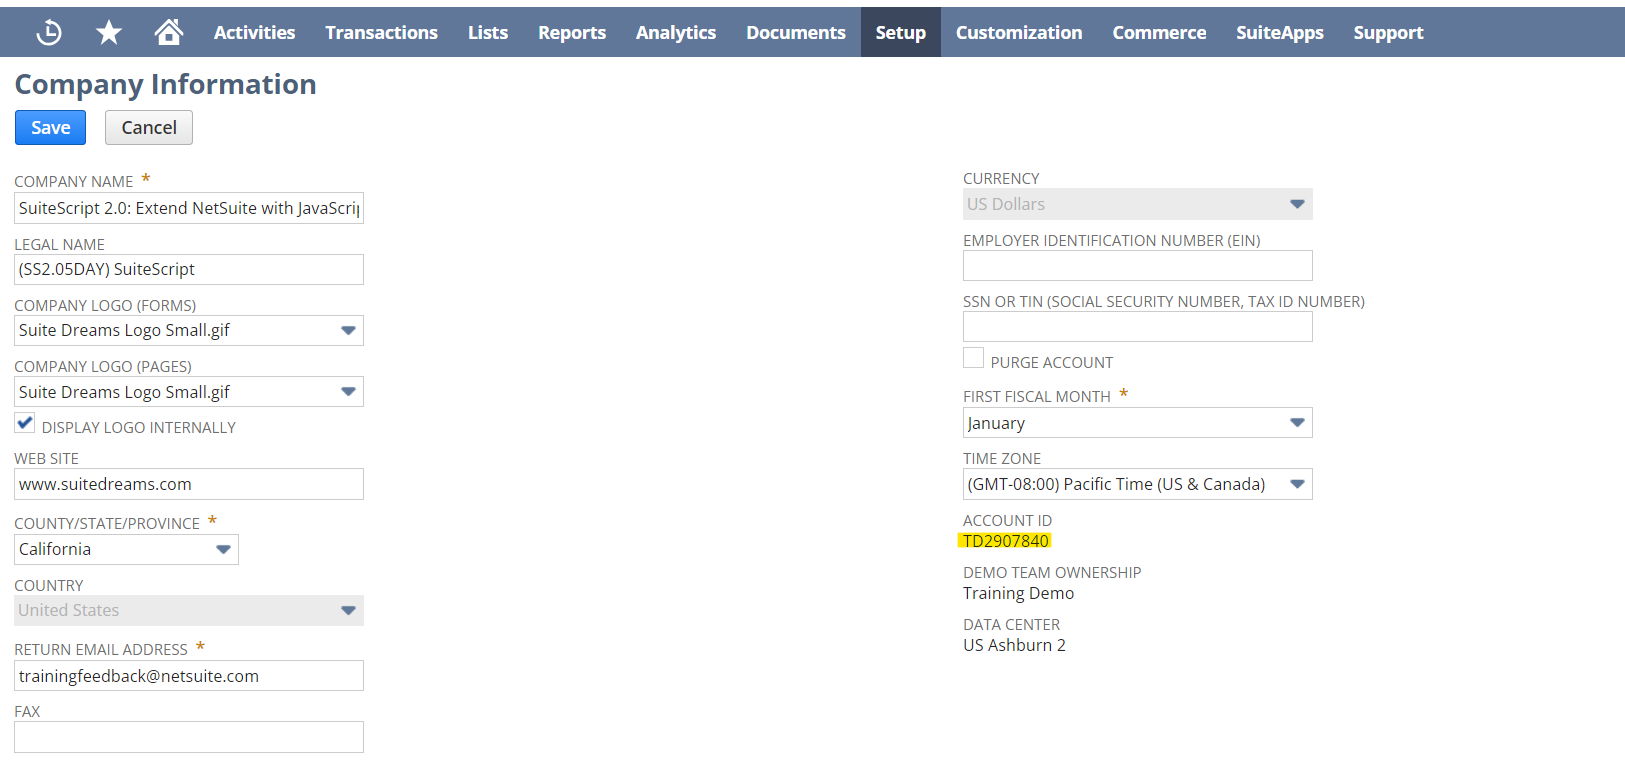
Step 1 – Get the Account ID
To set the account ID, first go to Setup, Company, and then click on Company Information. Next, you will find the Account ID value on the right column of the Company Information page.
Step 2 – Creating an Integration Record for the Consumer Key & Consumer Secret
Ensure all available settings are correct, as few may be harder to locate.
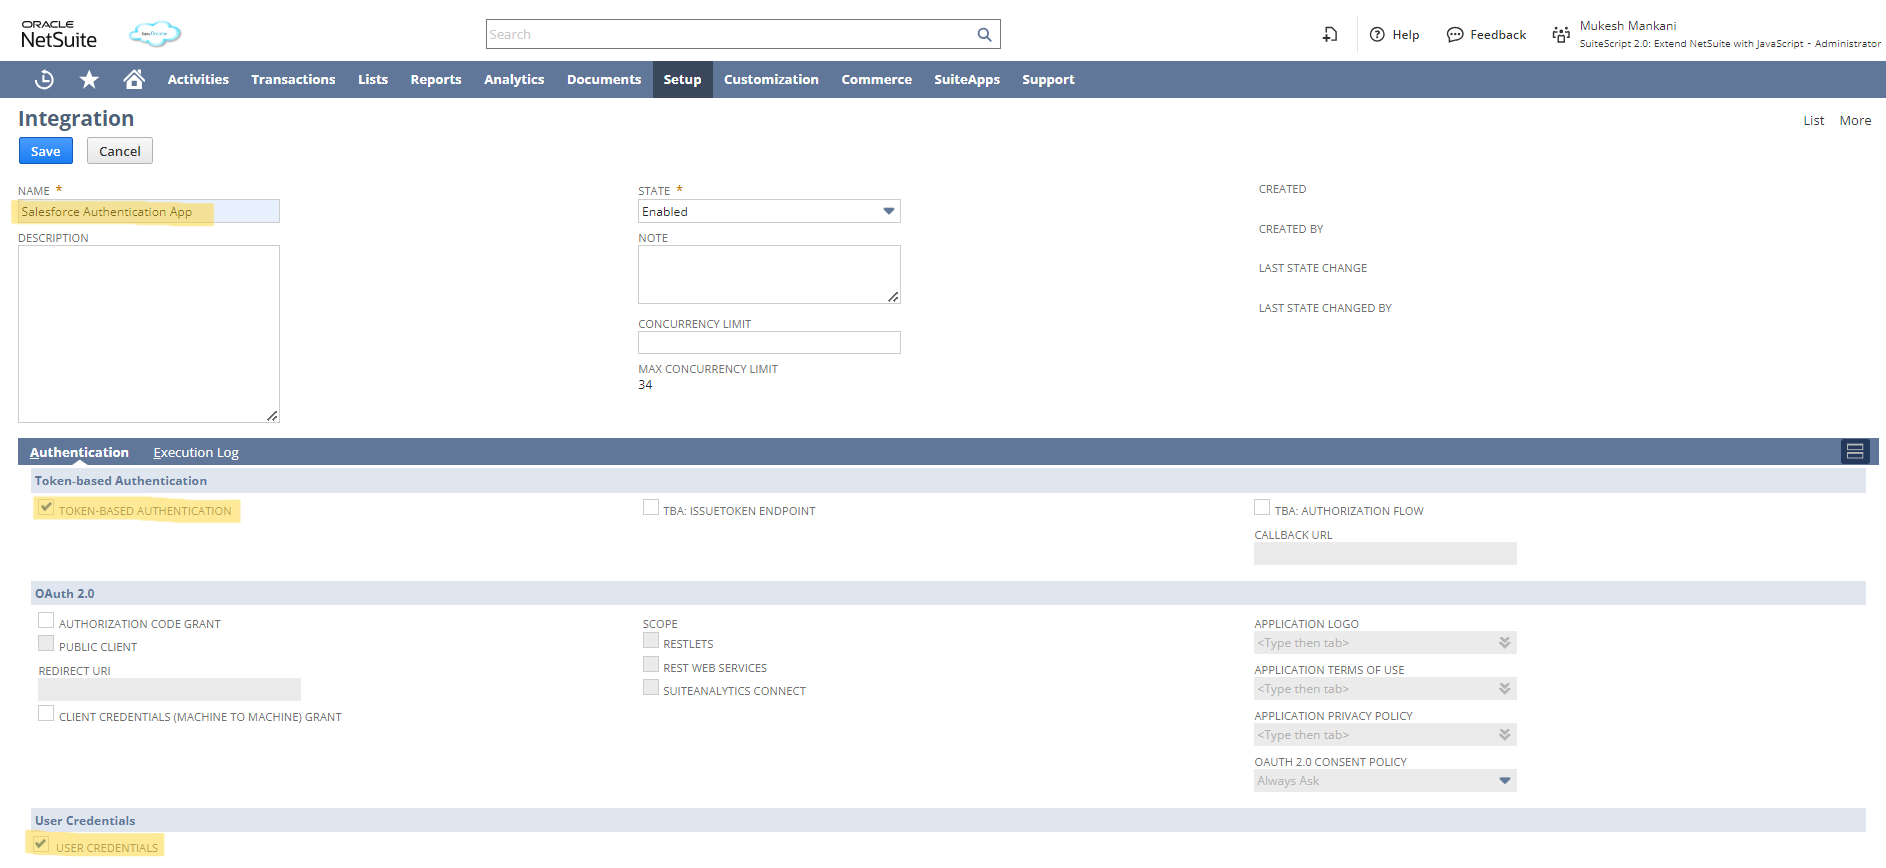
- First, click on Setup to Integration to Manage integrations, and last, click on New.
- Enter a name for your application and a description, if necessary. The following values should be checked before Salesforce integration with Netsuite:
- TOKEN-BASED AUTHENTICATION (TBA)
- USER CREDENTIALS
- The following values should be unchecked (these fields might not be visible, which is also fine as you can continue with integration)
- TBA: ISSUETOKEN AUTHENTICATION (*)
- TBA: AUTHORIZATION FLOW
- AUTHORIZATION CODE GRANT
- Leave the State set to the default value.
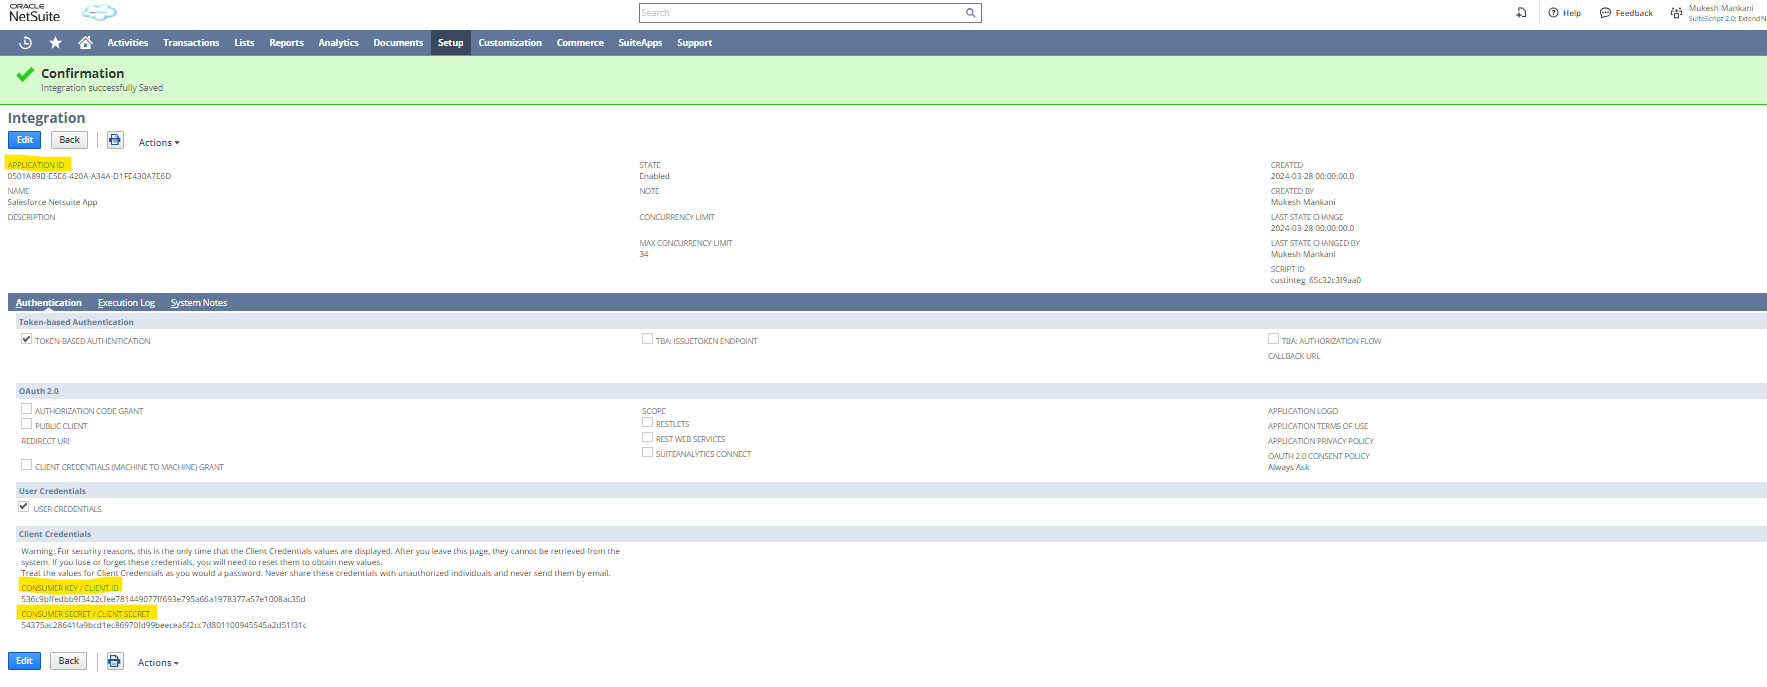
- Click Save. (Sensitive Data will be shown while you click on it)
- Copy the displayed Consumer Key and Consumer Secret, as it will show only once. If you navigate away from the page, you need to recreate the key and secret.
Note: Some selections in this guide may be available outside of NetSuite.
Step 3 – Get Application ID
Next, go to Setup, then Integration to Manage Integrations, and lastly, click on the Select App.
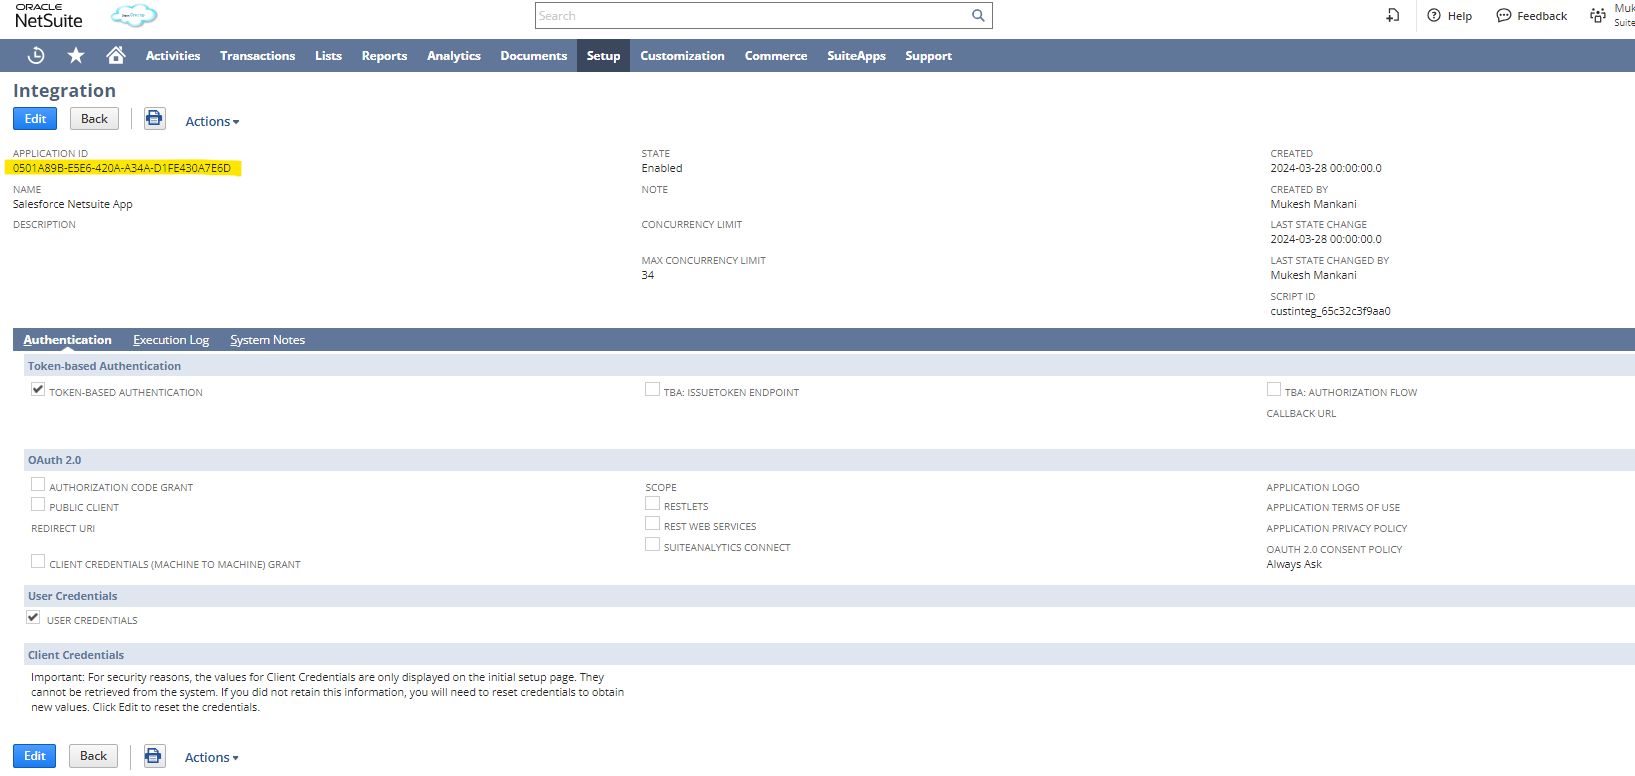
Step 4 – Generating an Access Token
You must ensure that some selections in this guide may not be available in some NetSuite. Hence, verify that all available settings are correct; some may require more work to be located.
- On the NetSuite Home page (indicated with a Home icon), there is a section called “Settings” in the lower left corner. Towards the bottom of that, click “Manage Access Tokens.”
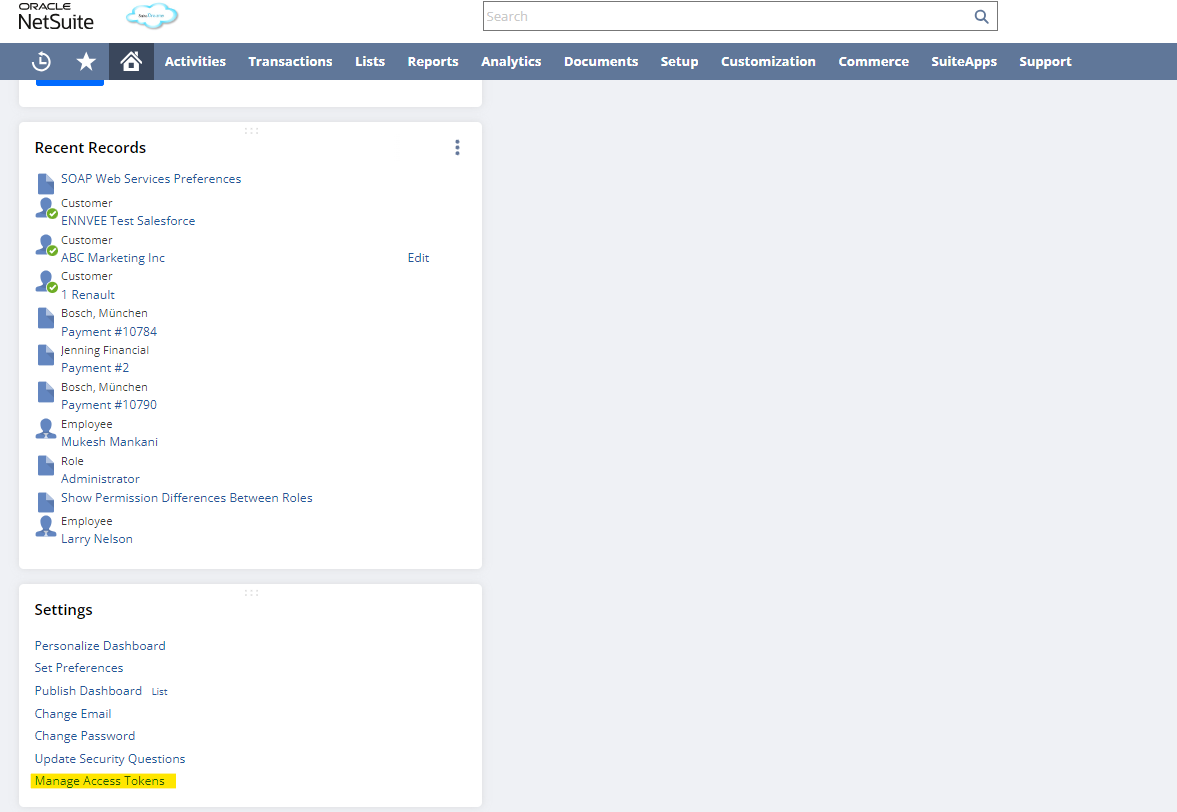
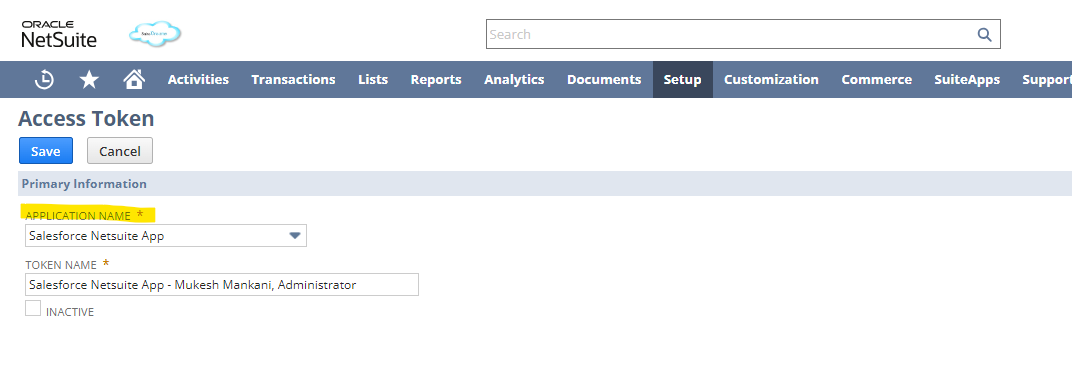
- Click “New My Access Token“.

- On the Access Token page, select Application Name. (created in the integration record steps above)
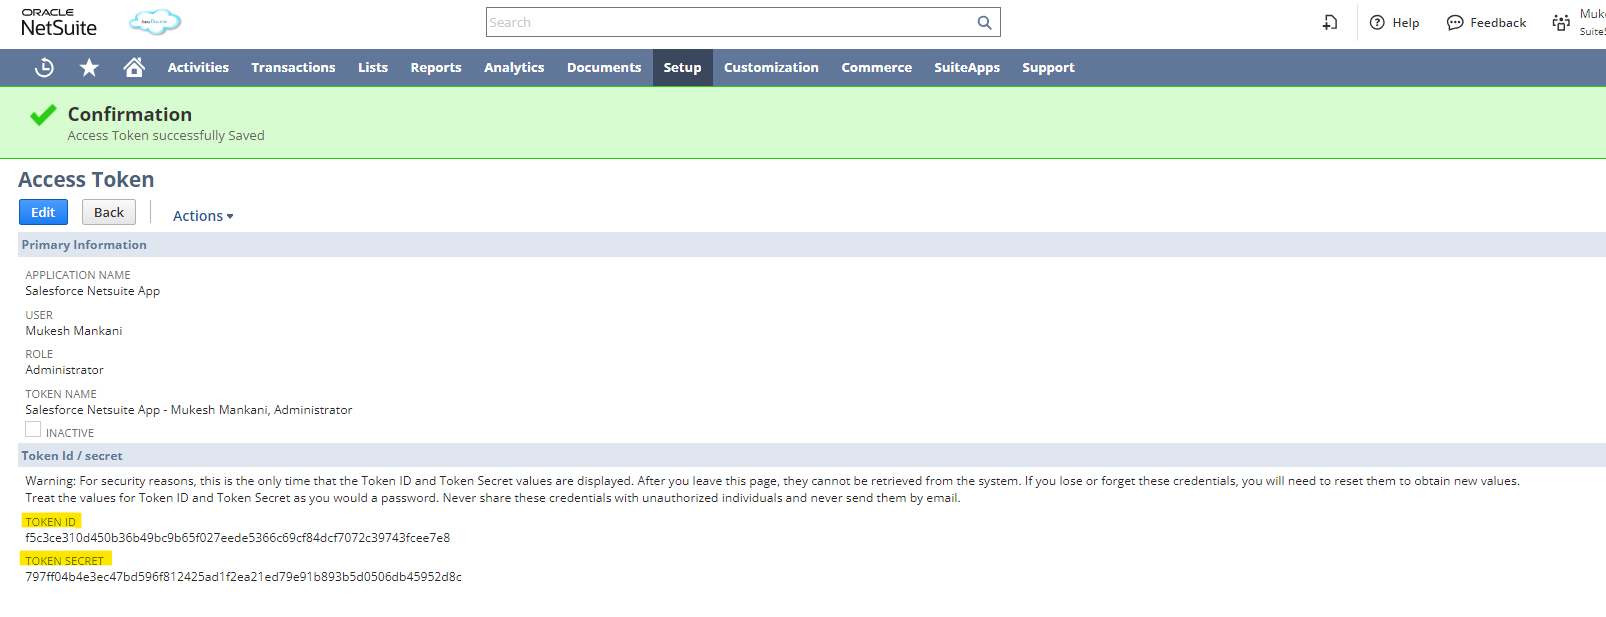
- Click Save to store all essential information. ( Sensitive Data will be shown when clicked)
- Copy the Token ID and Token Secret, which will appear only once. If you scroll away from the page, you need to recreate another access token.
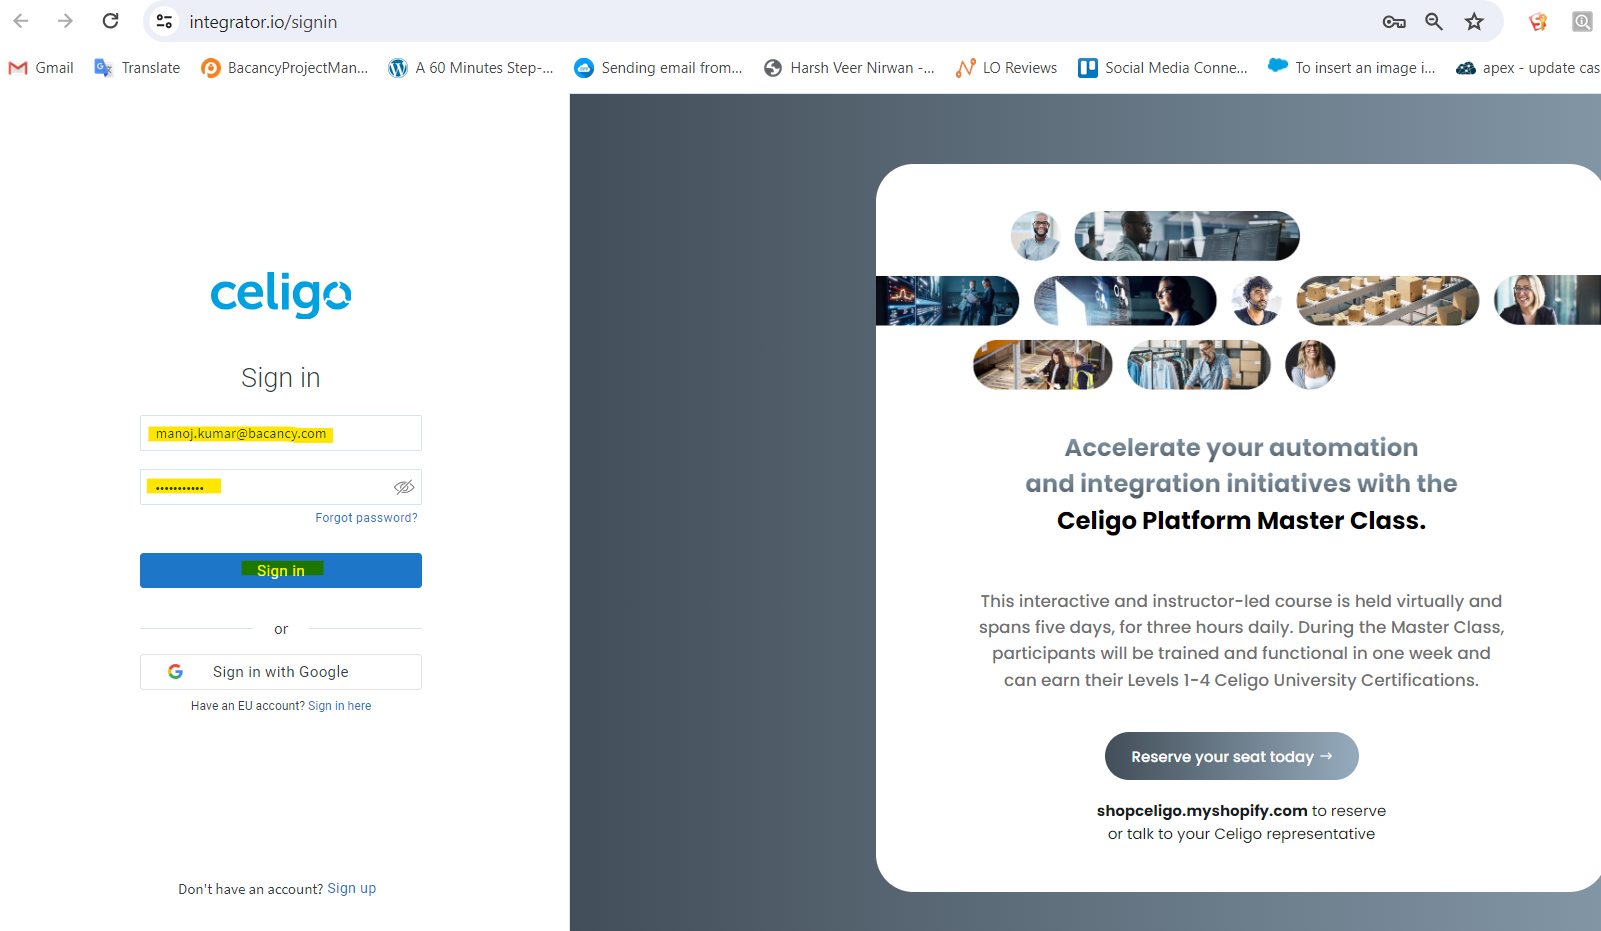
Step 5 – Log in to Celigo Account
Step 6 – Set Up an Automatic token-based Auth Connection to NetSuite
After successfully executing Salesforce integration with NetSuite, you can set up a NetSuite connection using the Celigo application.
- First of everything, you need to login Celigo account.
- You can start establishing a connection to NetSuite in either of the following ways: From the Resources menu, select Connections. Then, you need to select the click + Create connection at the top right of the feed.
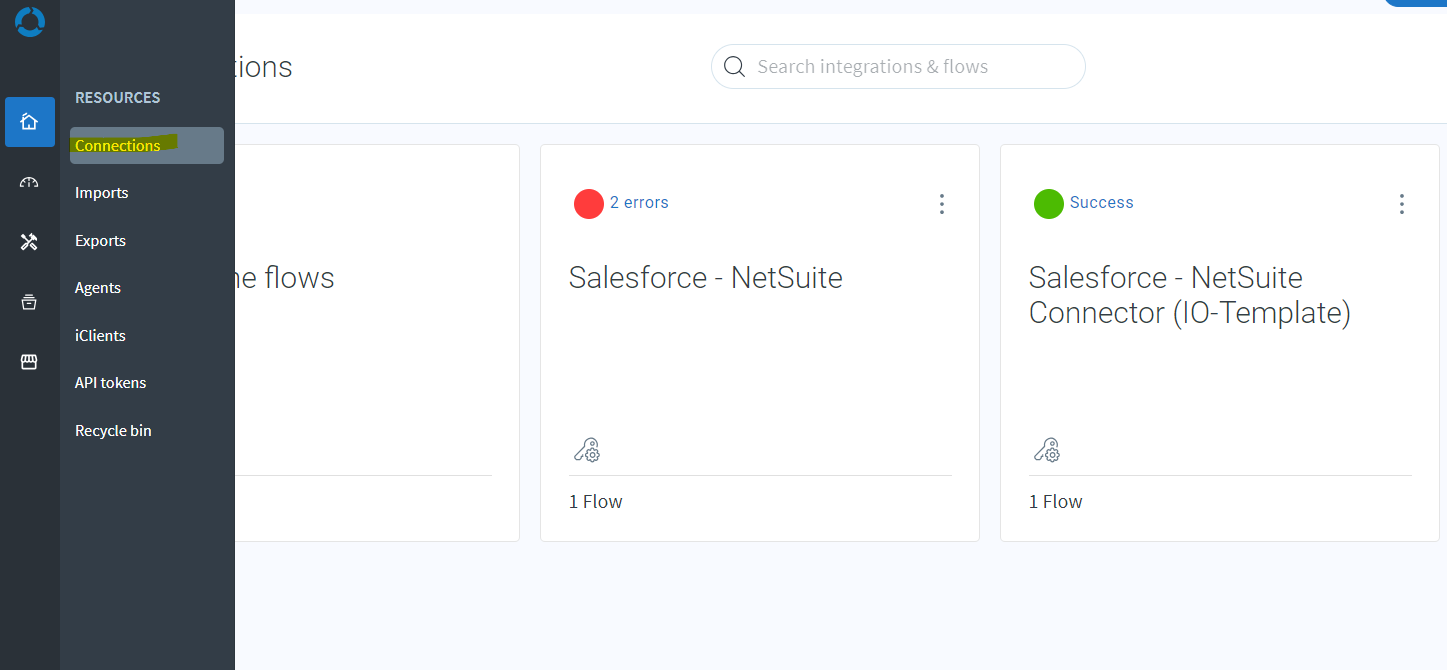
- Later, you will jump to the resulting Application list, where you need to select NetSuite.
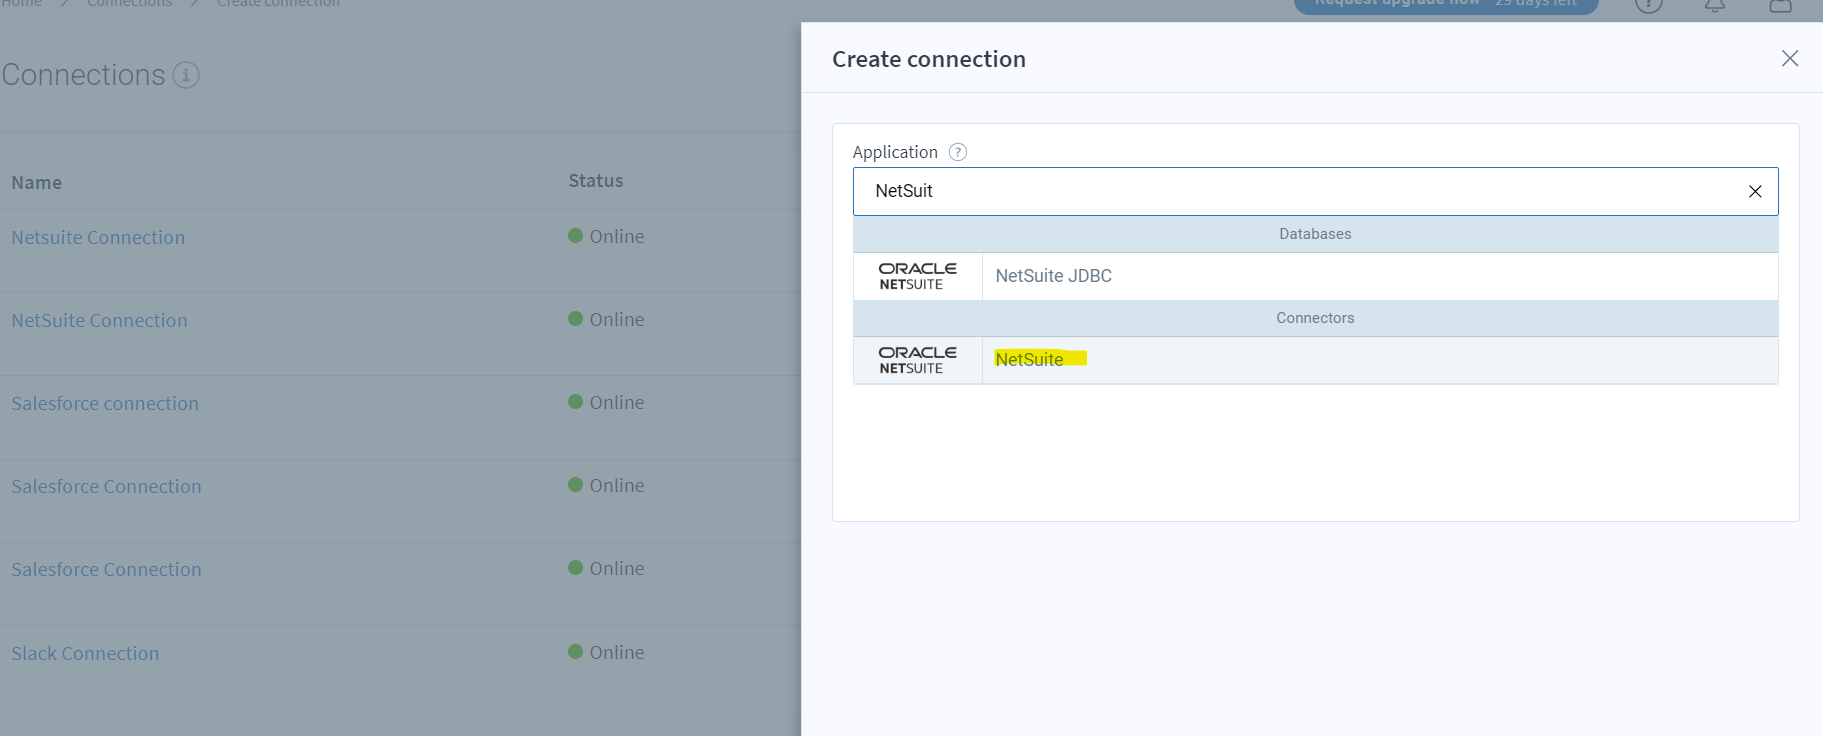
- First, name your connection or user in the General settings section of the feed.
- Name (required): Give a clear and distinguishable name. During the entire integrator.io imports and exports, you will have the option to select a new connection and a different identifier. This will help you when choosing among a list of connections that you’ve created.
- Application (required and non-editable): It is a reminder of the app while editing it.
- At this point, options will be displayed in NetSuite authentication.
- Authentication type (required): Select Token-Based Auth (Automatic).
Note: Before you choose the authentication type as Token Based Auth (Automatic) in integrator.io, in NetSuite:
- Enable the Token-based authentication feature..
Note: Create a copy of the Administrator or Celigo integrator.io Full Access roles. You must select Setup, then Users/Roles to Manage Roles, then click Customize.
- Account ID (required): Enter your account ID. However, you can also contact NetSuite support to obtain the ID if it is not displaying as it is in the following steps:
Note: Be sure to utilize dash (-) instead of underscore (_) when entering your account ID—for example, 12345_SB1.
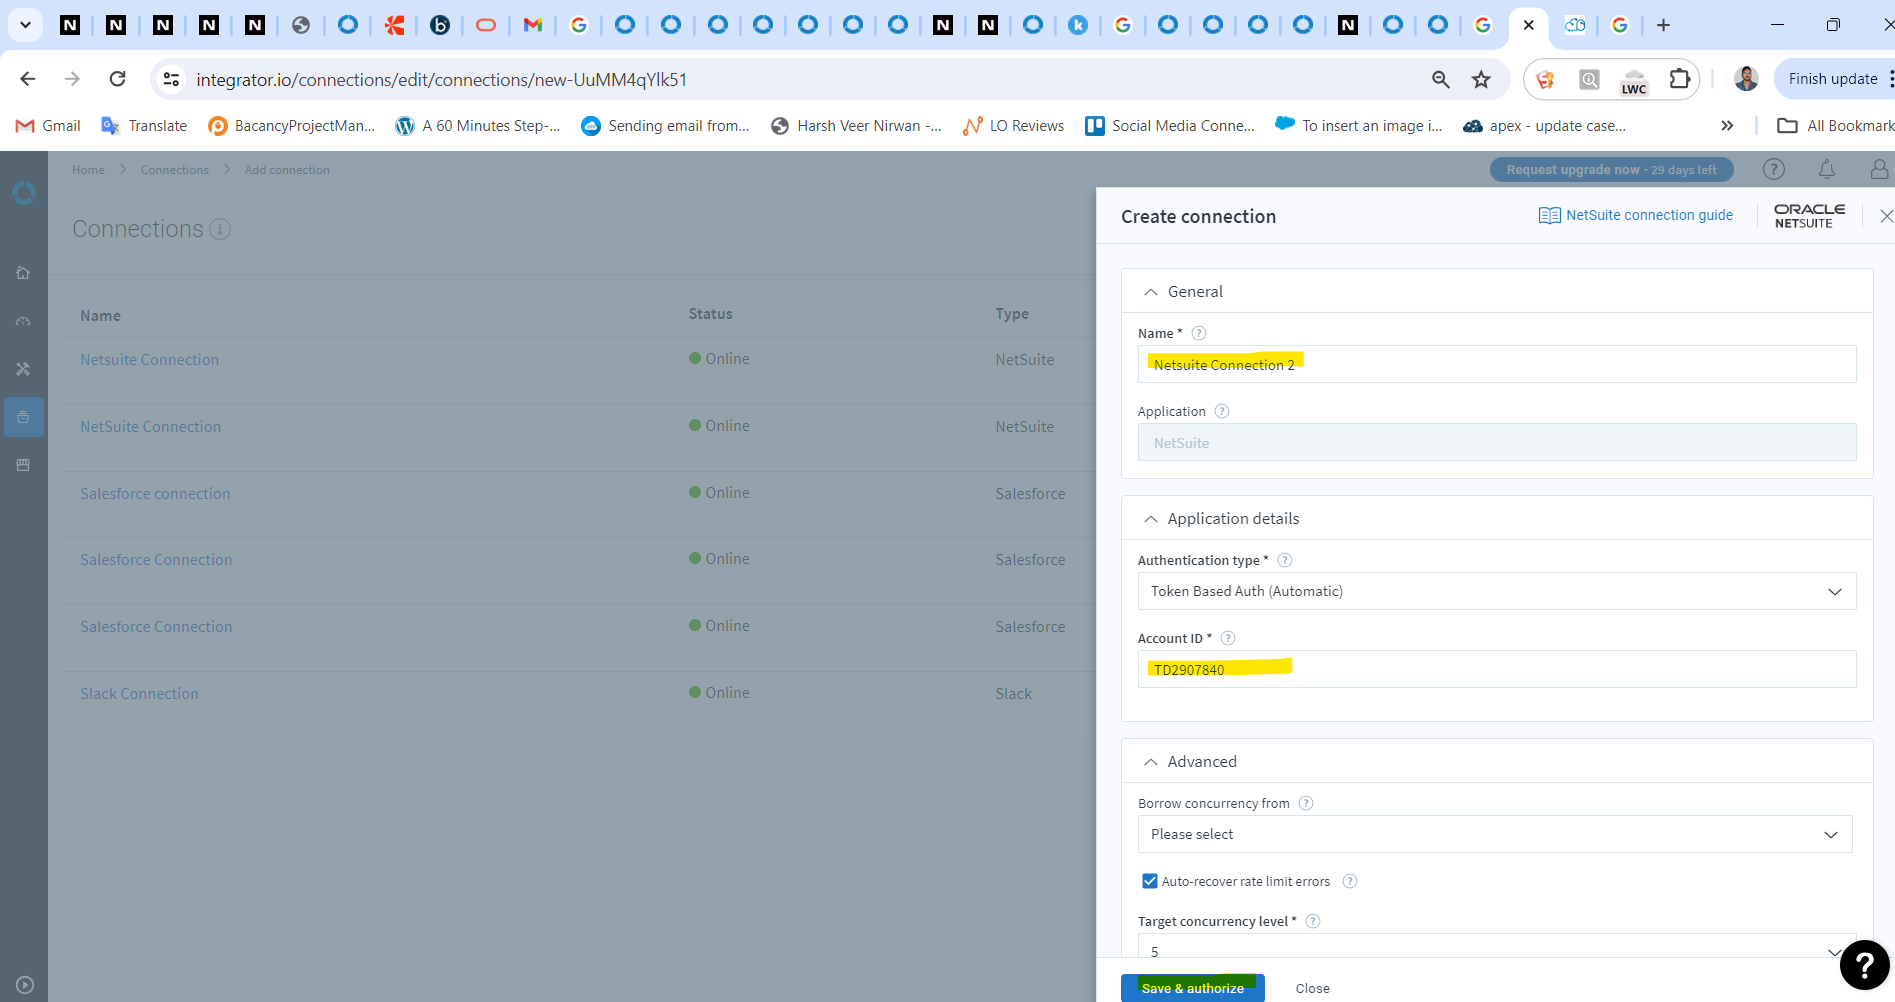
- Once you have configured the NetSuite connection, click Save & authorize. Also, you will be asked to sign into your NetSuite account to complete the connection process.
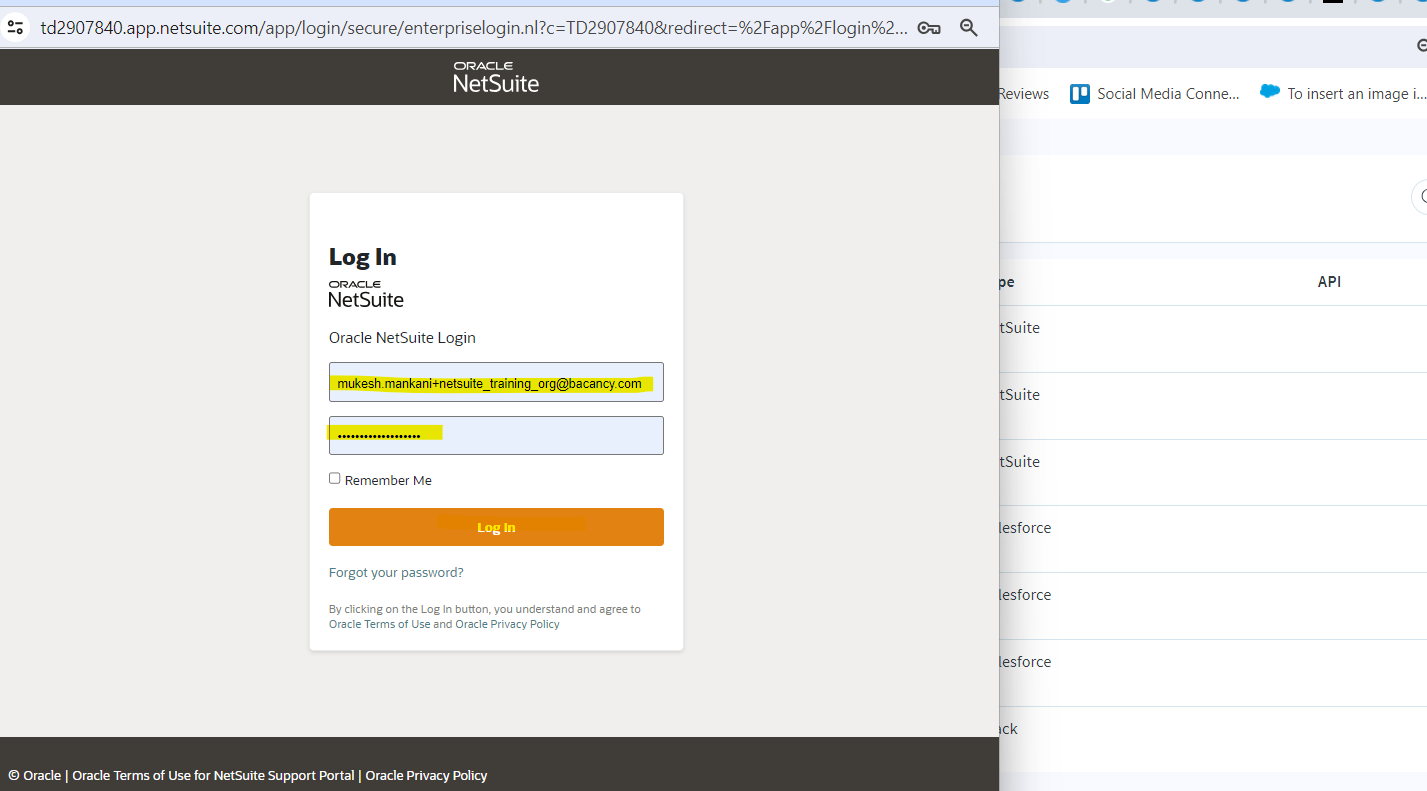
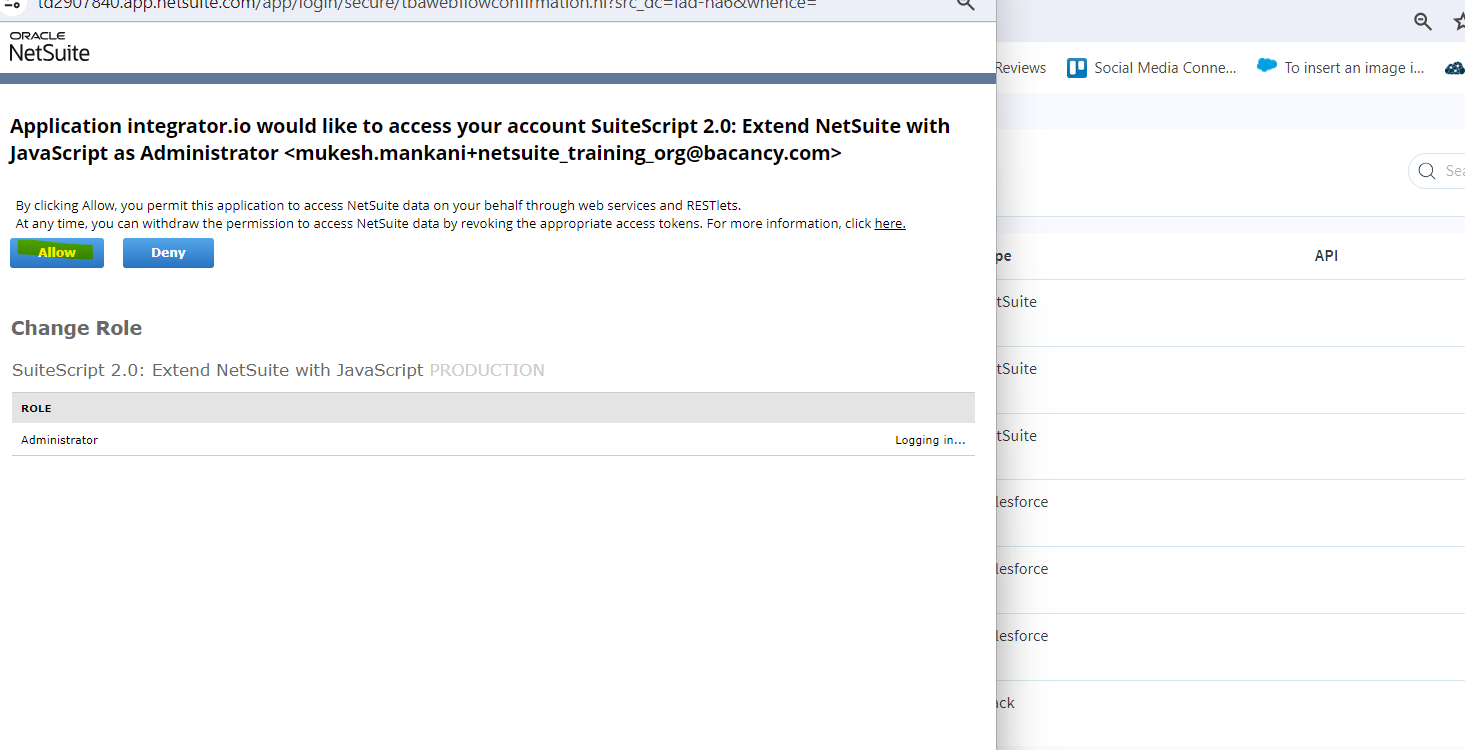
- If NetSuite authorizes your login, the new connection is successfully added to your account in Online status. If you created it within a flow, it will be applied to the current source or destination app.

Step 7 – Set up a Connection to Salesforce With Refresh Token Authentication
- Login Celigo account.
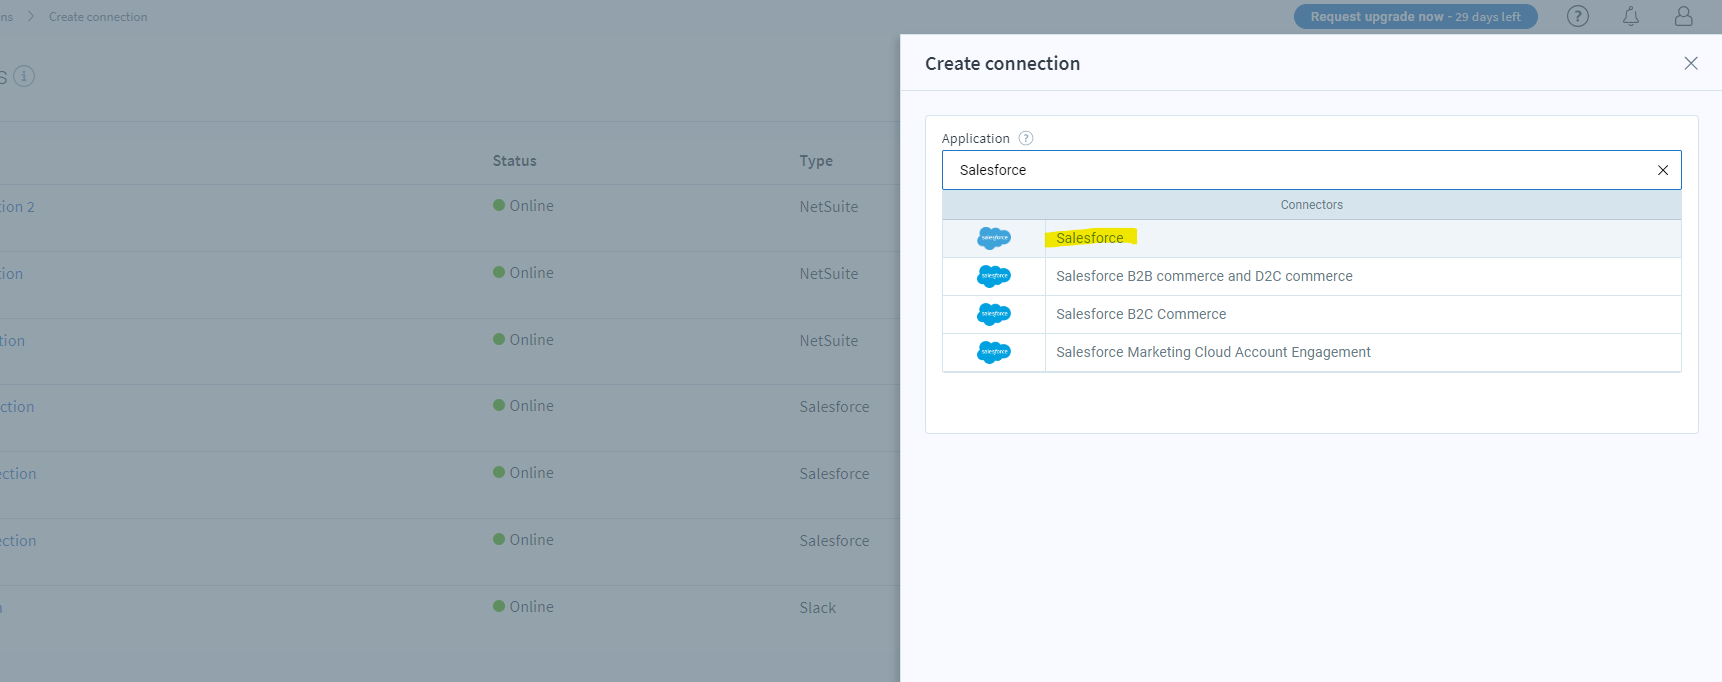
- Start connecting to Salesforce in either of the following ways: From the Resources menu, select Connections. Then, choose the click + Create connection at the top right of your feed.
- In the resulting Application list, select Salesforce.
- Name (required): Name the connection.
- Connection type (required): A form will be generated automatically, and then you need to select Salesforce.
- Account type (required): Select Production or Sandbox.
- Oauth2 flow type (required): Choose the Refresh token for web applications where server-side code is required to interact with Force.com APIs on the user’s behalf. (JWT bearer token connections are mentioned differently.)
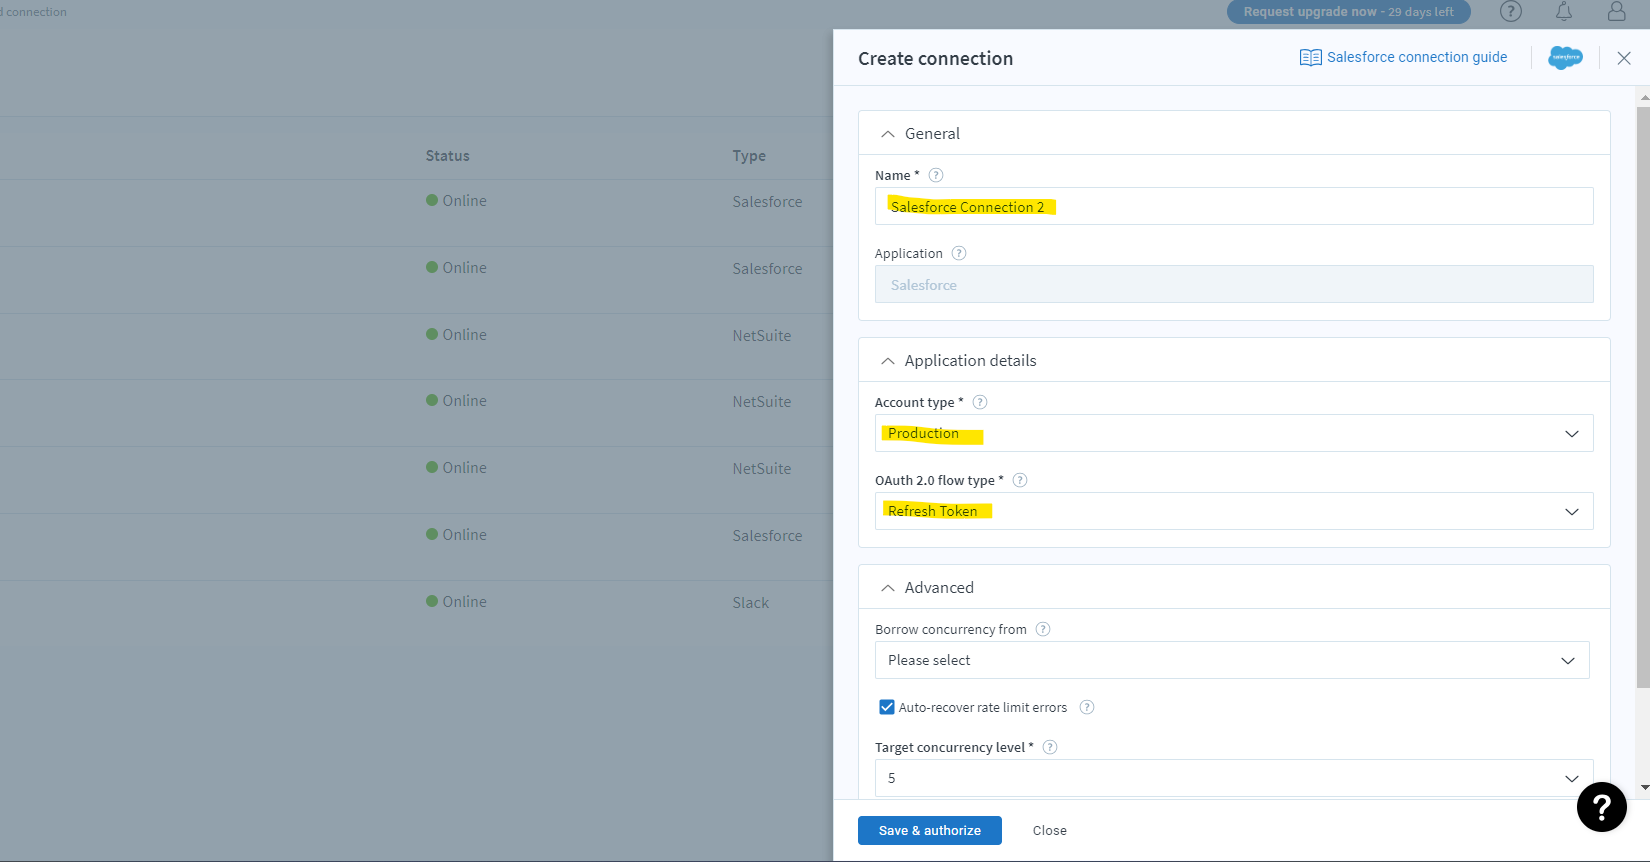
- Once you have configured the Salesforce connection, click Save & authorize. You will then be asked to sign into your Salesforce account to complete the connection.
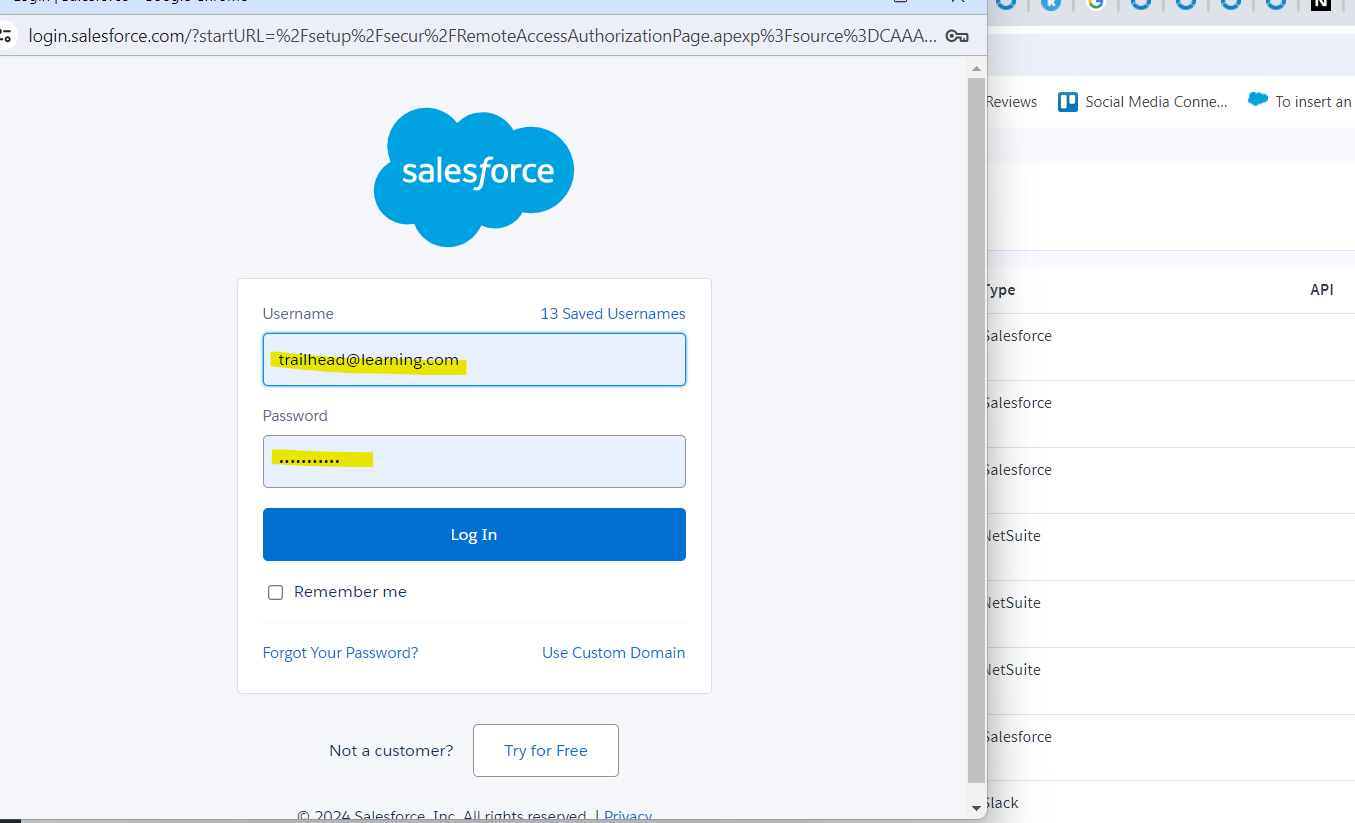

Create a NetSuite Customer from a Salesforce Account via Celigo
To begin with Celigo, create an account on Celigo. After completing the registration, log in to Celigo. Once logged in, you can start creating the Celigo Integration App, which is the automated workflow that Celigo uses to connect your apps.
Step 1 – Create Integration
On the Home page at the top right, you must click on Create and select Integration.

- Give your integration a name and an optional description to define your process accurately.
- Click Save
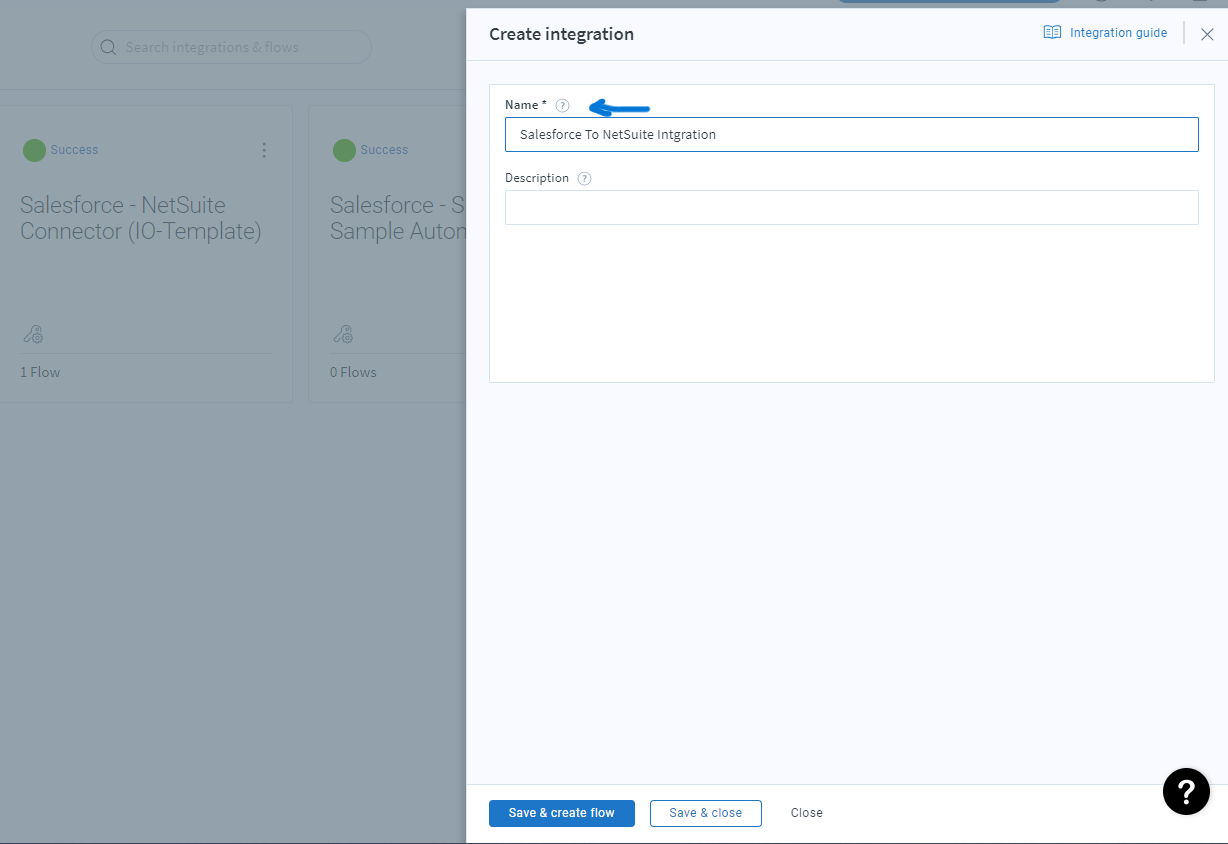
- Your first integration is now created. You can view the integration on the Home page. To create flows in your integration.

Step 2 – Select Salesforce Source Application
- Name the flow. integrator.io names the flow “New Flow” by default.
- Click Add source and select any application from which you need to export data.
- Select one of the following options from the What would you like to do? drop-down menu:
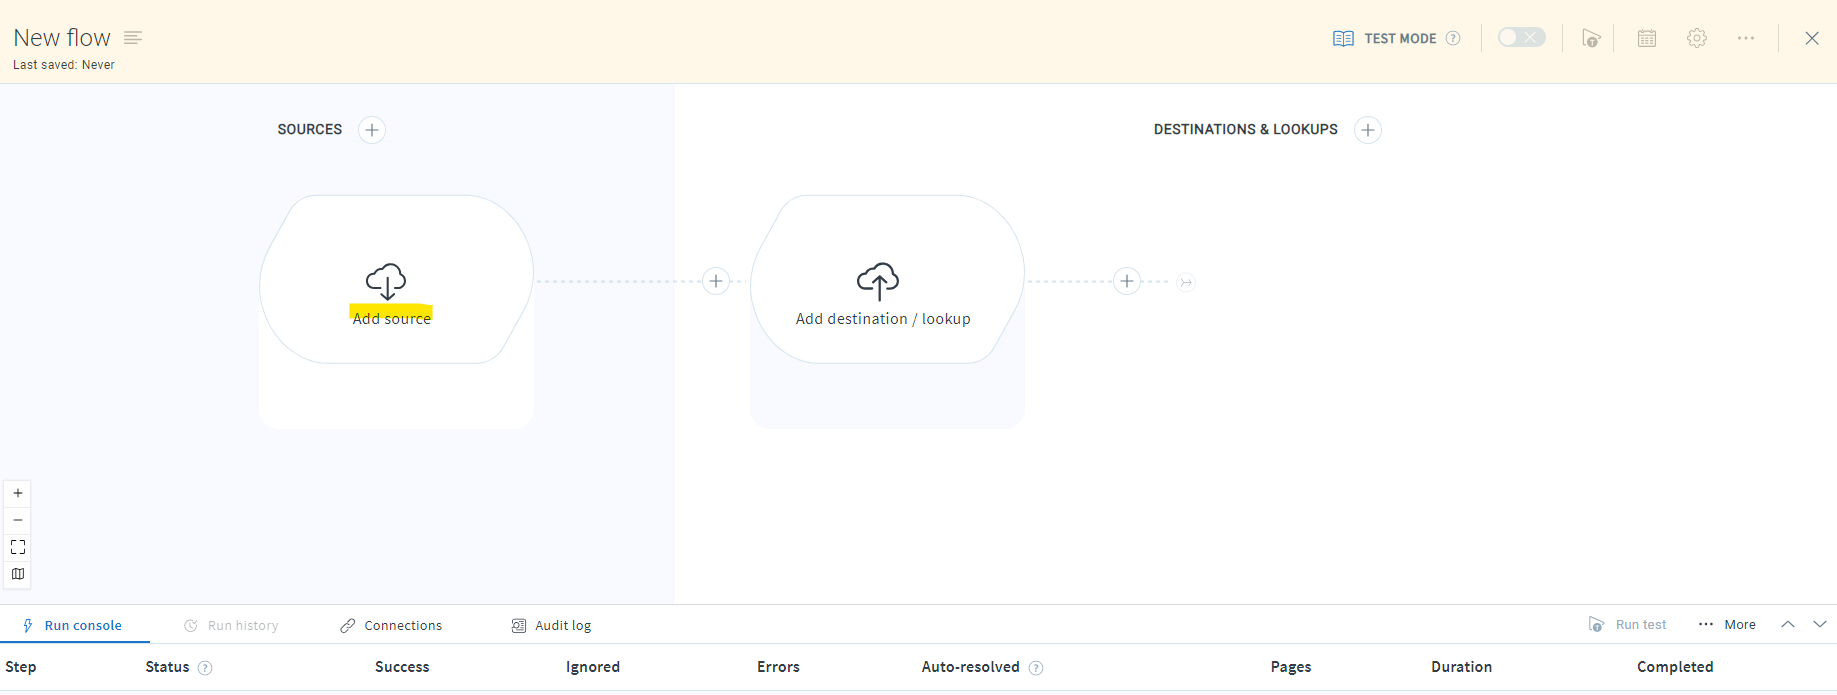
- Add Application Name.
- Export records from source application: You need to click this option to ensure export data from your source application goes into your chosen application.
- Click on create from scratch.
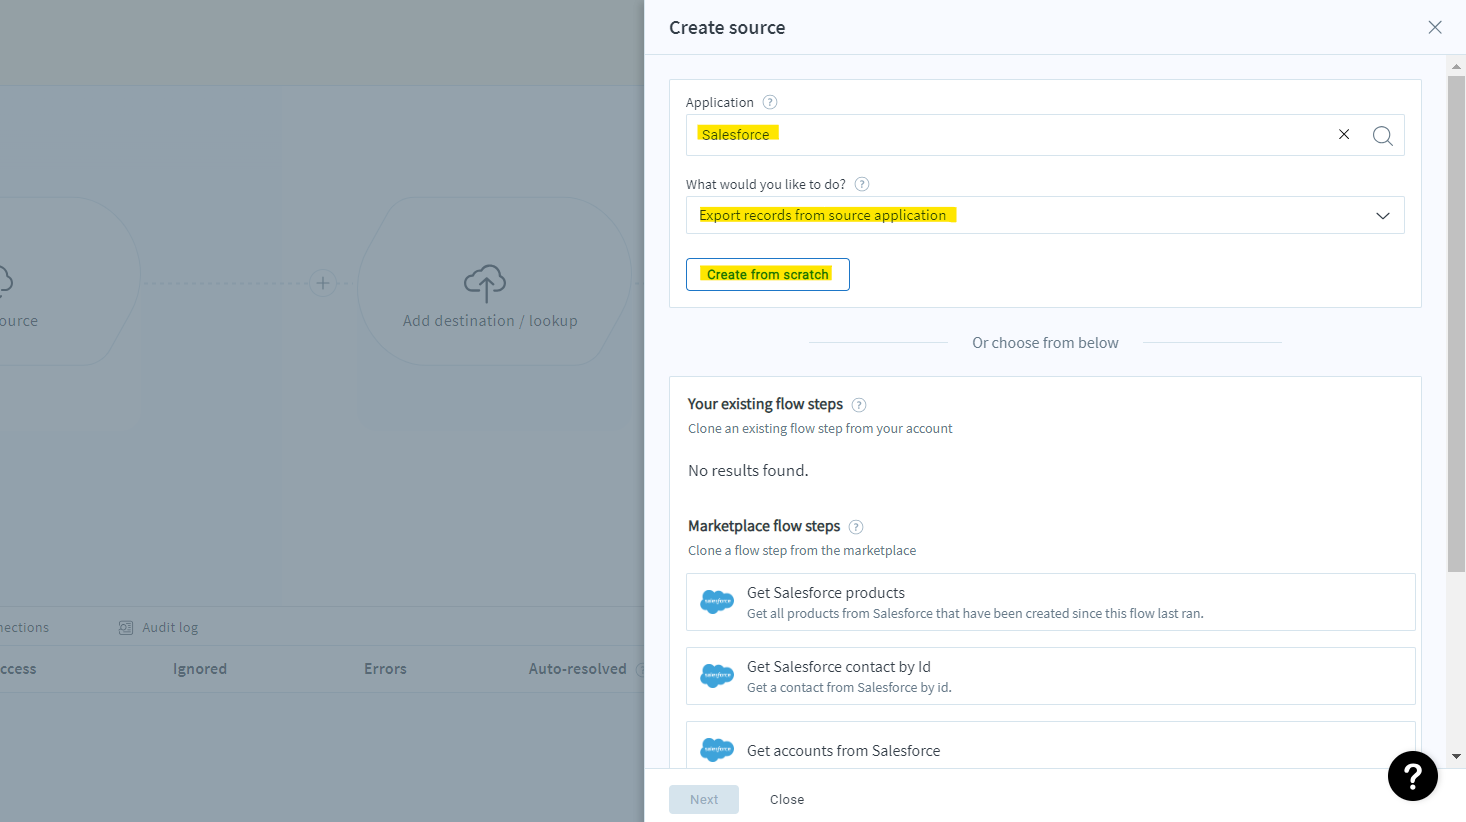
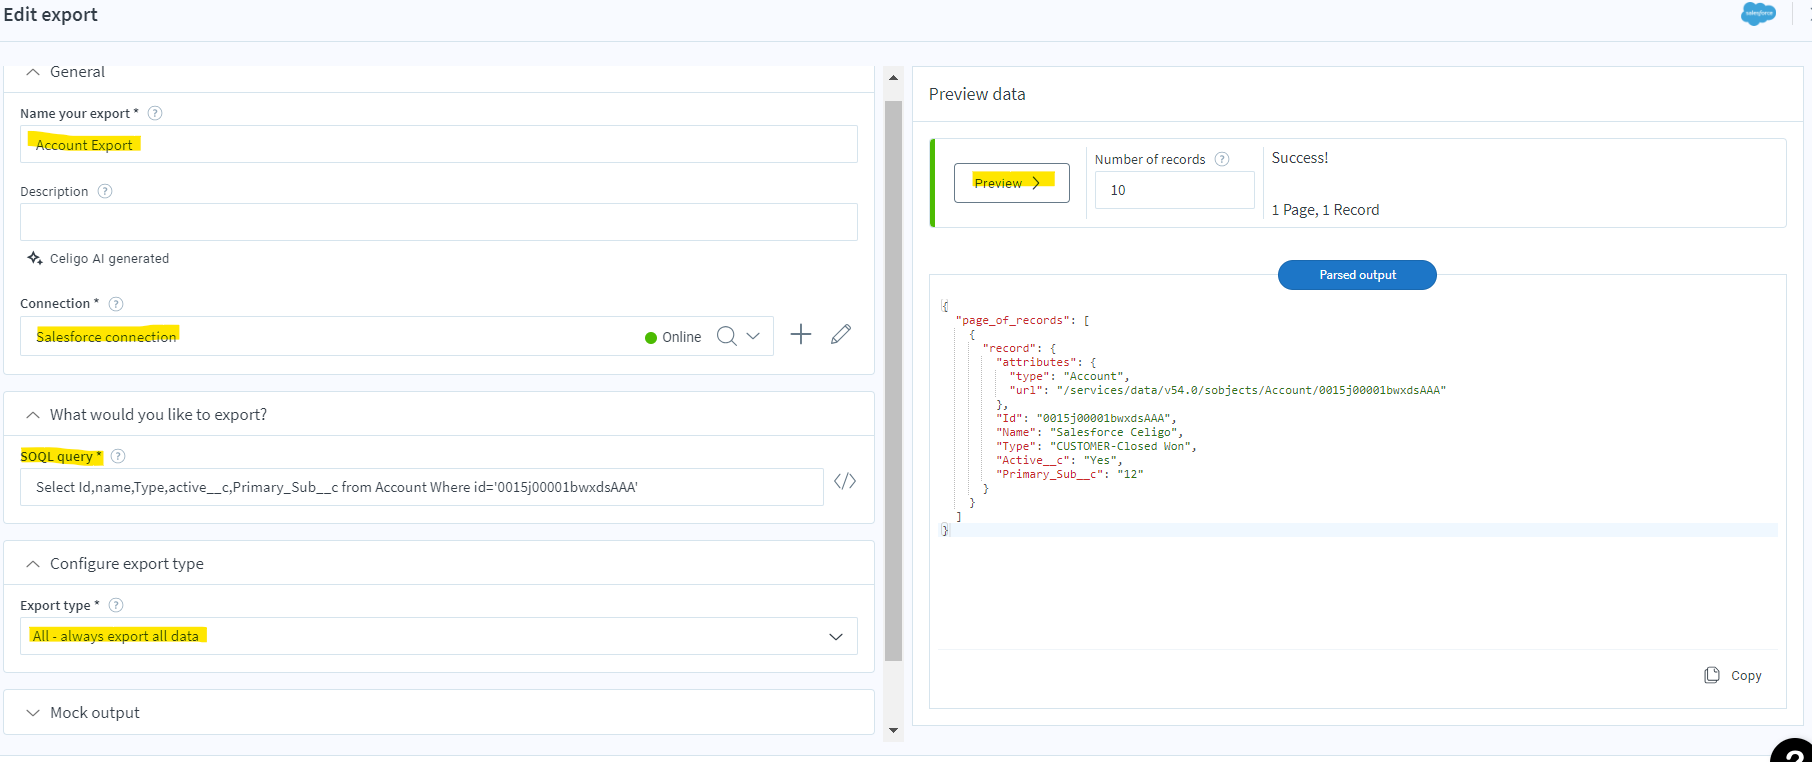
- Add the name of your Export.
- Connection: If you have already created a connection for your source application, you can select it from the drop-down menu. Otherwise, click the + icon to make a connection.
- Write SQL query to retrieve account records in SOQL query block.
- Select Export Type: Always export all data.
- Click Preview to get the output records for testing.
Step 3 – Select NetSuite destination Application
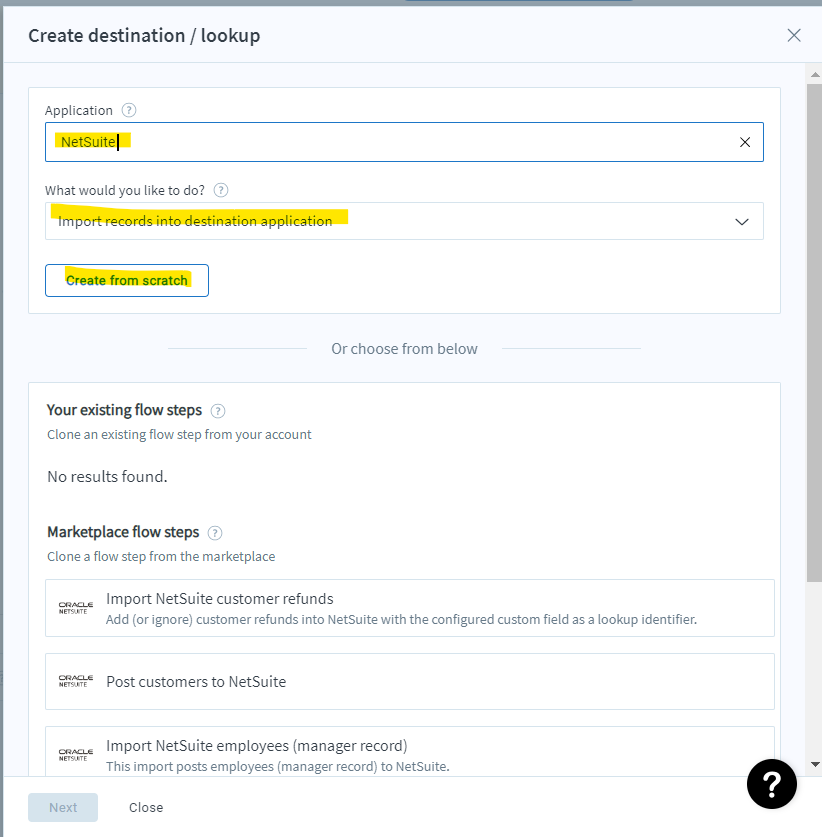
- Click Add Destination to choose the app you want to import data into.
- Add Application Name.
- Select one of the following options: What would you like to do? Drop-down menu:
- Import records into my application: Choose this if your flow does not need further steps to render the data you want to import into your destination application.
- Click on create from scratch.
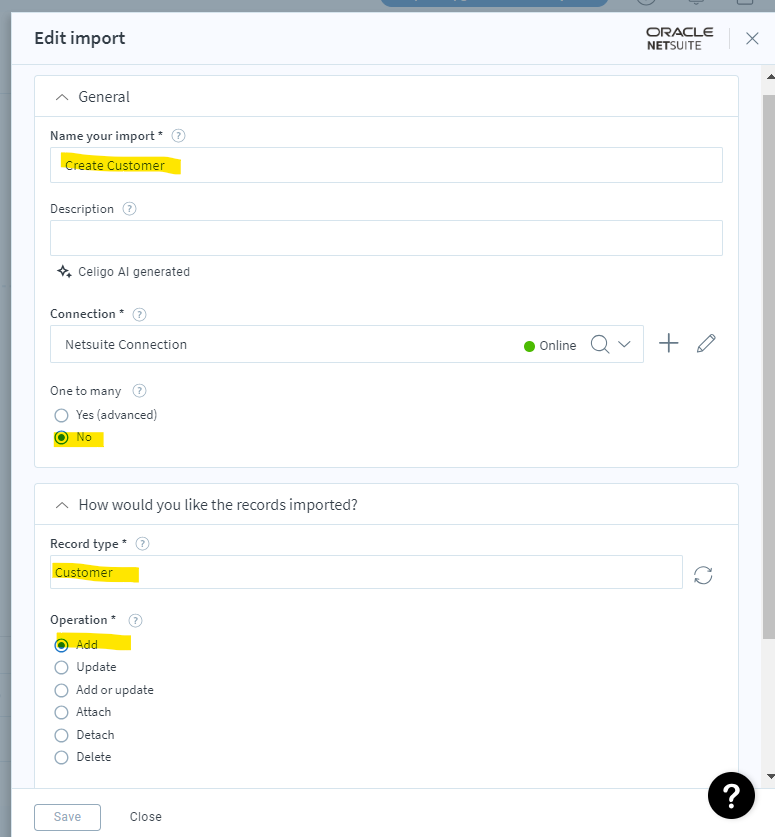
- Add a name to Import.
- Connection: If you have already created a connection for your lookup or destination application, you can select it from the drop-down menu. Otherwise, click the + button to make a connection.
- Record Type: Select the record object Name. (Customer Object)
- Operation: – select Add Operation to create a record.
Step 4 – Salesforce Account fields with NetSuite Customer fields Mapping
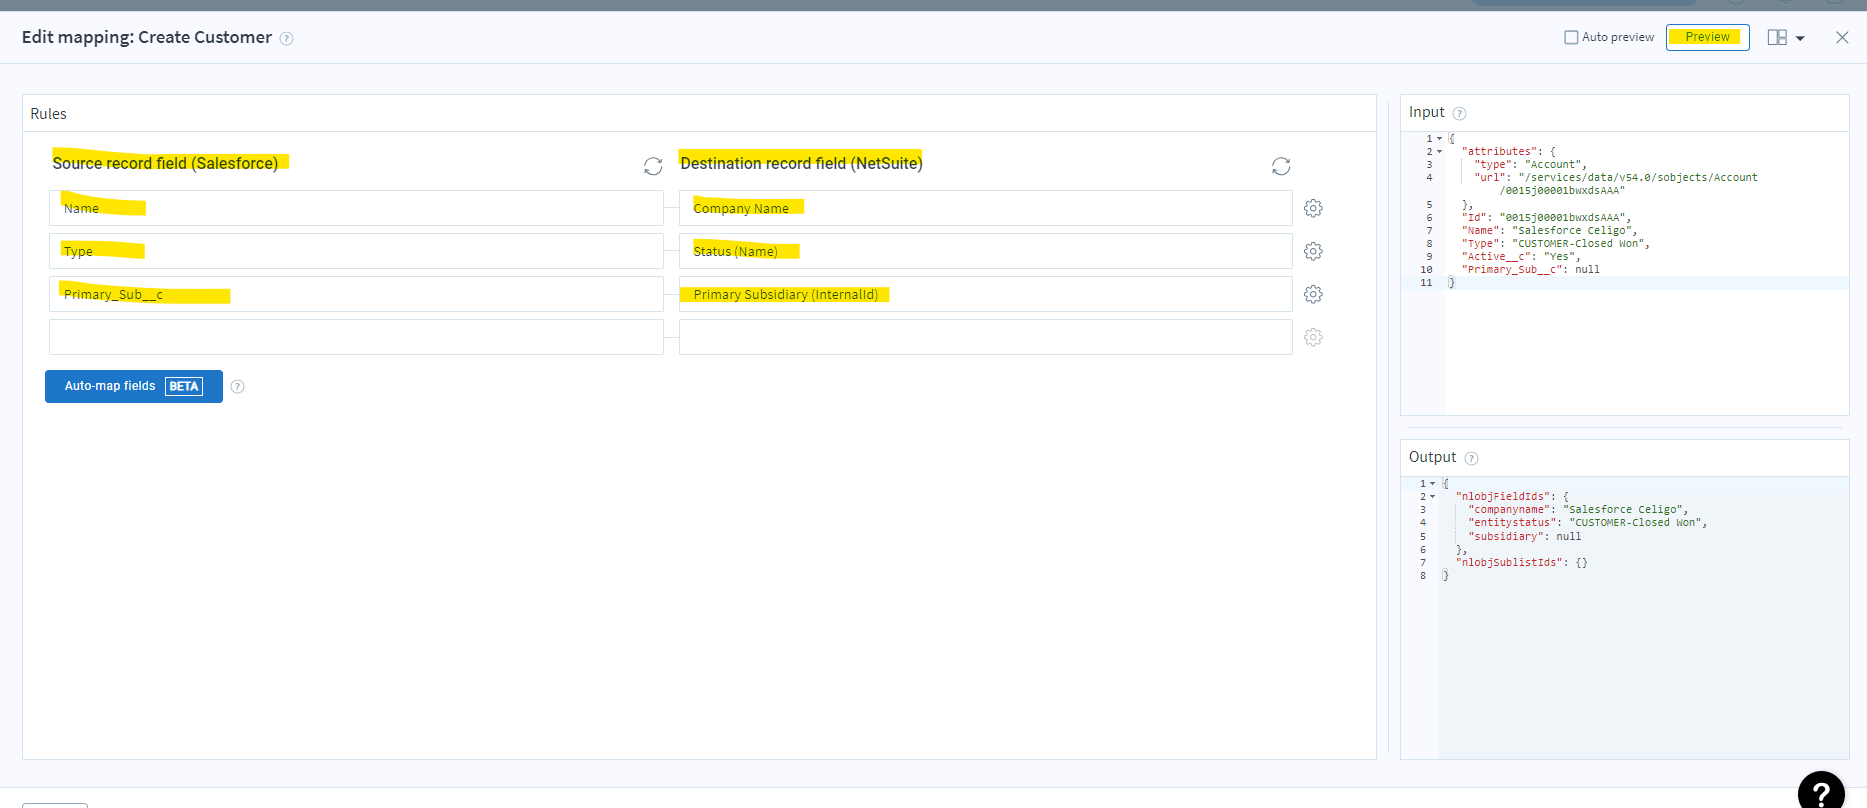
Once your source application data contains the export data you want to import into your destination application, you must map the fields from the source application to their destination application counterparts. Click the mapping icon to determine import mapping in Salesforce integration with NetSuite using Celigo.

- Click Preview to get the output records for testing.
Step 5 – Activate Flow
- Click the toggle button to activate the flow. Then, run the button.

- You can see the run console; the customer record was successfully created in the NetSuite.
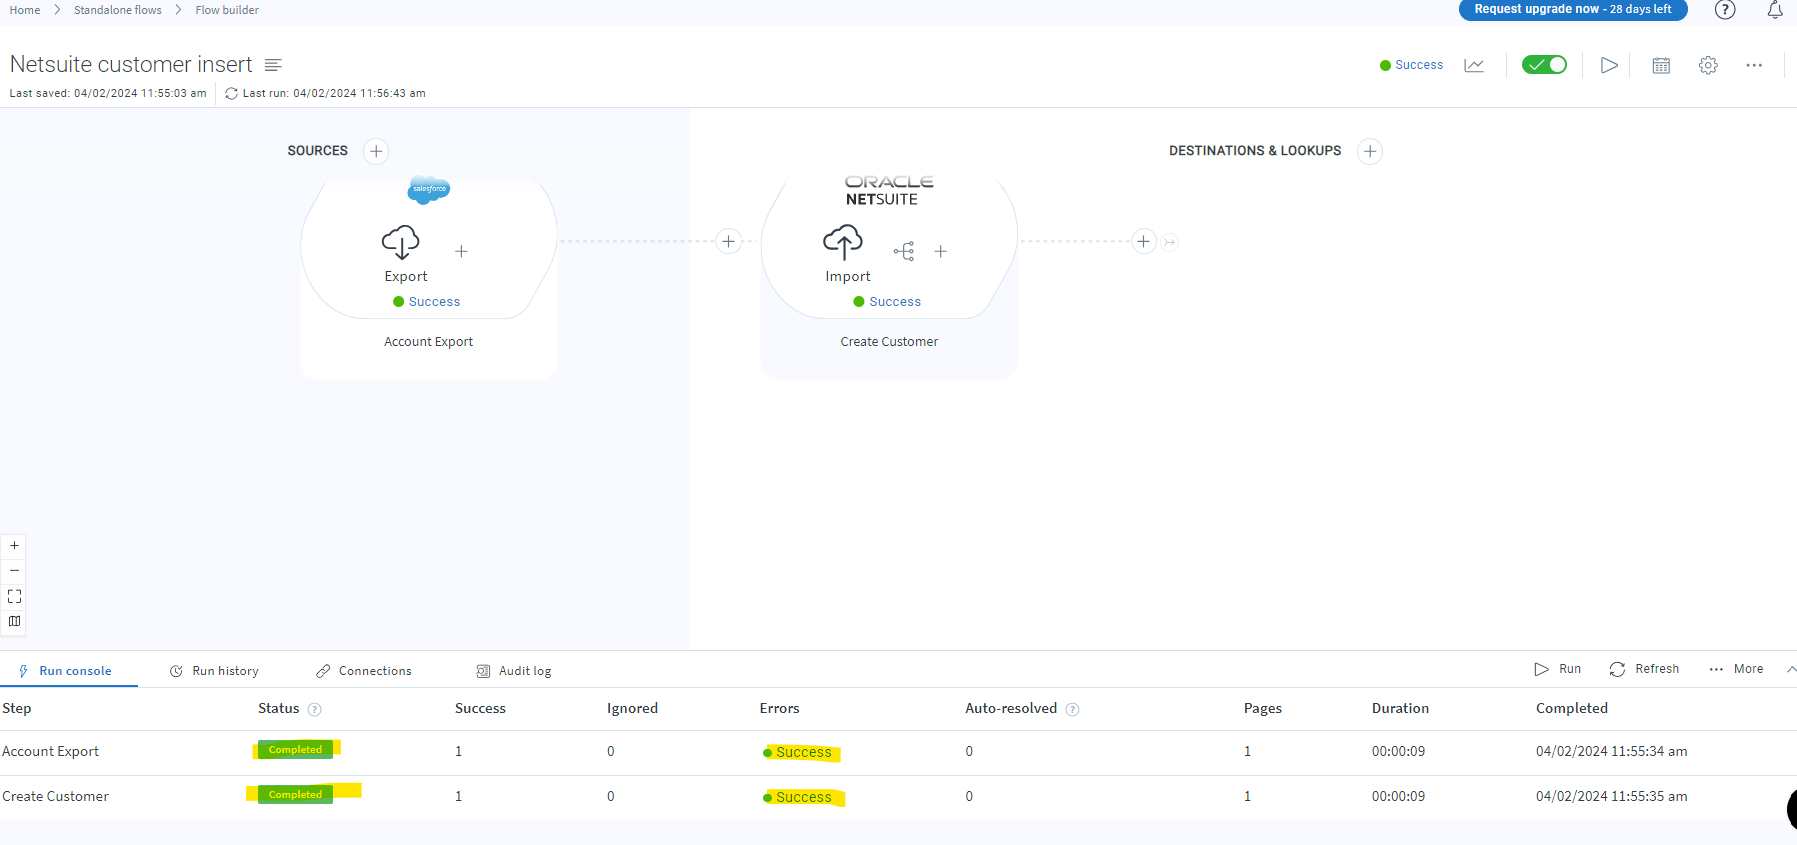
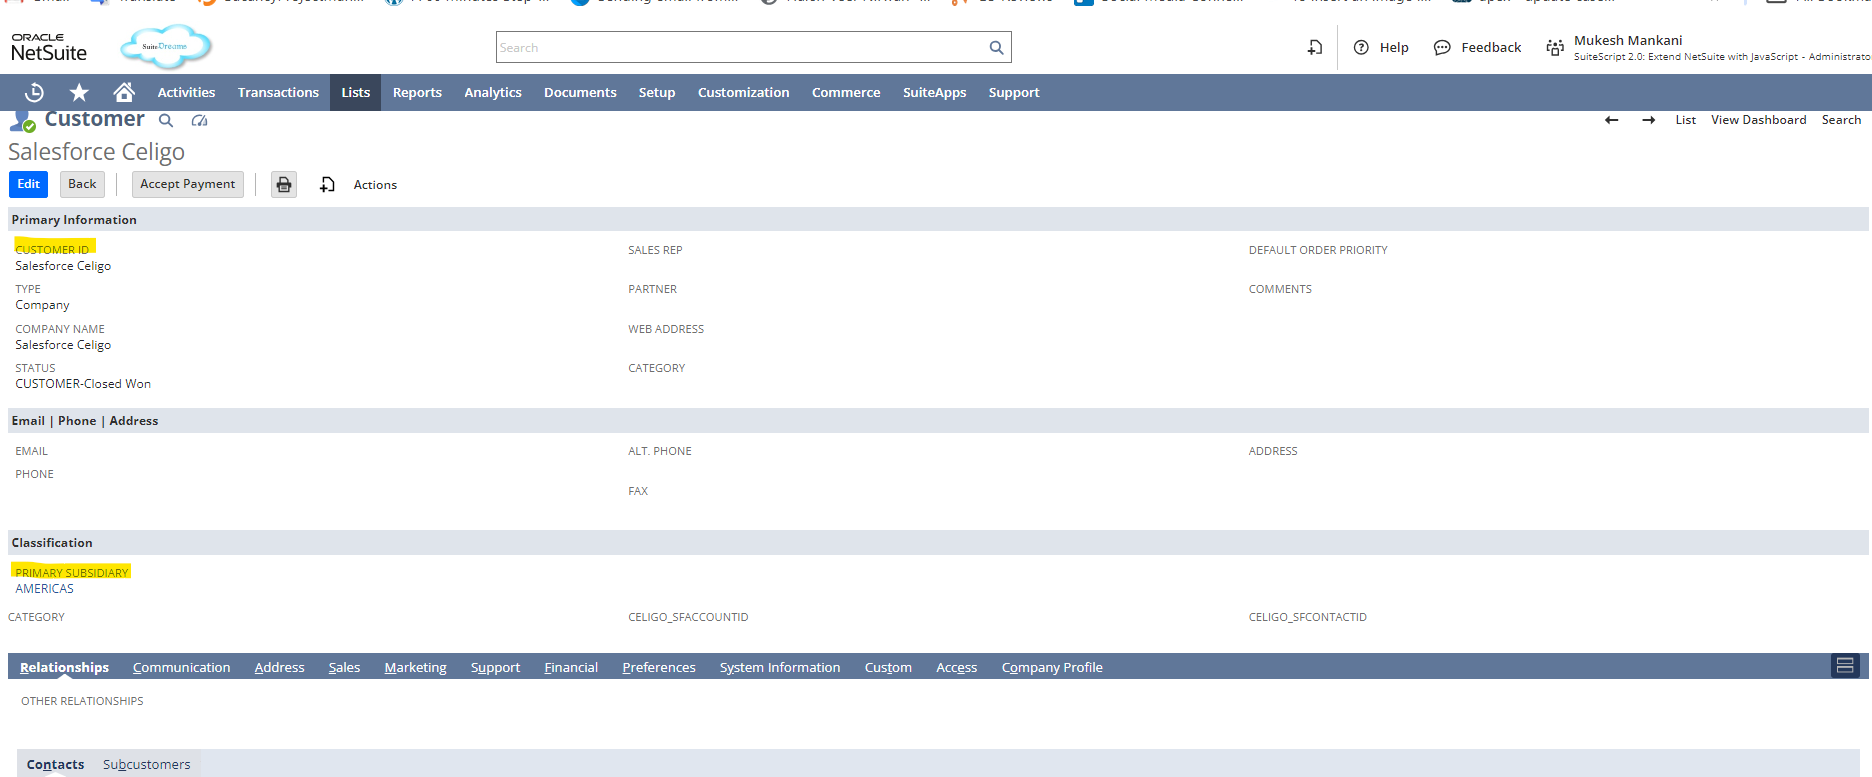
Step 6 – Successfully Create a Customer Record in NetSuite
Input: –

The final Output of Salesforce integration with NetSuite using Celigo: –
Frequently Asked Questions (FAQ’s)
Does Salesforce integrate with NetSuite?
Yes, Salesforce integration with NetSuite refers to connecting Salesforce CRM (Customer Relationship Management) software with NetSuite ERP (Enterprise Resource Planning) software, enabling seamless data flow and synchronization between the two platforms.
What are the key benefits of using Celigo for Salesforce to NetSuite Integration?
- Rapid Implementation: Celigo offers pre-built integration templates and configurable workflows, reducing the time and effort required for integration setup.
- Data Synchronization: To ensure real-time or scheduled synchronization of customer data, sales orders, invoices, and other records between Salesforce and NetSuite.
- Customization: allows users to customize integration workflows to meet specific business requirements and data mapping needs.
- Scalability: Celigo’s scalable integration platform allows businesses to adapt to changing data volumes and business processes.
- Reliability: It provides robust error handling and monitoring capabilities to ensure data integrity and system reliability.
What is Celigo, and how does it facilitate Salesforce to NetSuite Integration?
Celigo is a cloud-based integration platform that provides pre-built integrations and tools to connect various business applications, including Salesforce and NetSuite. Celigo NetSuite Salesforce integration offers a user-friendly interface and configurable integration templates to simplify integration and ensure smooth data synchronization between CRM platforms.
What support and resources does Celigo provide for Salesforce to NetSuite Integration?
Celigo offers comprehensive support and resources, including documentation, tutorials, and customer support services, to assist users throughout the integration process. Additionally, Celigo provides training programs and professional services for organizations seeking expert guidance and assistance in implementation and optimization.
