Apex Integration: Salesforce to QuickBooks
Table Of Content
Overview
If you own a business and have QuickBooks as accounting software, to merge it with Salesforce, creating or retrieving QuickBooks customers and invoices effortlessly, the following guide will assist you.
To sync QuickBooks with Salesforce, you require the following:
- Admin access for QuickBooks Online
- Admin access for Salesforce or a Development/Sandbox organization for testing purposes
- Familiarity with Apex code
If you lack proficiency in Apex, you may consider using a no-code integration via Zapier or Breadwinner’s no-code integration for linking Salesforce and QuickBooks.
Remote Site Settings
Salesforce has limitations on calls to unregistered network addresses. Therefore it is crucial to first register the target site in the Remote Site Settings page when making an Apex callout to an external website from Salesforce. If you fail to register the target site, your callouts will fail.
To ensure smooth integration with QuickBooks Endpoints, please adhere to the steps below to create two remote site settings in Salesforce:
- Navigate to Setup.
- In the Quick Find search bar, enter “Remote Site.”
- Select “Remote Site Settings.”
- Create the following two remote site settings:
- For authentication and obtaining the Access Token:
URL: https://oauth.platform.intuit.com - For retrieving data from QuickBooks:
Use QuickBooks Online Sandbox: ensure login to your Sandbox environment as a user, as the final setup of the Sandbox environment is executed upon the first login) or use QuickBooks Online Production environment
Connecting to QuickBooks Online using OAuth 2.0
Create App
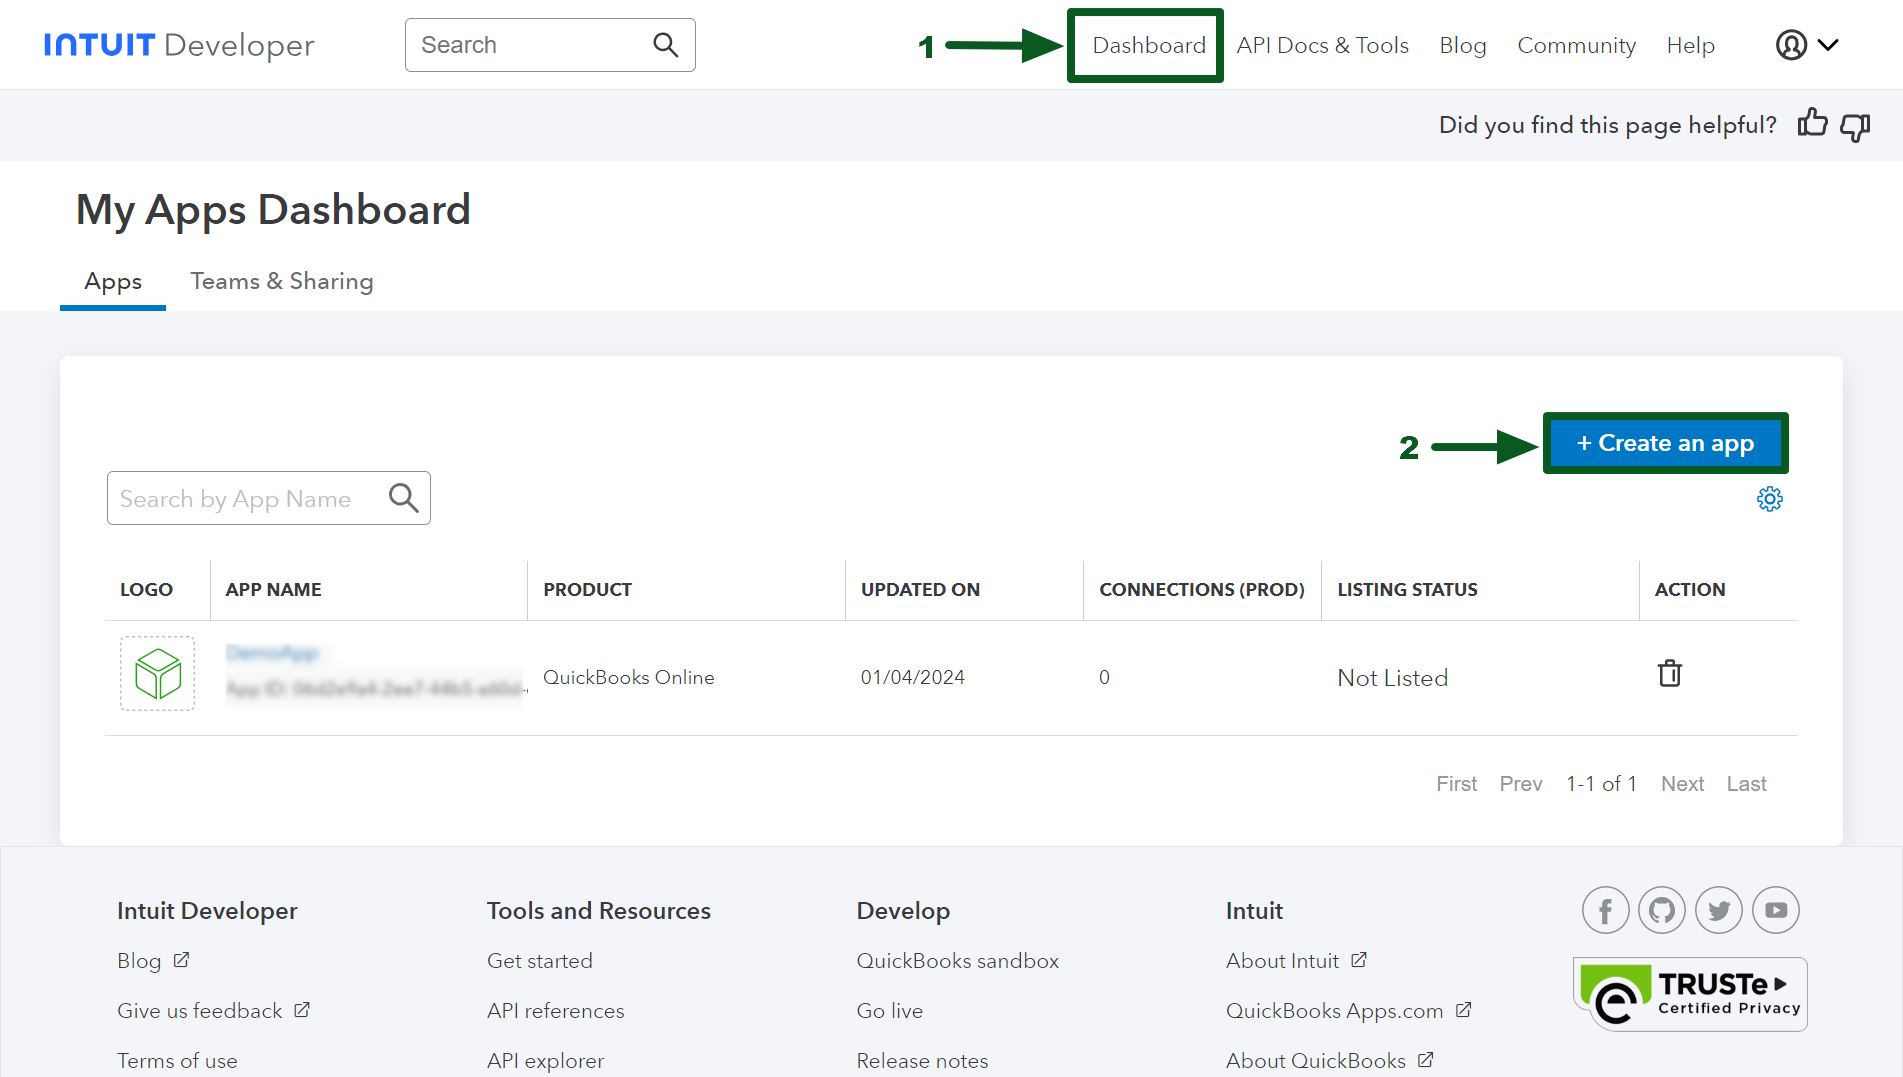
After logging into https://developer.intuit.com/, proceed to the “Dashboard” section and initiate the creation of a new App.
To create the App, follow these steps:
- Click on the button labeled “Create an app.”
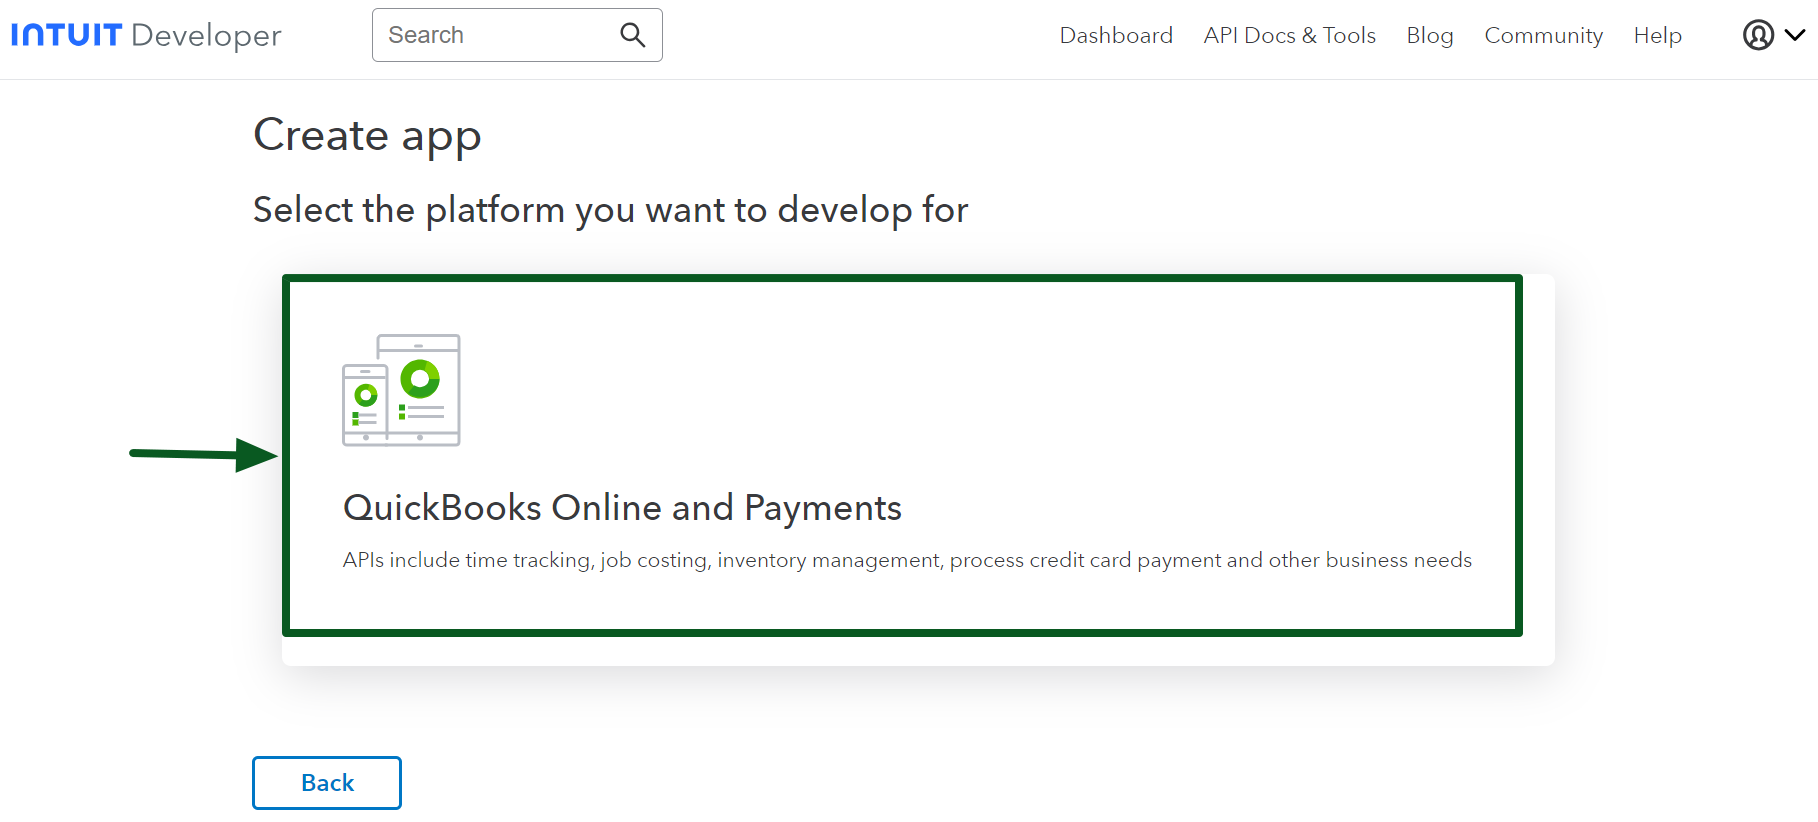
- Choose “QuickBooks Online and Payments” from the options presented.
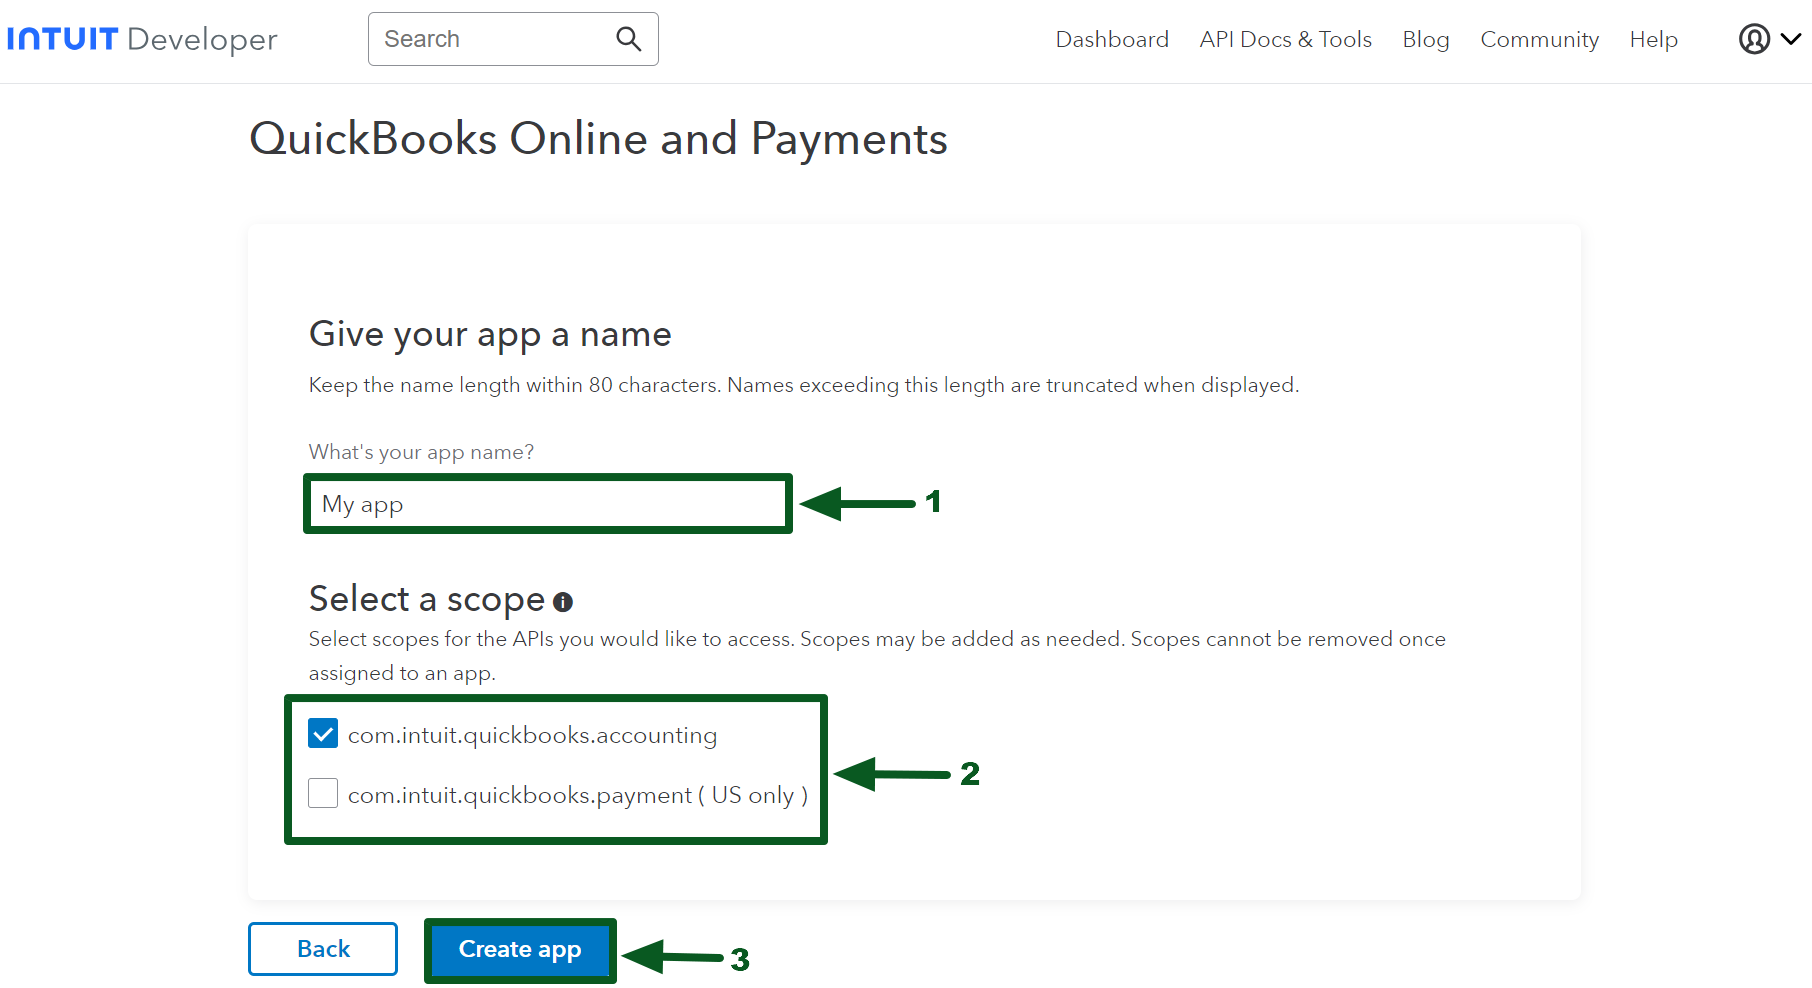
- Name your App as “My App.”
- Select the scopes required for your application.
- Finally, click on “Create app” to complete the process.


Create a Custom Object in Salesforce
To utilize tokens like Client ID, Client Secret, Access Token, and Refresh Token for future requests or callouts to QuickBooks Online, store them within Salesforce. This process entails creating a Custom Object with the following specifications:
Custom Object
- Label: QuickBooks Details
- API Name: QuickBooks_Details__c
Note: While the ideal approach would be to utilize Custom Settings for storing Tokens, we have chosen to employ Custom Objects due to the constraint of a maximum Access Token length of 4096 characters from QuickBooks. Custom Settings cannot handle fields of that length, necessitating the use of Custom Objects instead.
Retrieve Client Tokens
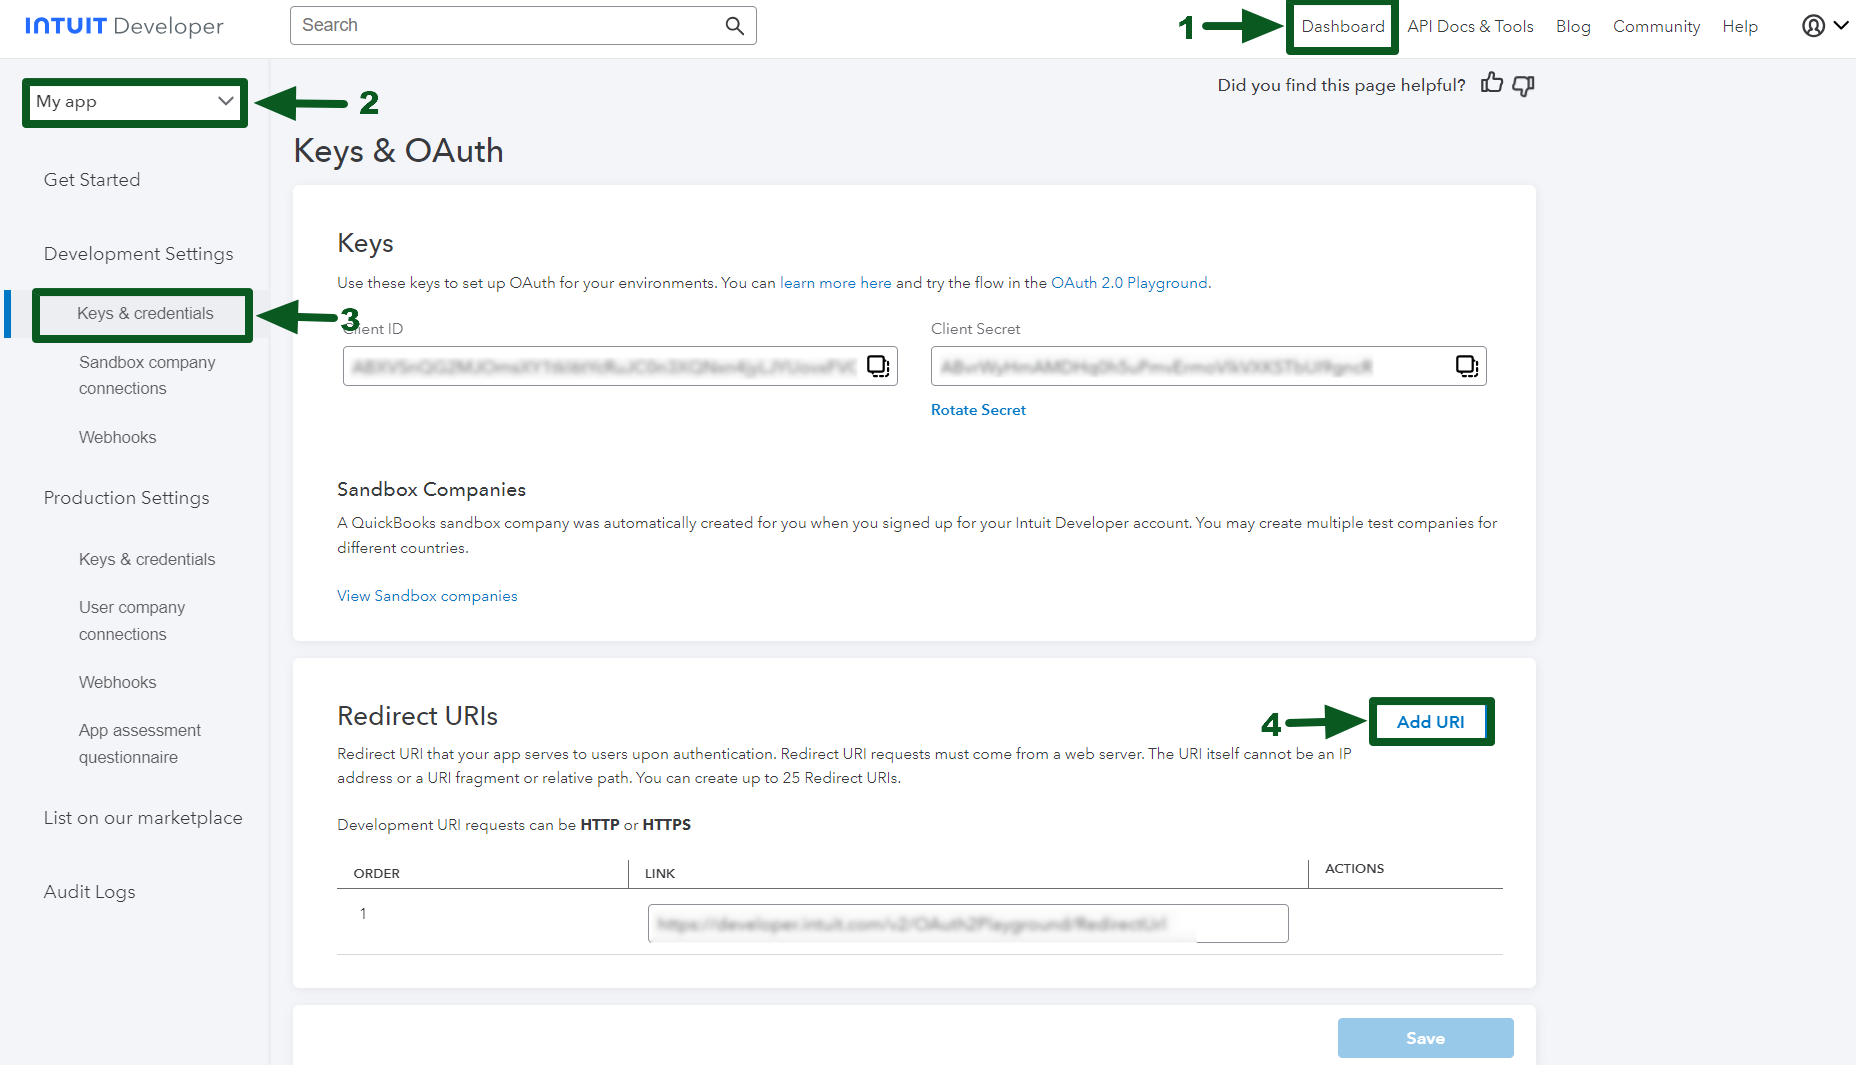
Once you’ve created the App, proceed to the Development Settings in the dashboard and access Keys & Credentials to obtain the “Client ID” and “Client Secret.”
Your unique identifiers and secrets will resemble the example below. Please know that your specific ID and Secret will vary from the values provided.
Client Id: ABsFR*******************************************gjLX
Client Secret: PRJP********************************************pA2To
Include Redirect URI
To establish a connection between Salesforce and QuickBooks, QuickBooks will transmit a code and realmId as URL Parameters to a designated web address specified in the Redirect URI. Subsequently, the code is utilized to obtain Access Tokens.
To accomplish this, it’s essential to create a Visualforce page named “qboOauthRedirect” (the code will be inserted in subsequent sections). After creating this page, it’s imperative to include the URL “https://<your-domain>/apex/qboOAuthRedirect” as a Redirect URI in QuickBooks for the previously created App.

Authorize QuickBooks Online and Obtain Tokens
Create a new record in Salesforce, save details such as Client ID and Client Secret. Then integrate the provided code by developing the corresponding Visualforce Page and Apex Class.
qboAuthorizationRedirect.vfp
<apex:page controller="quickBooksOAuthHandler" action="{!getQuickBooksOAuthTokens}" >
    <apex:form>
        <apex:pageMessage rendered="{!isAuthorized}" summary="Successfully Authorized with QuickBooks" severity="confirm" strength="3"/>
        <apex:outputPanel rendered="{!showHideOAuthButton}">
            <apex:commandButton value="Authorize QuickBooks Online" onclick="window.open('{!buttonLink}', '_blank ');window.close();"/>
        </apex:outputPanel>
    </apex:form>
</apex:page>
quickBooksOAuthHandler.cls
public class quickBooksOAuthHandler {

    public String buttonLink {get; private set;}
    public boolean showHideOAuthButton {get; private set;}
    public boolean isAuthorized {get; private set;}
    public String code;
    public String realmId;
    QuickBooks_Details__c qbDetails;
    FINAL String redirect_uri = 'https://doraemon12-dev-ed--c.develop.vf.force.com/apex/qboRedirect'; // Replace this with your Org's  Domain and Visualforce Page created
    FINAL String base_url = 'https://appcenter.intuit.com/connect/oauth2?response_type=code&scope=com.intuit.quickbooks.accounting&state=testStateSecurity';

    public quickBooksOAuthHandler(){
        showHideOAuthButton = false;
        isAuthorized = false;
        qbDetails = [SELECT Id, Client_Id__c, Client_Secret__c FROM QuickBooks_Details__c LIMIT 1];
        Map<String, String> urlParameters = ApexPages.currentPage().getParameters();
        if(urlParameters.containsKey('code')){
            code = urlParameters.get('code');
            realmId = urlParameters.get('realmId');
        }
        else{
            showHideOAuthButton = true;
            buttonLink = base_url + '&client_id='+qbDetails.Client_Id__c + '&redirect_uri='+redirect_uri;
        }
    }

    public pageReference getQuickBooksOAuthTokens(){
        if(String.isNotBlank(code) && String.isNotBlank(realmId)){
            Blob headerTokens = Blob.valueOf(qbDetails.Client_Id__c + ':' + qbDetails.Client_Secret__c);
            String authorizationToken = 'Basic ' + EncodingUtil.base64Encode(headerTokens);
            String payloadBody = 'grant_type=authorization_code&code='+code+'&redirect_uri='+redirect_uri;

            httprequest request = new Httprequest();
            request.setEndpoint('https://oauth.platform.intuit.com/oauth2/v1/tokens/bearer');
            request.setMethod('POST');
            request.setHeader('Authorization', authorizationToken);
            request.setHeader('Content-Type', 'application/x-www-form-urlencoded');
            request.setHeader('Accept', 'application/json');
            request.setBody(payloadBody);

            system.debug('request ::: '+request);

            Http http = new Http();
            HTTPResponse res = http.send(request);

            if(res.getStatusCode() == 200 && res.getBody() != NULL){
                String resBody = res.getBody();
                isAuthorized = true;
                updateQBDeatilsinSalesforce(resBody, realmId, qbDetails.Id);
            }
        }
        return null;
    }


    public static void updateQBDeatilsinSalesforce(String resBody, String realmId, Id qbDetailsId){
        Map<String, Object> responseMap = (Map<String, Object>)JSON.deserializeUntyped(resBody);
        QuickBooks_Details__c qbDetails = new QuickBooks_Details__c(Id = qbDetailsId);
        if(responseMap.containsKey('access_token')) qbDetails.Access_Token__c = String.valueOf(responseMap.get('access_token'));
        if(responseMap.containsKey('refresh_token')) qbDetails.Refresh_Token__c    = String.valueOf(responseMap.get('refresh_token'));
        if(responseMap.containsKey('expires_in')) qbDetails.Access_Token_Expiry__c  = Integer.valueOf(responseMap.get('expires_in'));
        if(responseMap.containsKey('x_refresh_token_expires_in')) qbDetails.Refresh_Token_Expiry__c  = Integer.valueOf(responseMap.get('x_refresh_token_expires_in'));
        if(String.isNotBlank(realmId)) qbDetails.RealmId__c = realmId;

        update qbDetails;
    }
}
QuickBooks Customers
Read QuickBooks Customers
Here is the sample code that can be used to read all the QuickBooks Customers from Salesforce.
Note: If you wish to get a single QuickBooks Customer, add the WHERE clause to the Query like below
select * from Customer where id = ’1234’
quickBooksCustomers.cls
public class quickBooksCustomers {
    public static final string QB_BASE_URL = 'https://sandbox-quickbooks.api.intuit.com/v3/company/'; // If connecting with Product, use the QuickBooks Production URL

    public static void getQuickBooksCustomers(){
        QuickBooks_Details__c qbDetails = [SELECT Id, RealmId__c, Access_Token__c FROM QuickBooks_Details__c LIMIT 1]; // Query the Tokens stored in Salesforce obtained from above steps

        String requestURL = QB_BASE_URL+qbDetails.RealmId__c+'/query?query='+EncodingUtil.urlEncode('select * from Customer', 'UTF-8')+'&minorversion=69';

        httpRequest request = new HttpRequest();
        request.setEndpoint(requestURL);
        request.setMethod('GET');
        request.setHeader('Authorization', 'Bearer '+qbDetails.Access_Token__c);
        request.setHeader('Accept', 'application/json');

        Http http = new Http();
        HTTPResponse response = http.send(request);
        if(response.getStatusCode() == 200 && response.getBody() != NULL){
            String responseBody = response.getBody();
            system.debug('responseBody ::: '+responseBody);
        }
        else{
            if(response.getStatusCode() == 401){
                // Refresh the token as Token got expired
                system.debug('response.getBody() ::: '+response.getBody());
            }
        }
    }
}
Create a QuickBooks Customer
Here is the sample code that can be used to create a QuickBooks Customer from Salesforce
quickBooksCustomers.cls
public class quickBooksCustomers {
    public static final string QB_BASE_URL = 'https://sandbox-quickbooks.api.intuit.com/v3/company/';

    public static void createQuickBooksCustomer(){
                QuickBooks_Details__c qbDetails = [SELECT Id, RealmId__c, Access_Token__c FROM QuickBooks_Details__c LIMIT 1]; // Query the QuickBooks tokens stored which are obtained in above steps

        String requestURL = QB_BASE_URL+qbDetails.RealmId__c+'/customer?minorversion=69';
        String requestPayloadBody = '{"FullyQualifiedName":"King Groceries","PrimaryEmailAddr":{"Address":"Andy@mybusiness.com"},"DisplayName":"Andy Groceries","Suffix":"Jr","Title":"Mr","MiddleName":"A","Notes":"Other details.","FamilyName":"Jones","PrimaryPhone":{"FreeFormNumber":"(666) 666-6666"},"CompanyName":"Andy Groceries","BillAddr":{"CountrySubDivisionCode":"CA","City":"Mountain Hill View","PostalCode":"94142","Line1":"789 Cross Street","Country":"USA"},"GivenName":"Andy"}';

        HttpRequest req = new HttpRequest();
        req.setEndpoint(requestURL);
        req.setMethod('POST');
        req.setHeader('Content-Type', 'application/json');
        req.setHeader('Authorization', 'Bearer '+qbDetails.Access_Token__c);
        req.setHeader('Accept', 'application/json');
        req.setBody(requestPayloadBody);

        Http http = new Http();
        HTTPResponse response = http.send(req);
        if(response.getStatusCode() == 200 && response.getBody() != NULL){
            String responseBody = response.getBody();
            system.debug('responseBody ::: '+responseBody);
        }
        else{
            if(response.getStatusCode() == 401){
                // Token Expired - Please refresh the token
                system.debug('response.getBody() ::: '+response.getBody());
            }
        }
    }
}
QuickBooks Invoices
Read QuickBooks Invoices
Here is the sample code that can be used to read all the QuickBooks Invoices from Salesforce.
Note: If you wish to get a single QuickBooks Invoice, add the WHERE clause to the Query like below
select * from Invoice where id = ‘239’
quickBooksInvoices.cls
public class quickBooksInvoices {
    public static final string QB_BASE_URL = 'https://sandbox-quickbooks.api.intuit.com/v3/company/';

    public static void getQuickBooksInvoices(){
        QuickBooks_Details__c qbDetails = [SELECT Id, RealmId__c, Access_Token__c FROM QuickBooks_Details__c LIMIT 1]; // Query the QuickBooks tokens stored which are obtained in above steps

        String requestURL = QB_BASE_URL+qbDetails.RealmId__c+'/query?query='+EncodingUtil.urlEncode('select * from Invoice', 'UTF-8')+'&minorversion=69';

        httpRequest request = new HttpRequest();
        request.setEndpoint(requestURL);
        request.setMethod('GET');
        request.setHeader('Authorization', 'Bearer '+qbDetails.Access_Token__c);
        request.setHeader('Accept', 'application/json');

        Http http = new Http();
        HTTPResponse response = http.send(request);
        if(response.getStatusCode() == 200 && response.getBody() != NULL){
            String respBody = res.getBody();
            system.debug('responseBody ::: '+respBody);
        }
        else{
            if(response.getStatusCode() == 401){
                // Refresh the token as it got expired
                system.debug('response.getBody() ::: '+response.getBody());
            }
        }
    }
}
Create a QuickBooks Invoice
Here is the sample code that can be used to create a QuickBooks Invoice from Salesforce.
quickBooksInvoices.cls
public class quickBooksInvoices {
    public static final string QB_BASE_URL = 'https://sandbox-quickbooks.api.intuit.com/v3/company/';

    public static void createQuickBooksInvoice(){
        QuickBooks_Details__c qbDetails = [SELECT Id, RealmId__c, Access_Token__c FROM QuickBooks_Details__c LIMIT 1]; // Query the QuickBooks tokens stored which are obtained in above steps

        String requestURL = QB_BASE_URL+qbDetails.RealmId__c+'/invoice?minorversion=69';
        String requestPayloadBody = '{"Line":[{"DetailType":"SalesItemLineDetail","Amount":500,"SalesItemLineDetail":{"ItemRef":{"name":"Spare Parts","value":"1"}}}],"CustomerRef":{"value":"1234"}}';

        httpRequest request = new HttpRequest();
        request.setEndpoint(requestURL);
        request.setMethod('POST');
        request.setHeader('Content-Type', 'application/json');
        request.setHeader('Authorization', 'Bearer '+qbDetails.Access_Token__c);
        request.setHeader('Accept', 'application/json');
        request.setBody(requestPayloadBody);

        Http http = new Http();
        HTTPResponse response = http.send(request);
        if(response.getStatusCode() == 200 && response.getBody() != NULL){
            String responseBody = response.getBody();
            system.debug('response Body ::: '+responseBody);
        }
        else{
            if(response.getStatusCode() == 401){
                // Refresh the Token as it got expired
                system.debug('response.getBody() ::: '+response.getBody());
            }
        }
    }
}
Next Steps
Now, you have the capability to generate a QuickBooks Invoice from Salesforce utilizing Apex. If you’re inclined to enhance or automate your current setup, consider the following:
To automatically create a QuickBooks Customer and Invoice whenever an Opportunity is converted: Craft an Apex Method annotated with @InvocableMethod, this method has the code to generate a QuickBooks Customer along with the associated Invoice. To complete the task, call this method from a Record Triggered Flow.
To retrieve data from QuickBooks, develop a schedulable class and execute at regular intervals.
