DBSync: Integrate QuickBooks and Salesforce
Table Of Content
Overview
DBSync is a Salesforce app created to facilitate integration between Salesforce, a customer relationship management (CRM) platform, and QuickBooks Online, an accounting software. This integration enables businesses to synchronize their financial workflows by allowing bidirectional data sync between Salesforce and QuickBooks Online.
The main purpose of DBSync is to reduce manual data entry tasks and promote collaboration between different departments, especially sales and finance. By connecting Salesforce and QuickBooks Online, DBSync ensures that data updates, such as customer information, opportunities, and invoices, are reflected in minutes across both platforms.
Video Guide for DBSync
Here is a video guide demonstrating the setup and generation of invoices from Accounts and Opportunity Products in DBSync.
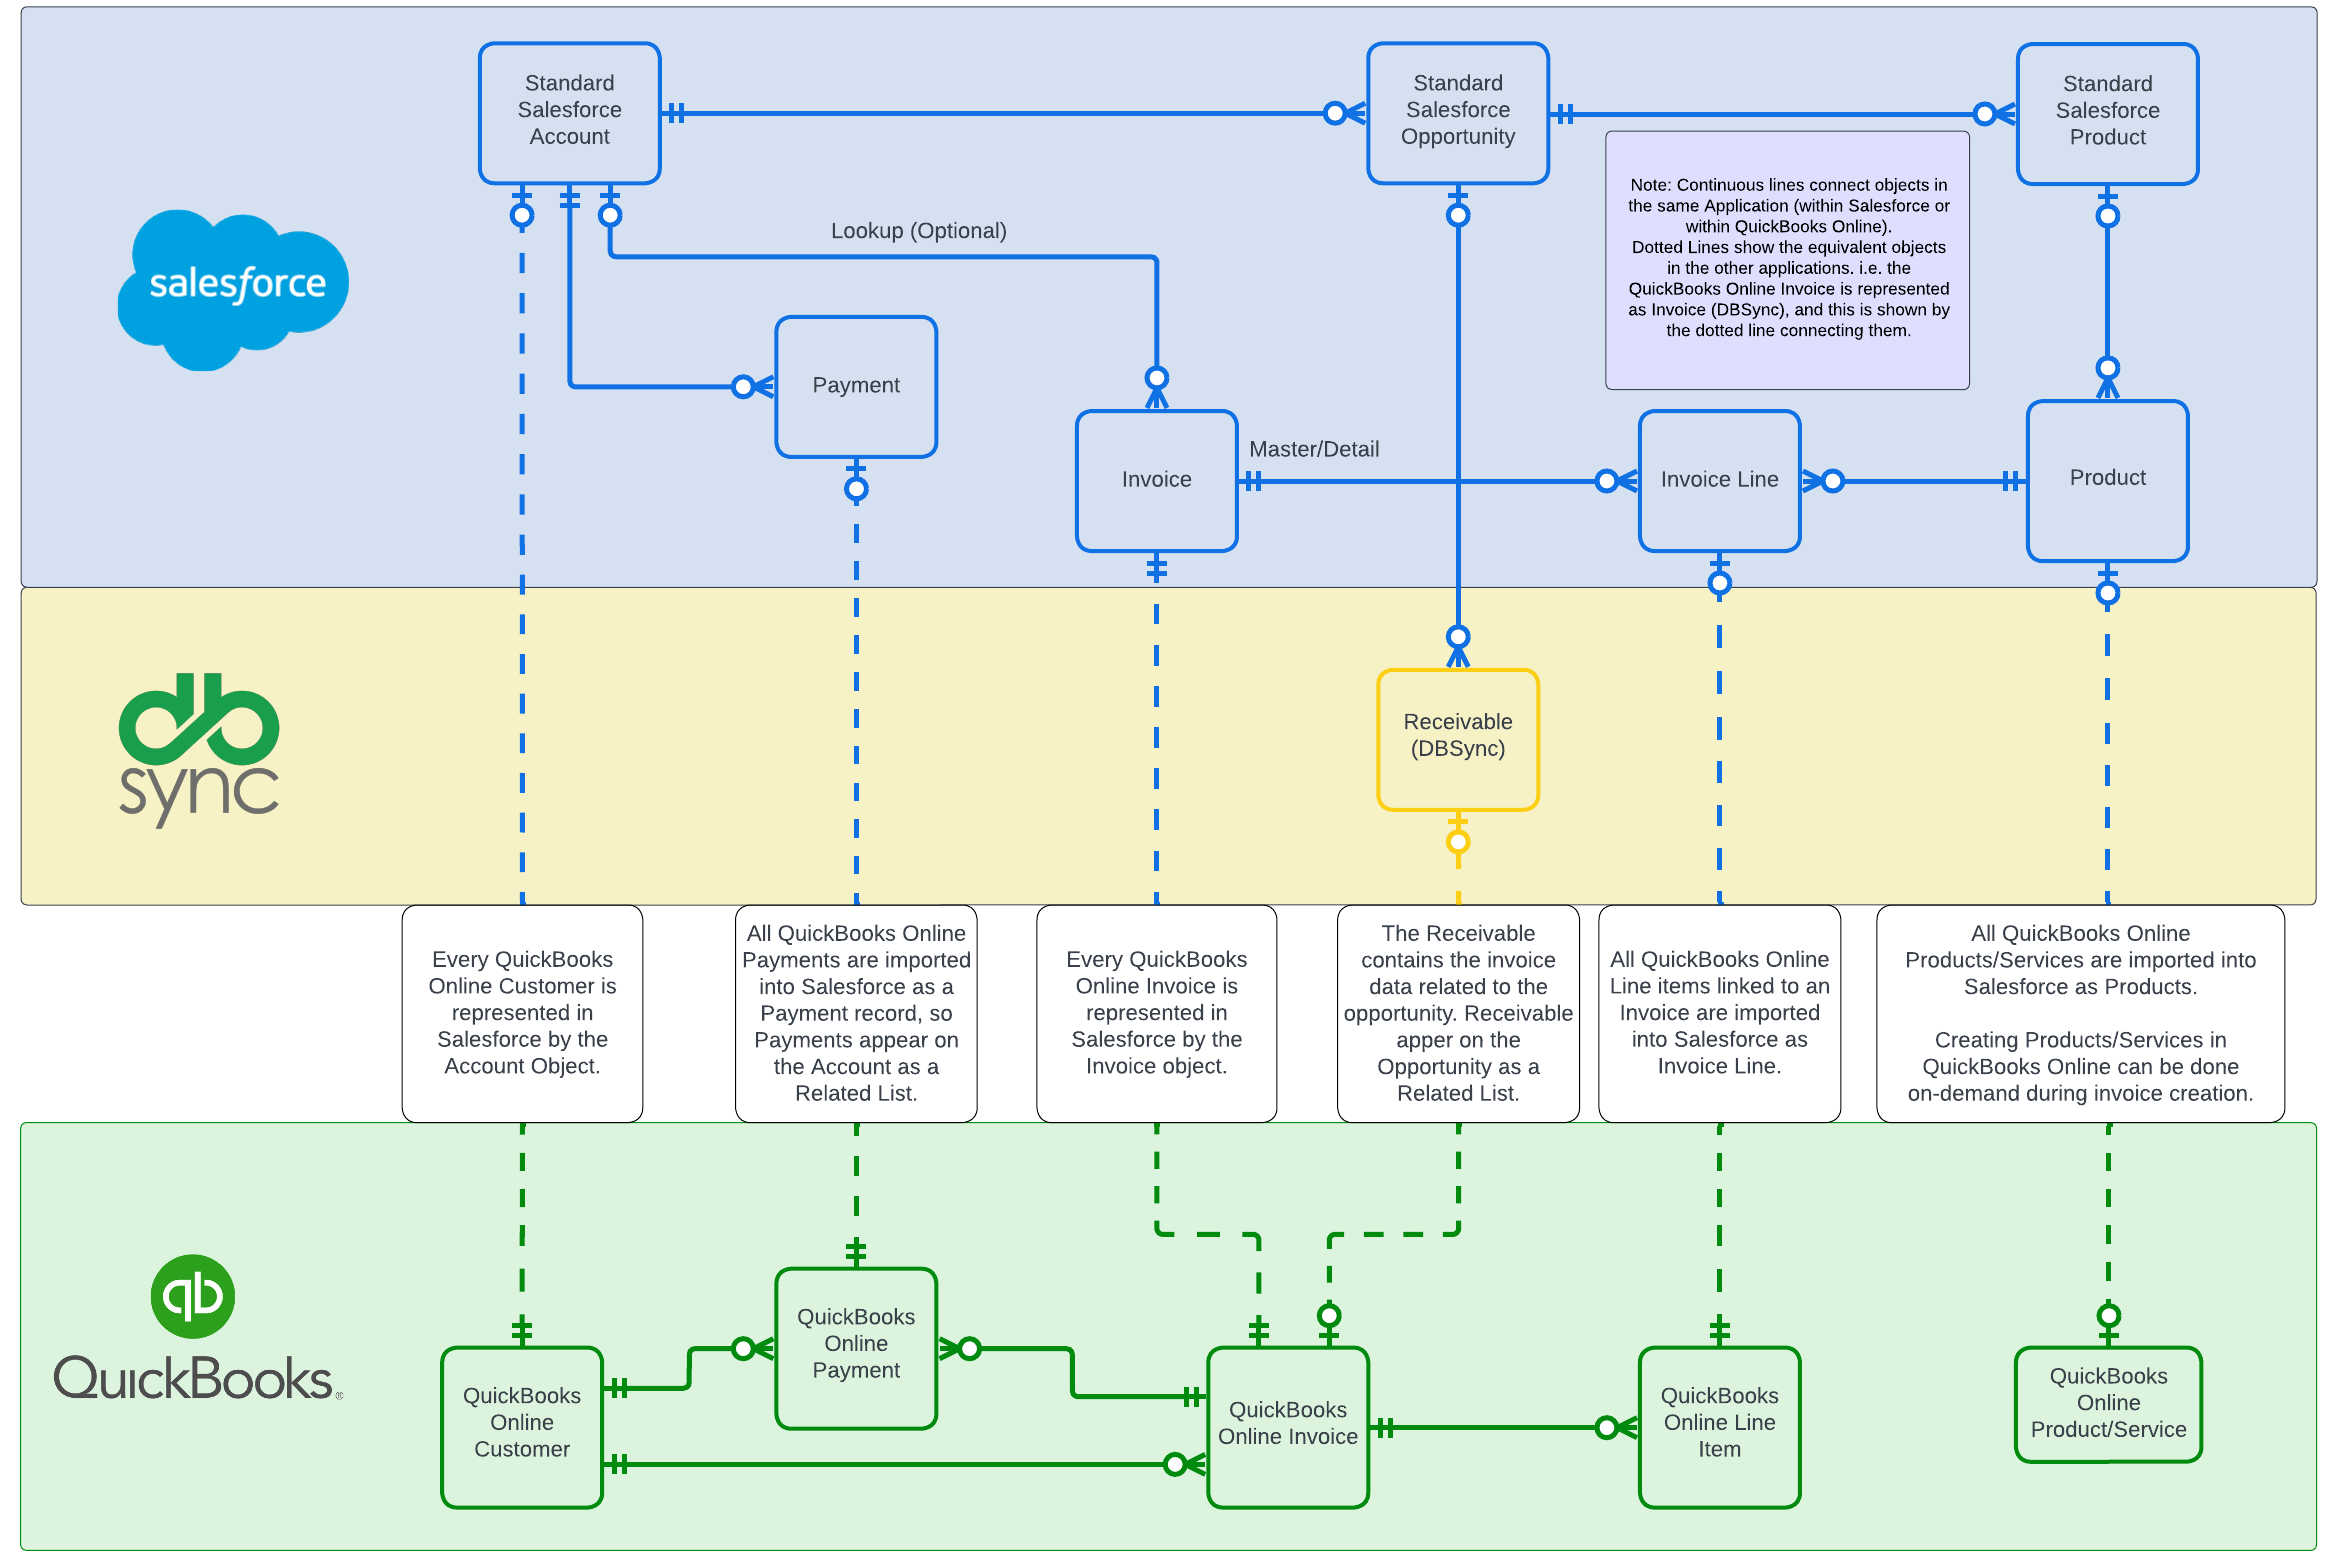
Entity Relationship Diagram for DBSync
Below is an Entity Relationship Diagram (ERD) to visualize the objects and data flow from Salesforce to QuickBooks via DBSync.
DBSync – Install Package from AppExchange
- The initial step is to log onto the AppExchange and search for DBSync.
- Once in the listing QuickBooks Online/Desktop Integration with Salesforce, click on ‘Get It Now‘.
- Follow the steps requested by the AppExchange.
- You can select ‘Install for Admins Only‘ to start with. You will be able to assign Permissions to others later on in the setup.
- After Installation, you will find it in the Installed Packages section.

DBSync – Package Configuration and Setup Guide
- After installing the DBSync app, you can open either the DBSync app or the Sales app in the App Launcher.
- You can use any of these apps to manage and sync data.
Step 1 – One-time set-up in Salesforce
- To manage and sync data using the DBSync app, it is crucial to add some mandatory fields to the Page Layout of certain objects.
- Without adding these fields, DBSync won’t be able to sync data.
Update the page layout of the Account Object
- Go to Setup > Object Manager.
- Search for the Account object in Quick Find.
- Click on the Page Layouts of the Account Object.
- Click on the Account Layout.
- Add a new section to the page and rename it as DBSync.
- Drag and drop some mandatory fields, i.e., QuickBooks Id, QuickBooks Error, and Fax into a new section.
- Save the page layout.

Update the page layout of the Product Object
- Go to Setup > Object Manager.
- Search for the Product object in Quick Find.
- Click on the Page Layouts of the Product Object.
- Click on the Product Layout.
- Add a new section to the page and rename it as DBSync.
- Drag and drop some mandatory fields, i.e., QuickBooks Id, QuickBooks Error, COGS, OnHand, and QuickBooks Item Type into a new section.
- Save the page layout.

Update the page layout of the Opportunity Object
- Go to Setup > Object Manager.
- Search for the Opportunity object in Quick Find.
- Click on the Page Layouts of the Opportunity Object.
- Click on the Opportunity Layout.
- Add a new section to the page and rename it as DBSync.
- Drag and drop some mandatory fields, i.e., QuickBooks Id, QuickBooks Error, Generate, Products Count, and Primary Contact into a new section.
- Save the page layout.

Update the page layout of the Opportunity Product Object
- Go to Setup > Object Manager.
- Search for the Opportunity Product object in Quick Find.
- Click on the Page Layouts of the Opportunity Product Object.
- Click on the Opportunity Product Layout.
- Add a new section to the page and rename it as DBSync.
- Drag and drop the mandatory fields, i.e., QuickBooks Id into a new section.
- Save the page layout.

Step 3 – Launch Development Studio
- After logging in to DBSync, you will see the screen below.
- Click on ‘Launch Development Studio‘ to open the development studio of DBSync.

Step 4 – Select Template Library
- Click on the ‘Import‘ button to select ‘Salesforce and QuickBooks Online Bi-Directional‘ as your template library.

Step 5 – Configure your Salesforce and QuickBooks Online Connector
- After importing your template library.
- Here, configure your Salesforce and QuickBooks Online Rest Connector.
- Click on the ‘Edit’ button to set up your respective Connector.
Configure QuickBooks Online Rest Connector
- To configure the QuickBooks Online Rest Connector, click on the ‘Edit‘ button.

Connect to QuickBooks Online
- To connect to QuickBooks Online, select your QuickBooks Online environment, either as a Production Instance or a Sandbox Instance.
- After selecting your QuickBooks environment, click on the ‘Connect to QuickBooks‘ button.
- Upon clicking, you will be redirected to the QuickBooks Online login.
- After successful login, you will be prompted to allow access, followed by connecting to QuickBooks Online.

- After connecting to QuickBooks Online, click on the ‘Advanced Properties‘ option.
- Now, validate the connection by clicking on the ‘Validate Connection‘ button.
- Finally, click on the ‘Save‘ button.

Configure Salesforce Connector
- To configure the Salesforce Connector, click on the ‘Edit‘ button.

Connect to Salesforce
- To connect to Salesforce, select your Salesforce End Point, either as Production/Developer Instance or Sandbox Instance.
- After selecting your Salesforce End Point, click on the ‘Connect to Salesforce‘ button.
- Upon clicking, you will be redirected to the Salesforce login.
- After successful login, you will be prompted to allow access, followed by connecting to Salesforce.

- After connecting to Salesforce, click on the ‘Advanced Properties‘ option.
- Now, validate the connection by clicking on the ‘Validate Connection‘ button.
- Finally, click on the ‘Save‘ button.

Generating a new Invoice using the Opportunity Products
- Go to the ‘Opportunities‘ tab to create a new invoice using the Opportunity products.
- Click on an existing Opportunity or create a new Opportunity.
- Then, fill in all the required details.
- Click on the ‘Save‘ button.

- Make sure that you have added products; you can add the products from the Products section.
- If you don’t add products to the opportunity while creating an invoice, the invoice won’t be pre-populated with opportunity products. Since there are no Opportunity Products on this Opportunity.

- After adding the products, now edit the Opportunity.
- Update the ‘Generate‘ field from ‘None‘ to ‘Invoice‘.
- Click on the ‘Save‘ button.

- In the image below, you can see that the opportunity has been created.

- Now, go to the DBSync website, and launch the Development Studio.
- Click on the ‘Projects‘ option, and edit the SalesforceQBonline Project.

- Now, after editing the SalesforceQBonline process.
- Navigate to the second page and run the SFQB_OpportunityToInvoice process.

- You will see the screen below after the process is completed.

- Now, again, switch back to Salesforce, open the app, and check the Opportunity to see if it’s updated.
- You will see the updated Quickbooks ID, as shown in the image below.
- Your invoice has been created.

Note: By default, DBSync doesn’t allow automatic sync. To enable automatic syncing of data, you need to add a schedule.
- To add a schedule, go to the DBSync website and launch the Development Studio.
- Select and edit the project to which you want to add a schedule.
- Click on the ‘Scheduler‘ option. Now, add a schedule by specifying the process for auto-syncing your data and the time at which the scheduler runs automatically.
- Click on the ‘Save‘ button.

Frequently Asked Questions (FAQs)
What is DBSync, and why is it essential for businesses using Salesforce and QuickBooks Online?
DBSync is a Salesforce app created to facilitate integration between Salesforce, a customer relationship management (CRM) platform, and QuickBooks Online, an accounting software. Its main purpose is to ensure that data updates, such as customer information, opportunities, and invoices, are reflected in minutes across both platforms.
Does DBSync allow Bi-Directional Sync?
Yes, DBSync enables data flow between Xero and your systems in both directions, ensuring consistency.
What types of data can be synchronized between Salesforce and Xero using DBSync?
DBSync can synchronize various types of data, including customer information, sales data, and financial transactions. The goal is to create a unified view of customer relationships and financial activities.