
Xero Integration with Salesforce & Breadwinner
Table Of Content
Overview
Breadwinner for Xero is a Salesforce app created to facilitate integration between Salesforce, a customer relationship management (CRM) platform, and Xero, an accounting software. This integration enables businesses to synchronize their financial workflows by allowing bidirectional data sync between Salesforce and Xero.
The main purpose of Breadwinner for Xero is to reduce manual data entry tasks and promote collaboration between different departments, especially sales and finance. By connecting Salesforce and Xero, Breadwinner ensures that data updates, such as customer information, opportunities, and invoices, are reflected in minutes across both platforms.
Video Guide for Breadwinner
Here is a video guide demonstrating the setup and generation of invoices from Accounts and Opportunity Products in Breadwinner for Xero.


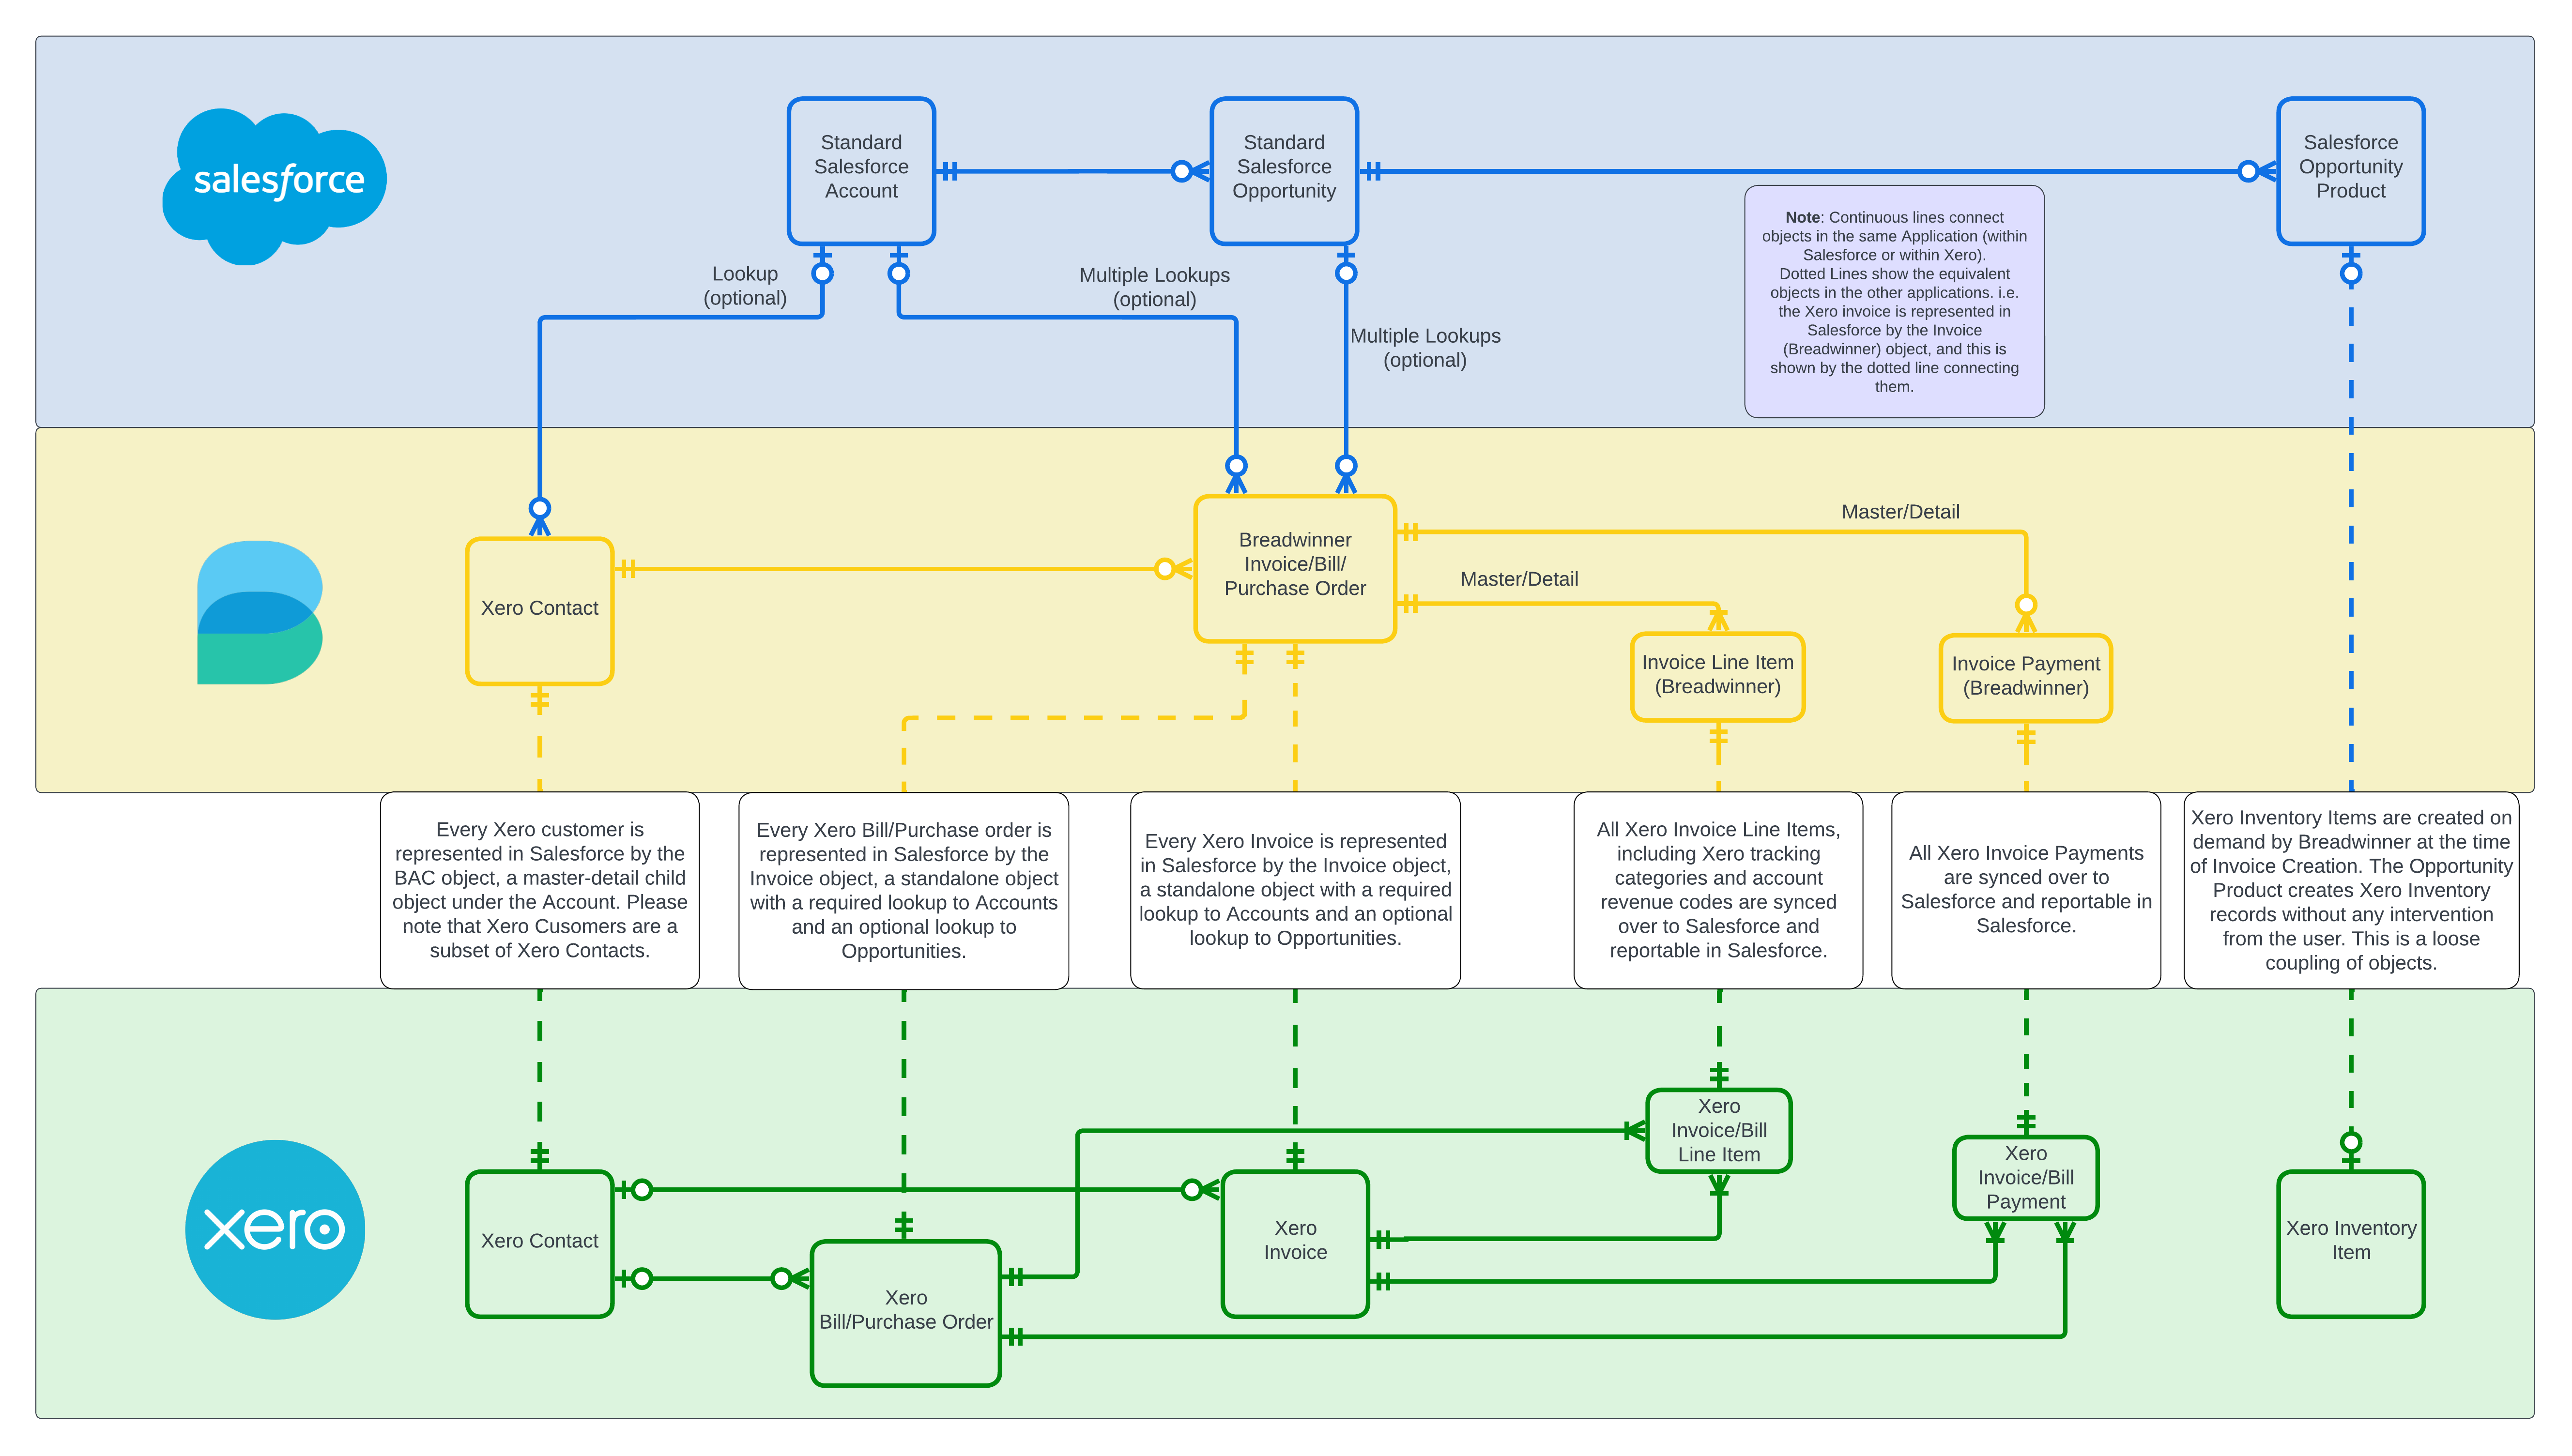
Entity Relationship Diagram for Breadwinner for Xero
Below is an Entity Relationship Diagram (ERD) to visualize the objects and data flow from Salesforce to Xero via Breadwinner.
Breadwinner for Xero – Install Package from AppExchange
- The initial step is to log onto the AppExchange and search for Breadwinner for Xero.
- Once in the listing Xero Integration with Salesforce – Breadwinner for Xero, click on ‘Get It Now‘.
- Follow the steps requested by the AppExchange.
- You can select ‘Install for Admins Only‘ to start with. You will be able to assign Permissions to others later on in the setup.
- After Installation, you will find it in the Installed Packages section.

Breadwinner for Xero – Package Configuration and Setup Guide
- After installing the Breadwinner for Xero app, Open the Breadwinner for Xero application in the App Launcher.
- Go to the ‘Breadwinner‘ tab, It will guide you through the various installation Steps required by the App.
Step 1 – Switch Breadwinner to Xero Active Mode from Xero Read Only Mode
- By default, Breadwinner will be in Xero Read Only Mode.
- Click on the ‘Xero Read Only Mode‘ button to switch Breadwinner to ‘Xero Active Mode‘.
Note: It is feasible and relatively straightforward to test Breadwinner with your Xero organization without impacting your Xero data by utilizing Xero Read Only mode. In this mode, any actions taken in Breadwinner will not result in changes to Xero; instead, Breadwinner will only retrieve information from Xero and update data in Salesforce.

Step 2 – Connect Breadwinner / Salesforce to Xero
- To connect Breadwinner/Salesforce with Xero, click on the ‘Connect to Xero‘ button.
- Upon clicking, you will be redirected to the Xero login.
- Upon successfully logging in, you will be asked to allow access, followed by connecting to Xero. You will get a pop-up saying Breadwinner is now connected to your company.

Step 3 – Assign Breadwinner Permission Sets
- By default, Breadwinner assigns permission sets to Salesforce Licensed Users only. You may manually assign them to other users.
- There are two options for assigning Breadwinner Permission Sets: giving all users Standard Permissions to Breadwinner or giving all users Read-Only Permissions to Breadwinner.
- Click on the permission that is appropriate for your business.

Step 4 – Update Page Layouts
- Click on the ‘Update Page Layouts‘.
- It will update all Account and Opportunity page layouts.

Step 5 – Match Xero Contacts to Salesforce Accounts
- Click on the ‘Preview Account Match for Customers‘ to match Xero Contacts to Salesforce Accounts.

- You will be redirected to the next page for Breadwinner Account Match.
- You will have three options for Breadwinner Account Match: Create a New Salesforce Account from Xero Contact, Manually Match to an existing Salesforce Account you select, or Do Not Sync invoices from this Xero Contact.
- Click on the option that is appropriate for your business.
- Click on the ‘Next‘ button.
- You will get a pop-up saying Account match completed successfully.

Generating new Invoices in Salesforce
Creating an Invoice from the Accounts
- Go to the ‘Accounts‘ tab.
- Choose the Account for which you want to create an invoice.
- Click on the Invoices>>New to begin the invoice creation process.

- Select the Xero Contact for this invoice.
- You can either create a new Xero Contact or Use an Existing Xero Contact.
- If you are creating an invoice from an account for the first time, you need to create a new Xero Contact.
- To create a new Xero Contact, fill in all the required details and click the ‘Create Xero Contact‘ button.
- If you choose to use an existing Xero Contact, select the Xero account you want and click the ‘Next‘ button.

- Now, fill in the remaining invoice details and add the line items.
- Click on ‘Create Draft Invoice in Xero‘ to generate a new invoice.

- An invoice will be created.
- An invoice will be generated simultaneously in both Breadwinner and Xero.

Creating a new Invoice using the Opportunity Products
- Go to the ‘Opportunity‘ tab to create a new invoice using the Opportunity products.
- Click on an existing Opportunity or create a new Opportunity. You can add the Products from the product section.
- If you don’t add products to the opportunity while creating an invoice, the invoice won’t be pre-populated with opportunity products. Since there are no Opportunity Products on this Opportunity, you will need to add a Product for each line item later.
- Click on the Invoices >> New.

- Choose whether to pre-populate the invoice with Opportunity Products or not.
- Choose the Xero Contact.
- You have the option to either create a new Xero Contact or use an existing one.
- Click on the ‘Next‘ button.

- As shown in the screenshot below, the invoice will be pre-filled with the corresponding Products.
- Products added in the opportunity will appear under XERO INVENTORY ITEM. Additionally, you can add more line items if needed.
- Click ‘Create Draft Invoice in Xero‘ to generate a new invoice using Opportunity Products.

- An invoice will be created.
- An invoice will be generated simultaneously in both Breadwinner and Xero.

- You will find the invoice under the ‘Invoices‘ tab.

Frequently Asked Questions (FAQs)
What is Breadwinner for Xero, and why is it essential for businesses using Salesforce and Xero?
Breadwinner for Xero is a Salesforce app created to facilitate integration between Salesforce, a customer relationship management (CRM) platform, and Xero, an accounting software. Its main purpose is to reduce manual data entry tasks and promote collaboration between different departments, especially sales and finance. By connecting Salesforce and Xero, Breadwinner ensures that data updates, such as customer information, opportunities, and invoices, are reflected in minutes across both platforms.
Can I email an Invoice to Customers using Breadwinner for Xero?
Yes, you can do it in two ways.
- Sending it directly from Salesforce.
- Downloading the Invoice to your system and sending it through your native email methods.
Does Breadwinner for Xero allow Bi-Directional Sync?
Yes, Breadwinner for Xero enables data flow between Xero and your systems in both directions, ensuring consistency.
What types of data can be synchronized between Salesforce and Xero using Breadwinner for Xero?
Breadwinner for Xero can synchronize various types of data, including customer information, sales data, and financial transactions. The goal is to create a unified view of customer relationships and financial activities.