
TwoCanConnect – Integrate Salesforce and Xero
Table Of Content
Overview
TwoCanConnect is a Salesforce app developed to integrate Salesforce CRM (Customer Relationship Management) with Xero accounting software. This integration facilitates the flow of information between these two business tools, enabling bi-directional data synchronization and reducing the necessity for manual data entry. By connecting Salesforce and Xero, TwoCanConnect ensures that data updates, such as customer information, opportunities, and invoices, are reflected across both platforms.
Video Guide for TwoCanConnect
Here is a video guide demonstrating the setup and generation of using the Opportunity Products in TwoCanConnect.

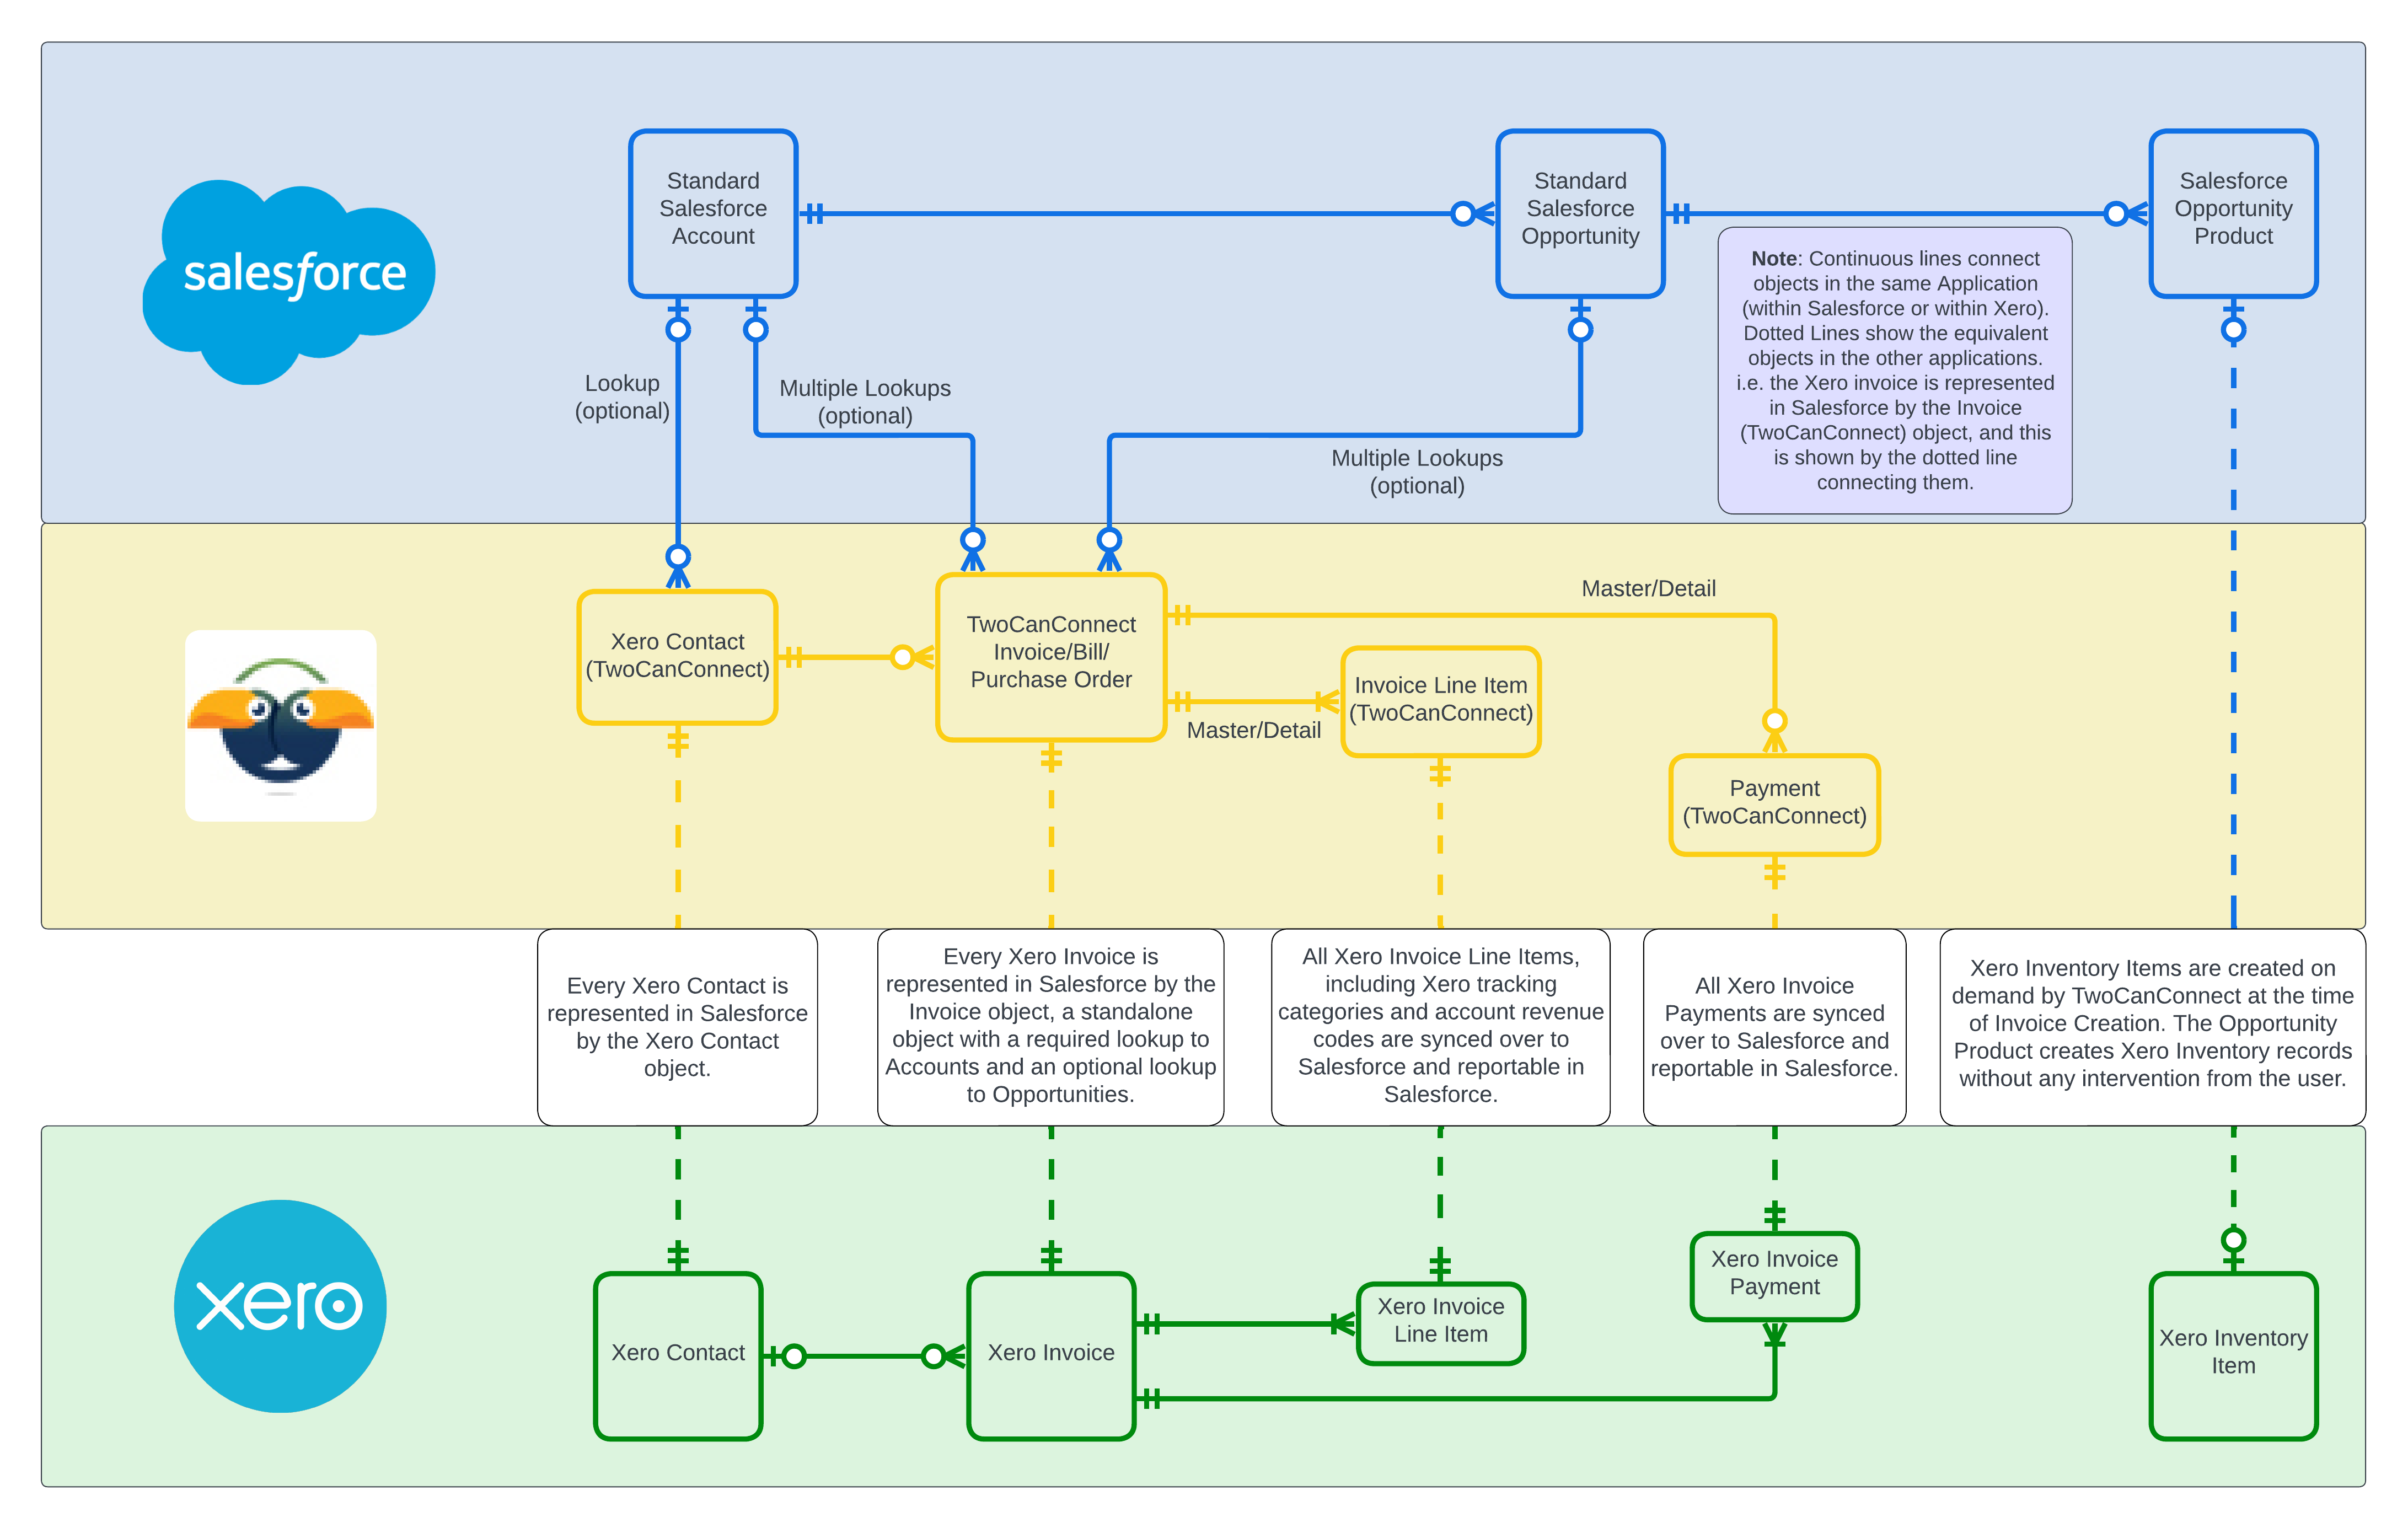
Entity Relationship Diagram for TwoCanConnect
Below is an Entity Relationship Diagram (ERD) to visualize the objects and data flow from Salesforce to Xero via TwoCanConnect.
TwoCanConnect – Install Package from AppExchange
- The initial step is to log onto the AppExchange and search for TwoCanConnect.
- Once in the listing TwoCanConnect – Integrate Salesforce and Xero, click on Get It Now.
- Follow the steps requested by the AppExchange.
- You can select ‘Install for Admins Only‘ to start with. You will be able to assign Permissions to others later on in the setup.
- After Installation, you will find it in the Installed Packages section.

TwoCanConnect – Package Configuration and Setup Guide
- After installing the TwoCanConnect app, Open the TwoCanConnect application in the App Launcher.
- Navigate to the ‘TCC Configuration‘ tab.
- Scroll down slightly and select the ‘TwoCanConnect Configuration‘ Option as shown below.
- Follow each step provided. It will guide you through the various installation Steps required by the App.

Step 1 – Xero Authentication
- Click on ‘Xero Authentication.’
- Following that, a window will appear on the right with the ‘Connect to Xero‘ option.
- Click on the ‘Connect to Xero‘ button to start the authentication process. You will need your Xero Login Details and Salesforce login details to authenticate.
- Upon clicking, you will be redirected to the Xero login.
- Upon successfully logging in, you will be asked to allow access, followed by connecting to Xero. You will get a pop-up saying TwoCanConnect is connected to “—–” (Your Xero organization name).
- Click on the ‘Continue to Configuration‘ button.

Step 2 – Sync Settings
- Click on ‘Sync Settings.’
- Following that, a window will appear on the right with the ‘Sync Settings‘ option.
- Sync Direction and Frequency:
- Select your sync direction. By default, the integration is set as a one-way sync while you set up TCC. Change this to Two Way Sync when you are ready to go live.
- Select your Sync Frequency. This option allows you to select how often Salesforce and Xero sync. If you change the frequency, it will update the timing after the next sync event completes. It is 15 minutes by default.

- Set Salesforce Default Field Permissions:
- If you intend to generate invoices from an opportunity, ensure that the ‘Discount‘ and ‘TotalPrice‘ fields are accessible to any profile involved in invoice creation. If you don’t set this permission, you will get an error on the invoice creation page.
- Click on ‘Redirect to Discount Permission Check,’ and you will be redirected to the Opportunity Product – Discount page to configure field-level security. Here, ensure the field is set to ‘Visible‘ for any user involved in creating invoices.
- Similarly, click on ‘Redirect to Total Price Permission Check,’ and you will be redirected to the Opportunity Product – Total Price page to set field-level security. Here, make sure the field is set to ‘Visible‘ for any user participating in invoice creation.

- Data to Sync:
- You can choose which data you want to sync between Salesforce and Xero.
- If you see some objects that are disabled, this is because they are not included in your subscription or have not yet been provisioned by TwoCanConnect Support.

Step 3 – Default Settings
- Click on ‘Default Settings.’
- Following that, a window will appear on the right with the ‘Default Settings‘ option.
- The options below will change the default settings for TwoCanConnect.
- Default Xero Sales Account for new products:
- When you create a new product in Salesforce, which Xero Account should it use if you have not specified one?
- Default Salesforce Opportunity Amount Setting:
- It is the price you enter into your opportunity products including tax, excluding tax, or having no tax.
- Select an option that is appropriate for your business.

Step 4 – Invoice Settings
- Click on ‘Invoice Settings.’
- Following that, a window will appear on the right with the ‘Invoice Settings‘ option.
- Now, choose your invoice settings. These options are related to when you create an invoice in Salesforce ready to send to Xero. These options are global for all users.
- Invoice Settings:
- These settings change the way invoices are displayed and the options that are available for syncing to Xero.
- Invoice Line Item Settings:
- These settings change the way users can interact with line items on the invoice creation page.
- Stock and Inventory Sync Settings (BETA):
- These settings allow you to track product stock/inventory and display the stock levels when creating an invoice.

Step 5 – Manage Users
- Click on ‘Manage Users.’
- Following that, a window will appear on the right with the ‘Manage Users‘ option.
- Now, Assign permission sets. TwoCanConnect uses permission sets to grant access to the objects provided by the application.
- Admin Permissions:
- Users are allowed to access config and all objects.
- Standard User Permissions:
- Allowed to access and create all data, just can’t access TCC Configuration, Account Matching, or Product Sync.
- Read Only Permissions:
- Is only allowed to read data and not edit any data or create data. Can’t access TCC Configuration, Account Matching, or Product Sync.

Step 6 – Manage Page Layout
- Click on ‘Manage Page Layout.’
- Following that, a window will appear on the right with the ‘Page Layout Editor‘ option.
- Now, Update your Account and Opportunity Page Layouts that are appropriate for your business.

Step 7 – Manage Syncing
- Click on ‘Manage Syncing.’
- Following that, a window will appear on the right with the ‘Manage Syncing‘ option.
- Syncing can be managed at the time of Configuration by setting some default values.
- Manage Historic Sync:
- The historic sync must be completed before the ongoing sync can be started. The historic sync grabs your existing Xero data and brings it across to Salesforce to ensure that no duplicate Xero contacts are created by Salesforce. You can also match your existing Xero Contacts to your Salesforce Accounts using our account matching tool.
- To start the Historic Sync, Click on the ‘Start‘ button.
- Manage Ongoing Sync:
- The ongoing sync is the tool that syncs according to your sync frequency setting. This sync gets all the changes between Salesforce and Xero and syncs them between both platforms to ensure everything is up to date. Must be enabled to allow invoices created in Salesforce to sync with Xero.
- You must enable the Ongoing Sync to see reflected data between two platforms.

- Automatically Manage Xero Data:
- TwoCanConnect can automatically pull all of your Branding Themes, Tracking Categories, Xero Accounts, and Tax Rates from Xero to Salesforce.
- When enabled, it will run instantly. After the first run, it will then auto-schedule to run at midnight each night to keep the data in sync.
NOTE: If you make adjustments in Xero (EG: New Account or Tax Rate) and when they show in Salesforce instantly, use the Instant Import section below to pull the change instantly. Enable if you are willing to pull all the data from Xero instantly and schedule it to run at midnight each night.

- Manually Manage Xero Data / Instant Import:
- If you want to manually manage your Xero Data, you can manually import each of the Xero Data types below by clicking the ‘Import‘ button against the Data type you would like to import. It will then instantly import the data.

- After completing all these steps, Once the historic sync is completed, you can start matching the contacts imported from Xero to your current Salesforce accounts using the Account Matching Tool.
- You can also Sync your items in Xero with your Salesforce products, or create new products in Salesforce from your Xero Items.
Generating a new Invoice using the Opportunity Products
- Go to the ‘Opportunities‘ tab to create a new invoice using the Opportunity products.
- Click on an existing Opportunity or create a new Opportunity. You can add the Products from the products section.
- If you don’t add products to the opportunity while creating an invoice, the invoice won’t be pre-populated with opportunity products. Since there are no Opportunity Products on this Opportunity, you will need to add a Product for each line item later.
- Click on the Invoices >> New Invoice.

- Select Invoice Contact Options.
- You have the option to Create New Contact in Xero using Salesforce Account Details, Use Existing Xero Contact Linked to Account, and Select Another Xero Contact.
- Click on the ‘Next‘ button.

- As shown in the screenshot below, the invoice will be pre-filled with the corresponding Products.
- Products added in the opportunity will appear under PRODUCT LOOKUP. Additionally, you can add more invoice line items if needed.
- Click ‘Create Draft Invoice‘ to generate a new invoice using Opportunity Products.

- An invoice will be created.
- An invoice will be generated simultaneously in both TwoCanConnect and Xero.
- You will find the invoice under the ‘Invoices‘ tab.

Frequently Asked Questions (FAQs)
What is TwoCanConnect, and why is it essential for businesses using Salesforce and Xero?
TwoCanConnect is a Salesforce app developed to integrate Salesforce CRM (Customer Relationship Management) with Xero accounting software. This integration facilitates the flow of information between these two business tools, enabling bi-directional data synchronization and reducing the necessity for manual data entry. By connecting Salesforce and Xero, TwoCanConnect ensures that data updates, such as customer information, opportunities, and invoices, are reflected across both platforms.
Does TwoCanConnect allow Bi-Directional Sync?
Yes, TwoCanConnect enables data flow between Xero and your systems in both directions, ensuring consistency.
What types of data can be synchronized between Salesforce and Xero using TwoCanConnect?
TwoCanConnect can synchronize various types of data, including customer information, sales data, and financial transactions. The goal is to create a unified view of customer relationships and financial activities.
Can I connect multiple Xero Instances using TwoCanConnect?
At this stage, TwoCanConnect only allows a single Xero instance to be connected to your Salesforce. TwoCanConnect has Multi-Org on the roadmap.