eShopSync: Integrate QuickBooks and Salesforce

Table Of Content
Overview
The eShopSync QuickBooks Salesforce Connector enables integration between the QuickBooks application and Salesforce CRM, providing a solution for data synchronization between these business systems. This integration benefits organizations looking to synchronize accounting data with customer relationship management.
Video Guide for eShopSync
Here is a video guide demonstrating the setup and generation of invoices from Accounts in eShopSync.

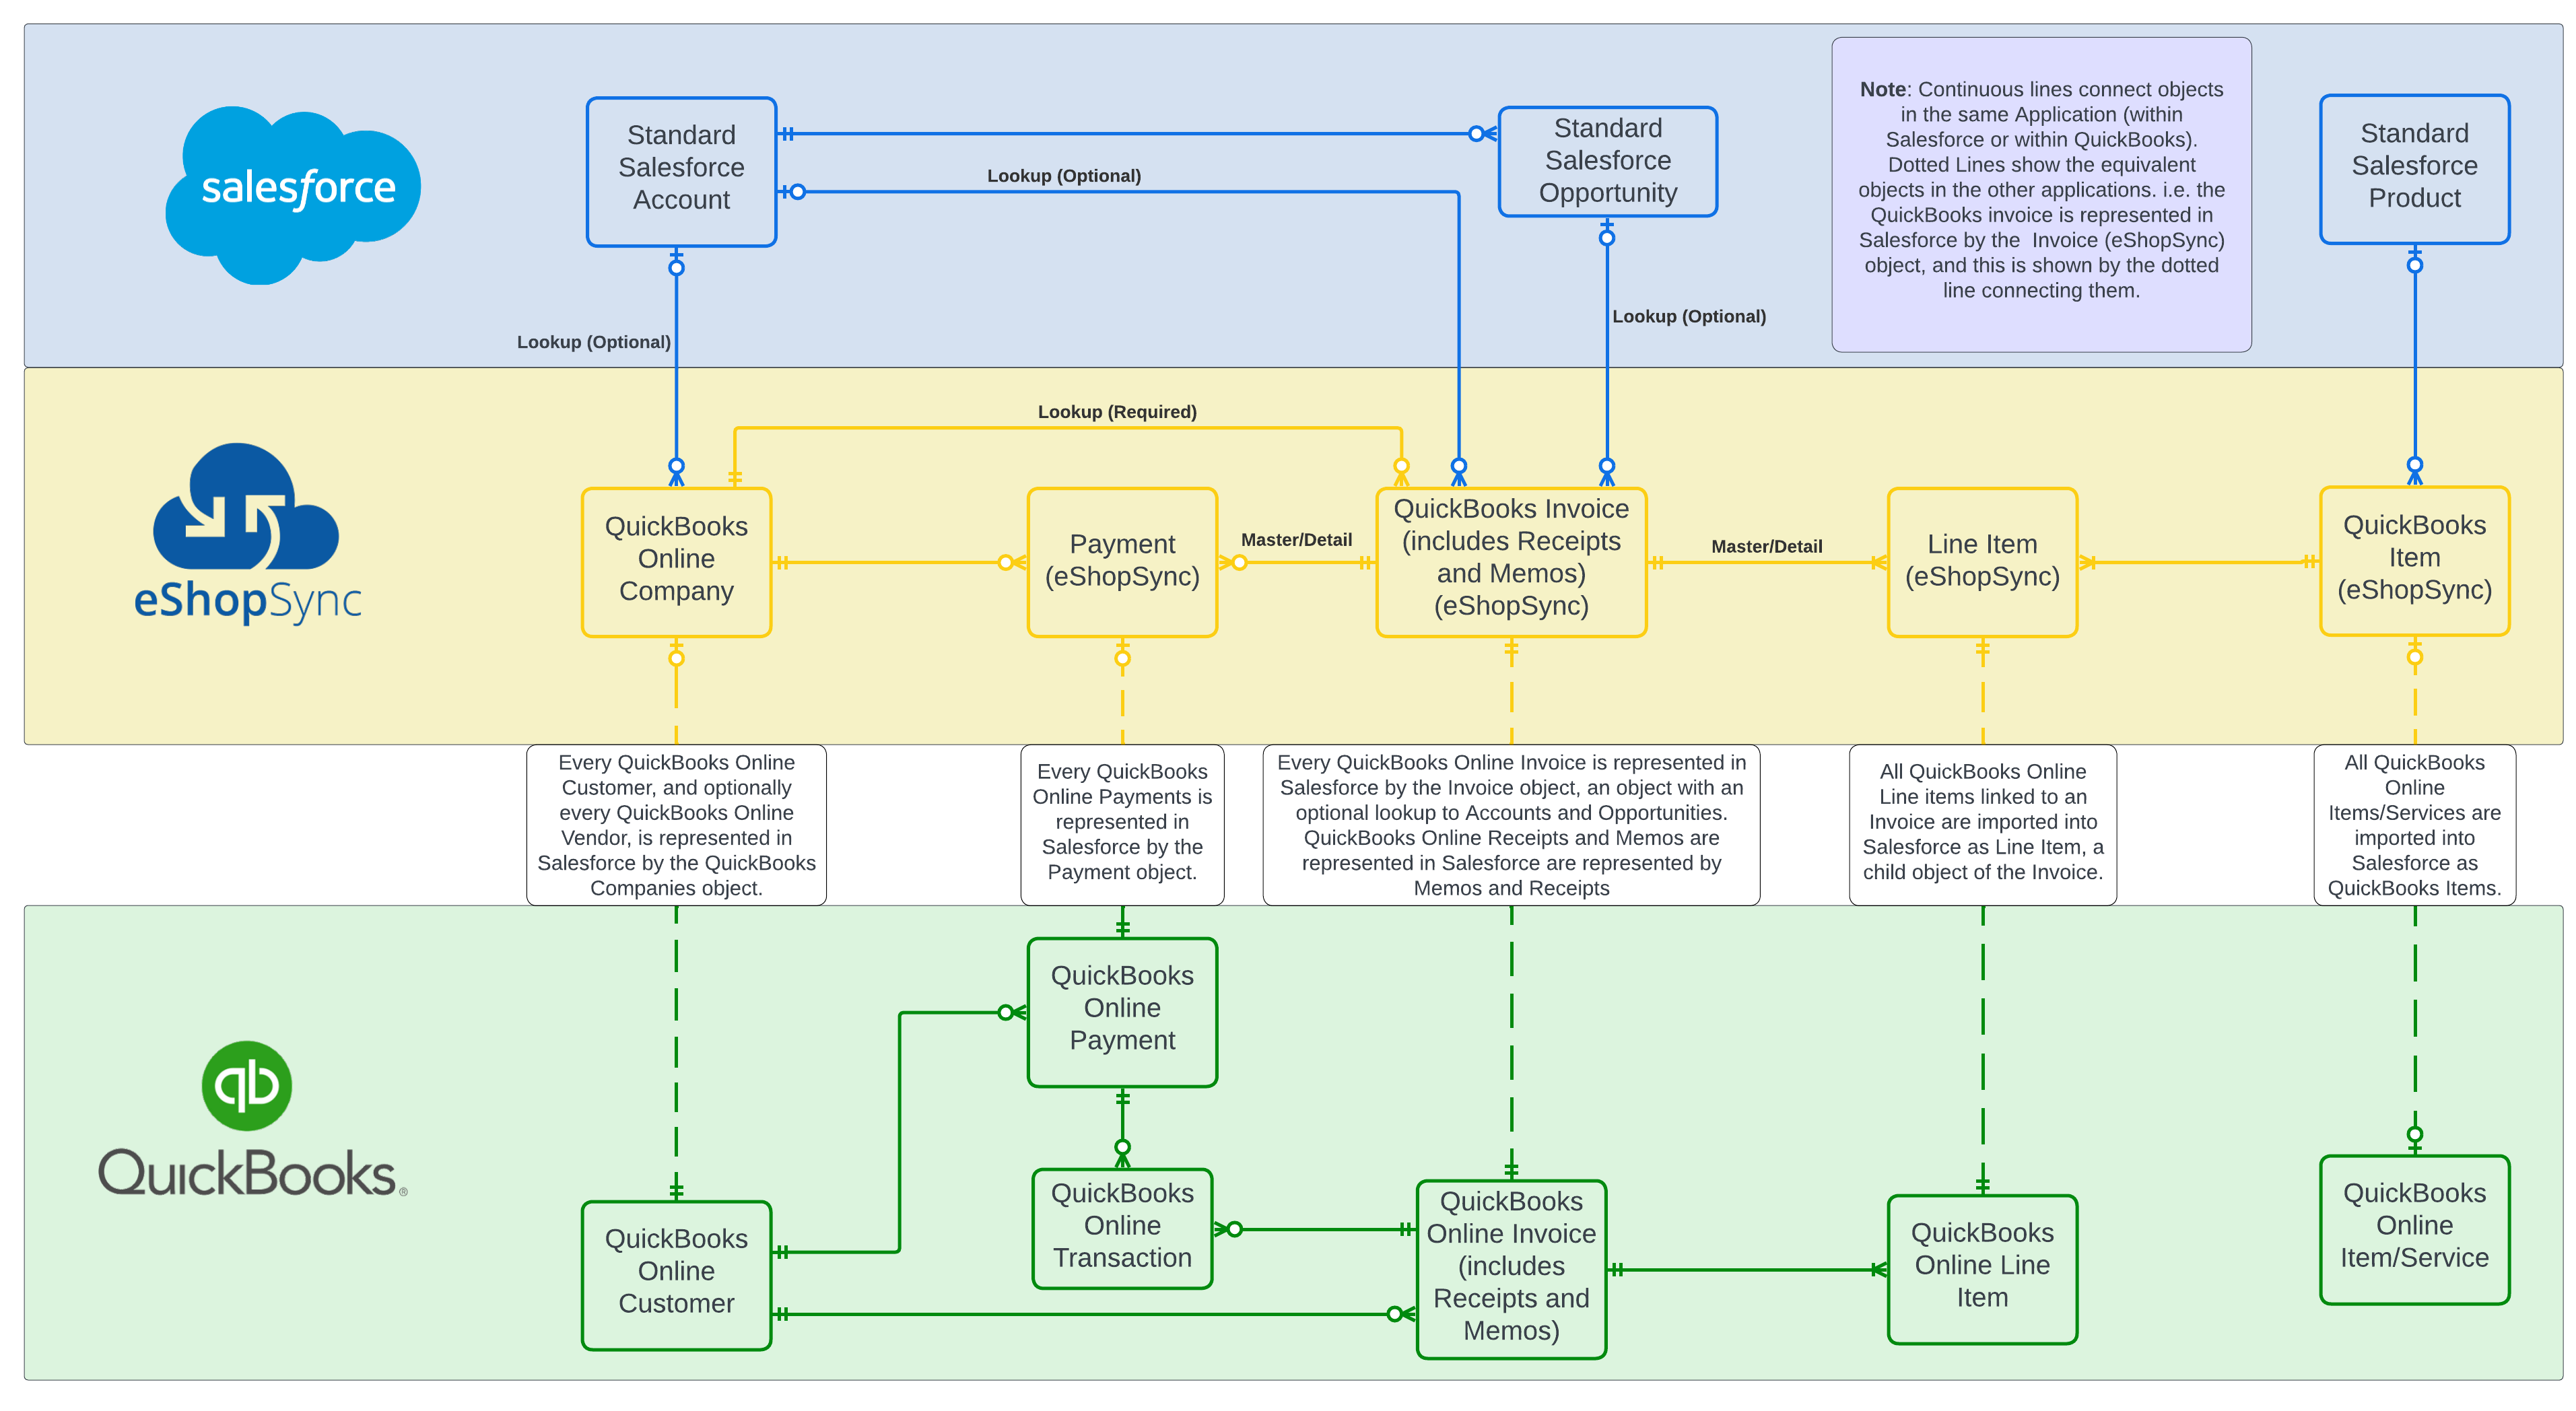
Entity Relationship Diagram for eShopSync
Below is an Entity Relationship Diagram (ERD) to visualize the objects and data flow from Salesforce to QuickBooks via eShopSync.
Installation
Step 1 – Installing the Intgeration on Salesforce
- Please navigate to the AppExchange, search for QuickBooks – Salesforce Connector, and click on Get it Now to begin the installation process.

- Follow the steps requested by AppExchange to install.
- After installation, determine which users can access it based on your specific requirements and grant all the third-party permissions for QuickBooks – Salesforce Connector.
Step 2 – Creating a QuickBooks app and connecting it with Salesforce
- To create an app in your Intuit Developer Account, log in or sign up at Intuit Developer Homepage.
- Click on Dashboard from the navigation bar on the homepage to access My Apps Dashboard.
- Click on the + Create an app.

- Select platform as QuickBooks Online and Payments to proceed

- Provide a name for the application and select the scope of the application.
- The first scope is com.intuit.quickbooks.accounting which is for granting access to the QuickBooks Online Accounting API, which focuses on accounting data.
- The second scope is com.intuit.quickbooks.payment which is for granting access to the QuickBooks Payments API, which focuses on payments processing.
- Click on Create App.

- You will be redirected to the Getting Started page of the newly created app.
- Navigate to Development Settings in the navigation panel on the left and click on Keys & Credentials to get the app’s Client ID and Client Secret and copy it for the connector.

- Go to Salesforce and access eShopSync for QuickBooks through the App Launcher, and then proceed to navigate to the QuickBooks Sync Tab.
- In the Configuration menu, click the + button to add a new QuickBooks Company.
-

- A new window opens up where you have to provide the details from your QuickBooks company.
- Sandbox Company – Select if it is a Sandbox Company.
- Company Name.
- Sandbox Client ID – Paste it from the Keys and Credentials menu in QuickBooks.
- Sandbox Client Secret – Paste it from the Keys and Credentials menu in QuickBooks.
- Webhook Verify Token –
- Then click on the Save button.

- In Important Section, copy the URI links and go to QuickBooks App Dashboard.

- In the Keys and Credentials, Scroll down to Redirect URIs.
- Click on Add URI.
- Paste the links in the LINK column.
- Click on Save.

- Go to Webhooks in Development Settings.
- In the Endpoint URL field, paste the link of your Salesforce site.
- Click on Save and you will get your verifier token and then copy it.

- Navigate back to Salesforce and paste the verifier token in the Webhook Verify Token Section and Click on Save.
- Your QuickBooks App has been added to Salesforce.

- Click on Connect to QuickBooks to finish connecting your QuickBooks company to Salesforce.
Configuration
Step 1 – Object Settings
- Enable the QuickBooks entities that you want to sync in Salesforce. Some entities are dependent on other entities so when you enable the entity then dependent entities for enabled automatically.
- Click Save & Next.

Step 2 – Import Settings
- Select the price book that you have for your Salesforce records.
- Enable the PDF settings.
- Click the Save & Next button.

Step 3 – Field Mapping
- In the Customer Default Field Mapping, select any one option that you want to choose. If you choose the Account option then it imports as accounts, if you choose the Contact option then it imports customers in contact, but if you choose both then both fields are created in Salesforce for your QuickBooks customers.
- If you have set the vendor as accounts in global settings then here you get only one option which is Contact as vendors got synced in Salesforce Accounts Object.
- In other fields, map the field names of QuickBooks to Salesforce and then click on the ‘+’ button to add to the list below them.

Step 4 – Record Type Mapping
- Choose the record type in which you want to create the records. There is also an Accounts option so you can do record type mapping as per the availability of record types that are selected in the customer map. After selecting the record type mapping, click on the Save & Next button to continue.

Step 5 – Matching Criteria
- Select the QuickBooks field.
- Then choose conditions (equals/ starts with/ ends with).
- Choose whether the values are case-sensitive or case-insensitive.
- Choose the Salesforce field to match with.
- Click on the “+” button to add the matching criteria you have set.
- Click on the Save & Next button.

Generating a New Invoice in Salesforce
Creating an Invoice from the Invoice Section
- Go to the Invoices Section in Salesforce.
- Click on the + icon.

- Select a Salesforce Contact to be linked with the invoice.
- Fill in the necessary fields such as amount, invoice date and so on.
- Click on Save to complete the creation of the invoice or Click on Save and New complete the creation of the invoice and start creating another new invoice on Salesforce.

- Your invoice will be generated and be redirected to the invoice page in Salesforce as shown below.

Note:
- Invoices can be created in Salesforce and can be exported to QuickBooks, but the Export button is only available after we buy the premium subscription.
- eShopSync can save an Invoice as an Opportunity but restricts the Invoice creation with Opportunity Products.
Frequently Asked Questions (FAQs)
What customization options are available for the QuickBooks – Salesforce Connector by eShopSync?
The connector offers various customization features to tailor the integration according to your business needs. Users can personalize mappings, configure field synchronization, and adapt settings to align with specific workflows.
Does eShopSync support bidirectional data sync between Salesforce and QuickBooks?
Yes, The premium version of eShopSync, supports bidirectional syncing, allowing data to flow both ways between Salesforce and QuickBooks, ensuring consistency across platforms.