
TwixRiva – Xero integration with Salesforce
Table Of Content
Overview
Video Guide for TwixRiva
Here is a video guide demonstrating the setup and generation of invoices from Accounts and Opportunity Products in TwixRiva.
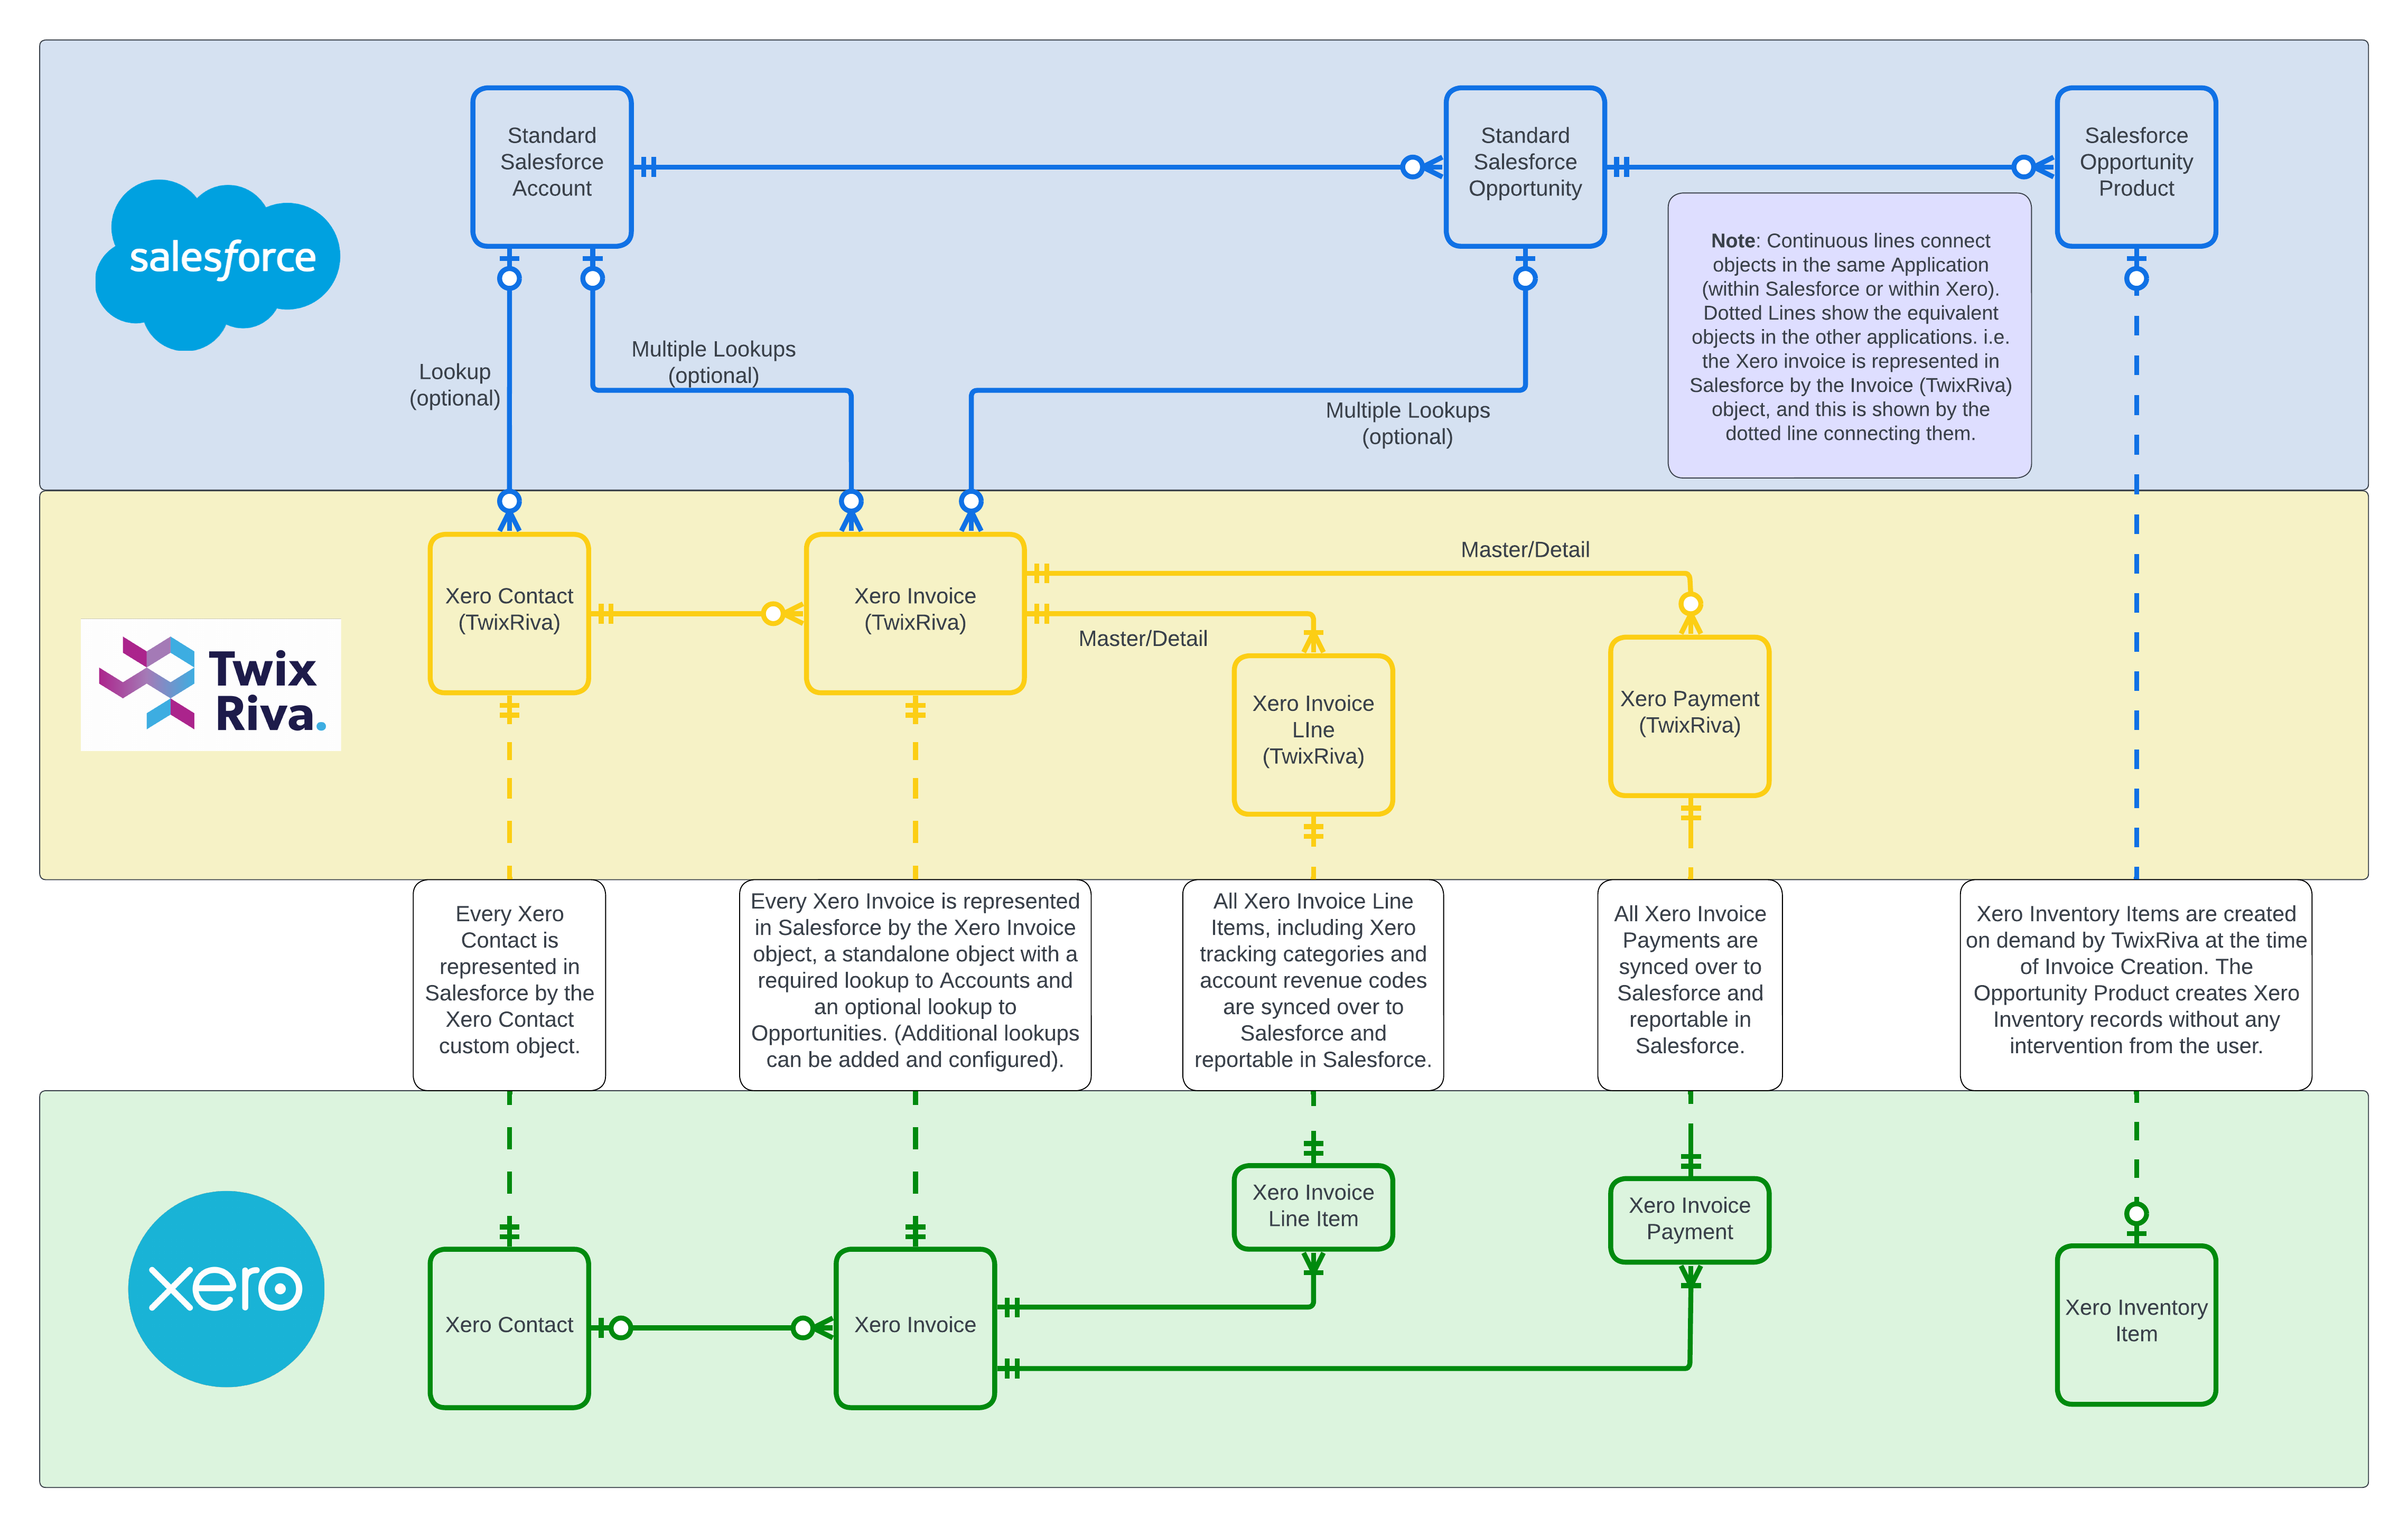
Entity Relationship Diagram for TwixRiva
Below is an Entity Relationship Diagram (ERD) to visualize the objects and data flow from Salesforce to Xero via TwixRiva.
TwixRiva – Install Package from AppExchange
- The initial step is to log onto the AppExchange and search for TwixRiva.
- Once in the listing TwixRiva – Xero integration with Salesforce, click on Get It Now.
- Follow the steps requested by the AppExchange.
- You can select ‘Install for Admins Only‘ to start with. You will be able to assign Permissions to others later on in the setup.
- After Installation, you will find it in the Installed Packages section.
TwixRiva – Package Configuration and Setup Guide
- After installing the TwixRiva app, Open the TwixRiva application in the App Launcher.
- Open the “TwixRiva Setup Assistant” tab, It will guide you through the various installation steps required by the app.
Step 1 – Post-Installation Script
- Click on the “Run post-installation script” button to execute this step.
- Once executed, the button will be greyed out.

Step 2 – Create the TwixRiva App in Xero
- Create the TwixRiva App in Xero: This step is required to ensure that Xero knows where the data needs to be sent.

- The following steps create the access keys to allow Salesforce to integrate with Xero. The user account that you use for this process will need to have Xero administrator access.
- Step 1: Log in to the Xero Developer site. (Use the same user credentials as logging in to Xero)
- Step 2: Click on the My Apps Tab, then the “New app” button.

- Set the following information for the new app.
- App Name – Any name to describe the Apps’s usage ( For Example “TwixRiva”)
- Web app – Standard Auth Code.
- Company or application URL – This is the OAuth 2.0 redirect URI Available in ‘TwixRiva Assistant Setup‘ – Step 2.
- Redirect URL – Same as above.
- Once complete, click on the “Create app” button.

- Step 3: On the Configuration page (below App details), copy the Client Id and record it for later.
- Generate a Client Secret, copy and record it also. This information will be entered in Salesforce in the next set of instructions. Click on the “Save” button.

Step 3 – Connect to Xero
- Switch back to Salesforce, and open the “TwixRiva Setup Assistant” Tab.
- On the page, start at “Connect to Xero” and enter the previously copied values for “Client Id” and “Client Secret” generated from the Xero Developer website.
- Click on the “Save OAuth Settings” button.
- Now, click on the “Connect to Xero” button.
- Upon successfully logging in, you will be asked to allow access, followed by connecting to Xero. You will get a pop-up saying you are now connected to a Xero Organization.

Step 4 – Enable TwixRiva Error Notifications
- Once enabled, the system administrator can configure an email alert for notification when a synchronization task generates an error.

Step 5 – Assign TwixRiva Permission sets
- Assign TwixRiva Permission sets to your needs.
- TwixRiva ReadOnly: Use this permission set if you want to provide view access only to Xero records in Salesforce.
- TwixRiva User: Use this permission set if you want to provide view, create, and edit access to Xero records in Salesforce.
- TwixRiva Administrator: Provide full rights on all TwixRiva settings and related objects.

Step 6 – TwixRiva Documentation
- TwixRiva allows to profile invoices, or automatically create Xero records based on Salesforce events.
- Do not hesitate to look at the various configuration examples available in your documentation.

Optional Configuration
Initial Synchronisation
- This page will allow you to store default settings when working with your Xero data.
- Click on the right of your Tenant and Select the “Initial Synchronization” option.

- Whether you change any settings or will do so later, hit “Save” to move to the final step.

- You can map your existing accounts from Xero by selecting the corresponding Salesforce account in the account look-up.
- When have mapped the accounts that you can reconcile, click “Next” to start the import process. (If you do not have any Xero contacts, it will say ‘No Xero Contacts retrieved‘ and you can click on the synchronized tab to finish the installation process)
- You will be presented with a summary of the import process, including the number of contacts and invoices imported.

Product Synchronisation
- If you need to synchronize Xero Items into Salesforce Products and vice-versa, click on the right of your Tenant and Select the “Product Synchronisation” option.

- Once activated, you will be requested to have a matching rule.
- Choose either Match products by Xero Item Name or Xero Item Code.

- Once saved, all products will be downloaded from Xero and mapped to Salesforce products by either Code or Name.
- All Salesforce products ticked ‘Synchronise to Xero‘ will be sent to Xero.
- A schedule will then keep all records synchronized on a 15-minute interval.
Purchase Order Synchronisation
- If you need to synchronize Xero Purchase Orders into Salesforce Products, click on the right of your Tenant and Select the “Purchase Order Synchronisation” option.

- Once activated, you will be able to define how many days back you wish to synchronize.

Generating new Invoices in Salesforce
- Creating Invoices in Salesforce is fairly simple, there are multiple ways to do the same.
- From the “Xero Invoices” Tab- under All Invoices List View Or any other View except the Recently Viewed List view, there are two separate buttons New Bill and New Sales Invoice.
- When You click on a “New Sales invoice” it brings up a pop-up window which is the same as the Invoice screen in Xero as shown below. This is where you can create a Sales Invoice for your customers.

Creating an Invoice from the Accounts
- Go to the “Accounts” tab.
- Choose the Account for which you want to create an invoice.
- Now, Go to the Xero field.
- Under Invoices, click the “New” button to initiate the invoice creation process.

- Here, Xero Contact will already be mapped, as we are creating the invoice from the account.
- Now, fill in the remaining invoice details and add the line items.
- Click on the “Save” button.

- An invoice will be generated simultaneously in both TwixRiva and Xero.
- You will find the invoice under the “Xero Invoices” tab.

Creating a new Invoice using the Opportunity Products
- TwixRiva doesn’t allow the creation of invoices from Opportunities products by default. To create invoices from Opportunities products, we have to configure the TwixRiva app manually.
- TwixRiva allows you to pre-fill your new Invoice using any of your Custom/Standard Salesforce objects. This essentially allows you to create Invoices from any Standard or Custom objects in Salesforce and to prefill the Invoice UI with the data mapping defined under the Xero Lookup Custom Metadata.
- This involves you identifying the source object and then creating a lookup relationship to that object from the Xero Invoice object, adding the related list for Xero Invoices to the source object page layout, and creating a button on the Xero Invoice object and adding that to the related list.
- This feature offers you the flexibility to be able to Create Invoices from any Salesforce object of your preference and prefill the Invoice UI with the data from the same source object.
- Step 1: Create a new record in the Xero Lookup Custom Metadata Types.
- Go to Setup> Custom Metadata Types> Xero Lookup> Manage Records>New.
- Fill in the following sections as shown below.

- It has three sections as depicted above:
- General Information: This is where you can specify the Label and name for the Xero Lookup Custom Metadata.
- Xero Header: This is where you can define the mapping for Source Object fields to prefill the Xero Invoice Object.
- Xero Lines: This is where you can define the mapping for the Invoice Lines. Here you can define the mapping to be from the Line Item object on the source object, so say if your source object is Opportunity, the Invoice Lines can come from the related Product object.
- So if you have created an Opportunity and added Products to it, when you define this mapping it will pull the Opportunity information to the Invoice record and all the listed product information to the Invoice Lines as per the mapping.
- Step 2: On the Xero Invoice object, create a custom Button
- Button to be:
- Display Type: List Button
- Behavior: Display in existing window without sidebar
- Content Source: URL
- Button Content: /lightning/cmp/CGCB__NewXeroInvoice?c__parentId={!Opportunity.Id}&c__type=ACCREC
- Where :
- c__parentId needs to be assigned with the Step 2 source object Id. I.e. {!Opportunity.Id} in the example above
- c__typw needs to be assigned with the Xero Invoice type: ACCREC for Client Invoice, ACCPAY for Supplier Invoice
- On your source object, display the new button in the related list.
- As a result, your invoice will be refilled with the object(s) data.

- Step 3: Creating a new Invoice using the Opportunity Products
- Go to the “Opportunity” tab to create a new invoice using the Opportunity products.
- Click on an existing Opportunity or create a new Opportunity. You can add the Products from the product section.
- If you don’t add products to the opportunity while creating an invoice, the invoice won’t be pre-populated with opportunity products. Since there are no Opportunity Products on this Opportunity, you will need to add a Product/Service for each line item later.
- Click on the Xero Invoices >> New Xero Invoice.

- As shown in the screenshot below, the invoice will be pre-filled with the corresponding Products.
- Products added in the opportunity will appear under Invoice Lines. Additionally, you can add more line items if needed.
- Click on the “Save” button to generate a new invoice.

- An invoice will be created.
- An invoice will be generated simultaneously in both TwixRiva and Xero.

- You will find the invoice under the “Xero Invoices” tab.

Frequently Asked Questions (FAQs)
TwixRiva is a software application within the Salesforce ecosystem that facilitates integration between Xero, an accounting platform, and Salesforce, a customer relationship management (CRM) system. This application functions as a connector, enabling businesses to synchronize data between Xero and Salesforce without manual intervention. The primary goal of this integration is to improve the efficiency of data management processes, providing Salesforce users with a unified and current perspective of financial interactions.
What types of data does TwixRiva synchronize?
TwixRiva synchronizes various financial data, including invoices, payments, and customer details, between Xero and Salesforce.
Does TwixRiva allow Bi-Directional Sync?
Yes, TwixRiva enables data flow between Xero and your systems in both directions, ensuring consistency.
Can I email an Invoice to Customers using TwixRiva?
Yes, you can do it by downloading the Invoice to your system and sending it through your native email methods.