QB Sync Made Easy: Integrate QuickBooks and Salesforce

Table Of Content
Overview
The QB Sync Made Easy guide is a comprehensive resource crafted to assist users in the installation, configuration, and effective utilization of this financial integration tool. Designed to simplify the integration between QuickBooks and Salesforce, the guide aims to help users with a step-by-step walkthrough of the entire process.
Video Guide for QB Sync Made Easy
Here is a video guide demonstrating the setup and generation of invoices from Accounts and Opportunity Products in QB Sync Made Easy.
Entity Relationship Diagram for QB Sync Made Easy
Below is an Entity Relationship Diagram (ERD) to visualize the objects and data flow from Salesforce to QuickBooks via QB Sync Made Easy.
Installation
- Navigate to AppExchange and search for QB Sync Made Easy.
- Click on the Get it Now button to initiate the installation process.

- Follow the instructions from AppExchange and grant the necessary permissions to complete the installation of QB Sync Made Easy.
Configuration
Step 1 – Permission Sets for QB Sync Made Easy.
- Before commencing the configuration process, it is necessary to enable the corresponding permission sets provided by QB Sync Made Easy which will be important in the later stage in the setup section of the guide for adding custom buttons to help sync Salesforce Data to QuickBooks Online.
- To do this, navigate to your Salesforce Setup and search for Users.

- Click on your Alias which has been associated with the profile of System Administrator.

- Navigate to Permission Assignments and, then click on Edit Permission Assignments.
- Search for QbMadeEasy Admin User and add it to the Enabled Permission Sets.
- Search for QbMadeEasy Business User and add it to the Enabled Permission Sets.
- After completing the process, click on Save to preserve all your changes.

Step 2 – Setting up QB Sync Made Easy
- Navigate to the App Launcher and search for QB Sync Made Easy.
- First, go to the QB Setup Tab, and then proceed to click on Connect with QuickBooks Online for establishing a connection between your QuickBooks company and Salesforce.

- You will encounter a prompt to choose between a Sandbox or Production . Click on the environment where your QuickBooks Company exists
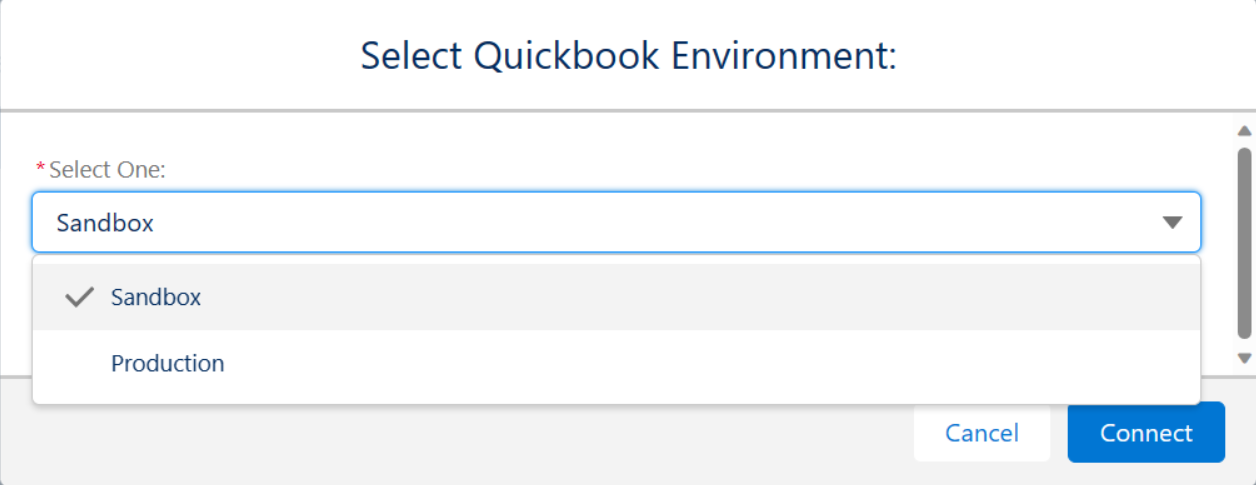
- Upon selecting Connect, you will be redirected to authorize QB Sync Made Easy to establish a connection between QuickBooks Online and Salesforce.
- Subsequently, you will be directed to the QuickBooks Online login page. If you are already logged in, you will then be redirected to a confirmation page, finalizing the connection between QuickBooks Online and Salesforce.
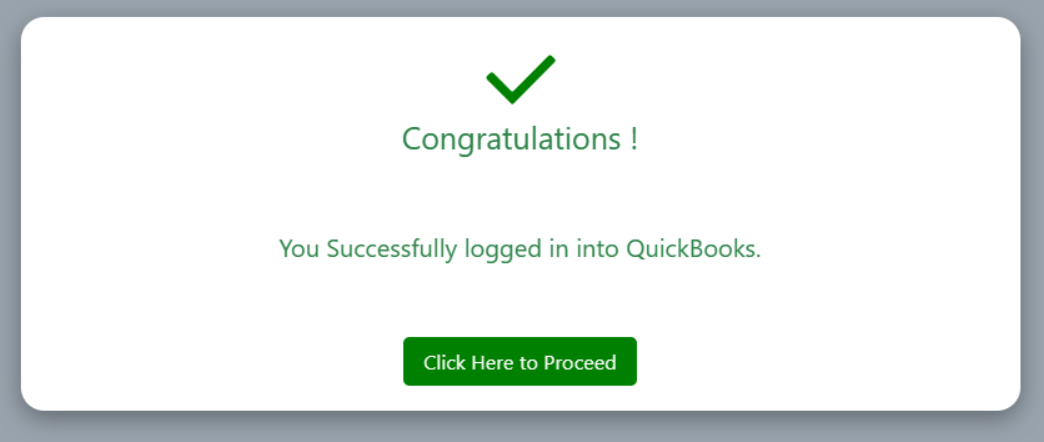
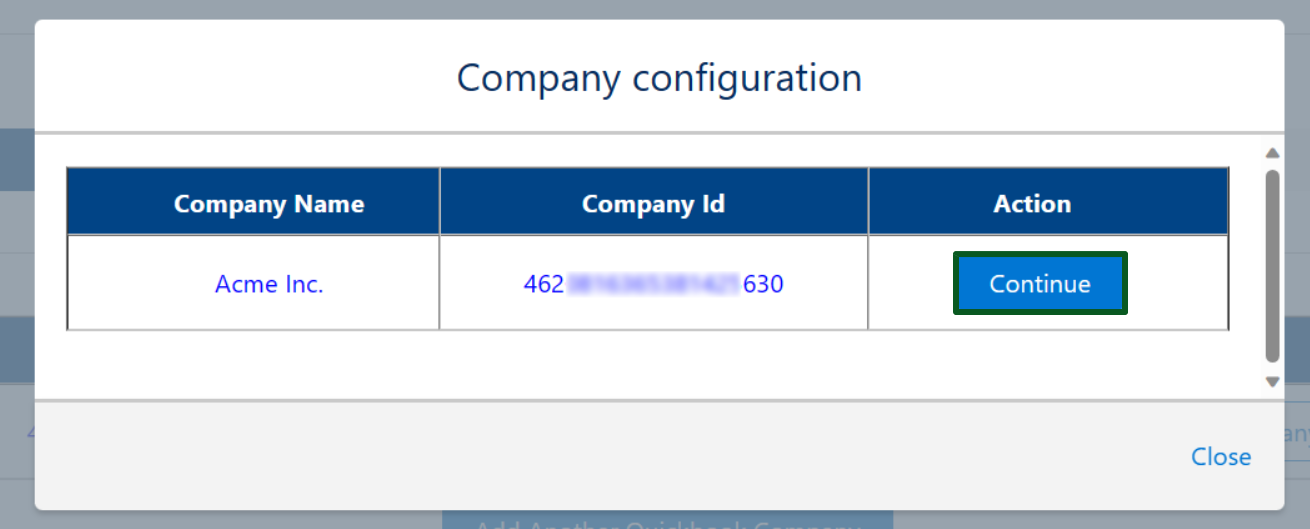
- After clicking on Proceed, you will be redirected to the QB Setup Tab, displaying the QuickBooks Company Name that already exists in the specified QuickBooks Environment you have chosen and click on Continue.
- It is entirely optional to enter your email address to receive a notification about the completion of the historical sync between QuickBooks Online and Salesforce. Following this, click on Save and Go to Next Page and proceed to the next page.

- Following that, you will be redirected to the Object and Fields Setup page. Click and select QuickBooks Online to Salesforce from the dropdown box to add object mapping from QuickBooks Online to Salesforce

- You have the option Switch To Default Mappings by clicking the button, changing it from No to Yes as shown below. QB Sync Made Easy will then automatically map the Quickbook objects to Salesforce Objects for you.

- Alternatively, you can create your own mapping by clicking on the Add button, connecting any Salesforce Object to a Quickbook object as shown below.

NOTE: The chosen mappings will only be applied to the specified mapping order. For instance, if you make changes to the QuickBooks Online to Salesforce Mapping, please be aware that the mappings for Salesforce to QuickBooks Online will remain unaffected by the changes made.
- After adding all your mappings from QuickBooks Online to Salesforce, click on either Save and Sync to save all your mappings and synchronize all pre-existing QuickBooks records into Salesforce. Alternatively, you can choose Save All to save all the mappings from QuickBooks Online to Salesforce without initiating the syncing process.

- After clicking on Save and Sync, you will be redirected to the Historic Sync Progress Bar, providing details on the completion of the synchronization process. It will show the number of QuickBooks Customers synced with Salesforce accounts, the count of QuickBooks items synced to Salesforce Products, and the quantity of QuickBooks Estimates synchronized to Salesforce Opportunities.
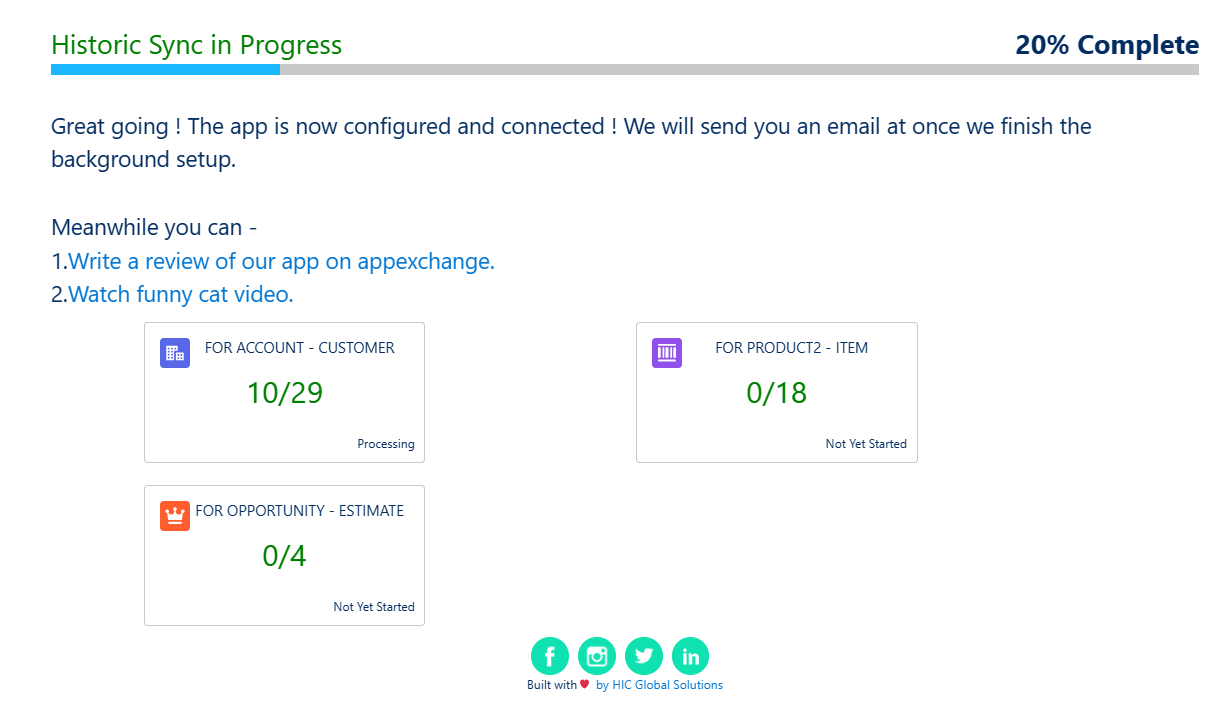
- While the historical sync is in progress, you can initiate the process of adding object mappings from Salesforce to QuickBooks. Click on Object and Field Setup.
- Click and select Salesforce to QuickBooks Online Mapping from the dropdown box to add object mapping from Salesforce to QuickBooks Online.
- You have the option Switch To Default Mappings by clicking the button, changing it from No to Yes as shown below. QB Sync Made Easy will then automatically map the Salesforce objects to QuickBook objects for you.
- Alternatively, you can create your own mapping by clicking on the Add button, connecting any Salesforce Object to a QuickBook object as shown below.

- Click on Save All to save all the mappings from Salesforce to QuickBooks Online
Step 3 – Adding Custom Buttons to Account Page
- Navigate to any Salesforce Account to access the Account Page.
- Click on the gear icon in the top right corner and select Edit Page, you will be redirected to the Lightning App Builder Page.

- Scroll down to the Custom section under Components.
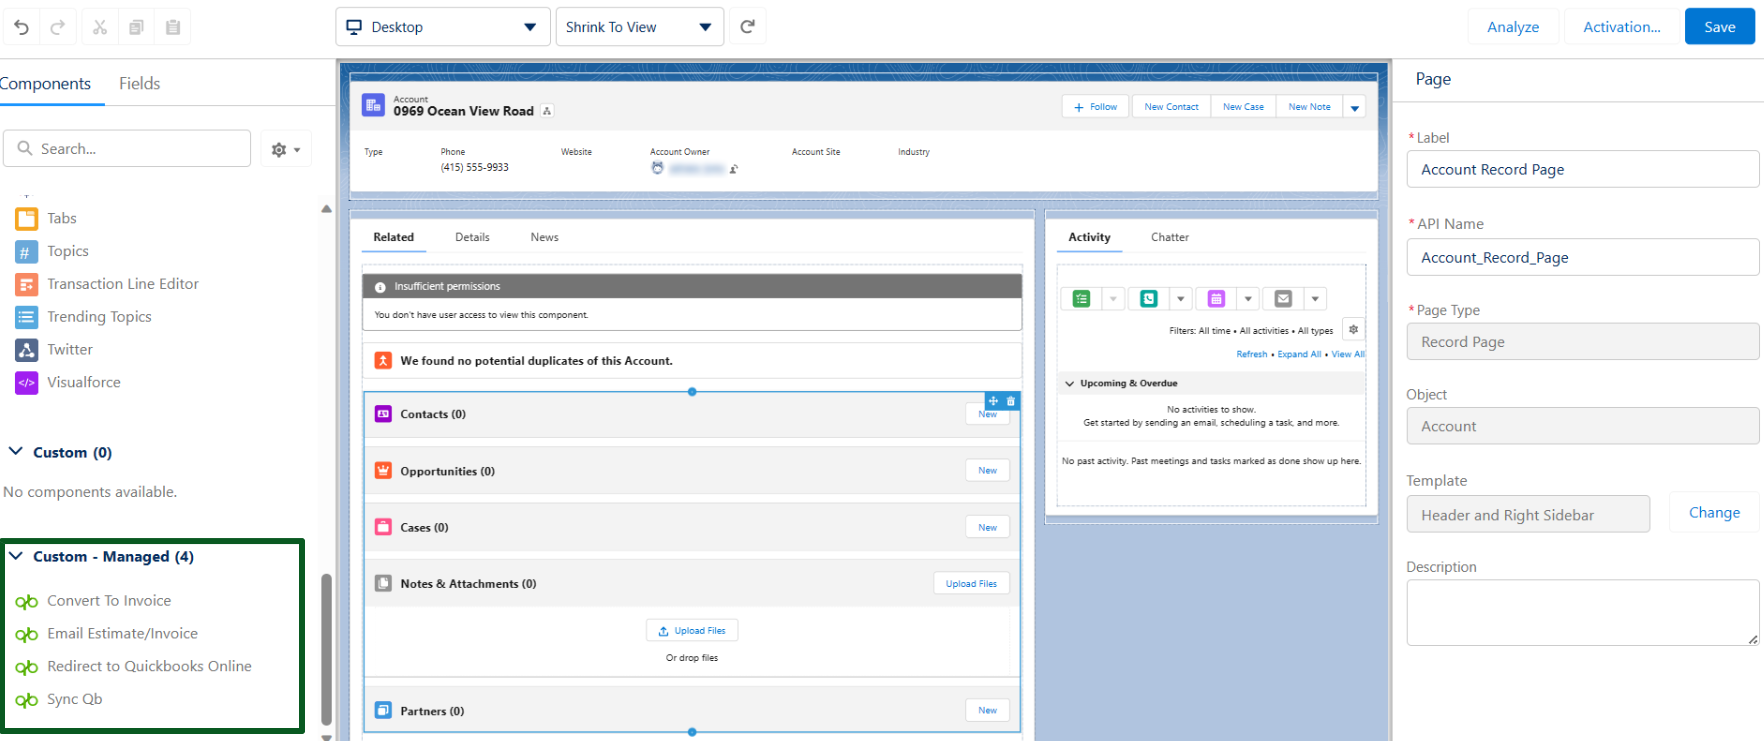
- Custom Button Convert to Invoice is used for converting an opportunity, which already has an estimate linked to it, into an invoice in QuickBooks.
- Custom Button Sync Qb is used for syncing Salesforce Account Data to QuickBooks Online.
- Custom Button Email Estimate/Invoice is used for emailing the Invoice.
- Custom Button Redirect to Quickbooks Online is used for redirecting the user to the associated Salesforce objects in Quickbooks.
- Drag the appropriate custom buttons according to your requirements and place them in a location that is easily accessible to you.
- Under Page > Sync Qb, choose your QuickBooks Company under QuickBooks Company to Sync With.
- Choose QuickBooks Entity to Sync With as Estimate, to sync Account as Customer.

- Click on Save to save all the changes made to the page.
- Activate it by clicking the Activation button in the top right corner of the Lightning Builder App, then proceed to click on Assign as Org Default.
- Select the form factor for which you want your Org Default page to be available (Desktop/Phone/Desktop and Phone). Click Next, and you will be redirected to the Review Assignment Page. Finally, click on Save and exit in the Lightning App Builder.
Step 4 – Adding Custom Buttons to the Opportunities Page.
- Navigate to any Salesforce Opportunity to access the Opportunity Page.
- Click on the gear icon in the top right corner and select Edit Page, you will be redirected to the Lightning App Builder Page.
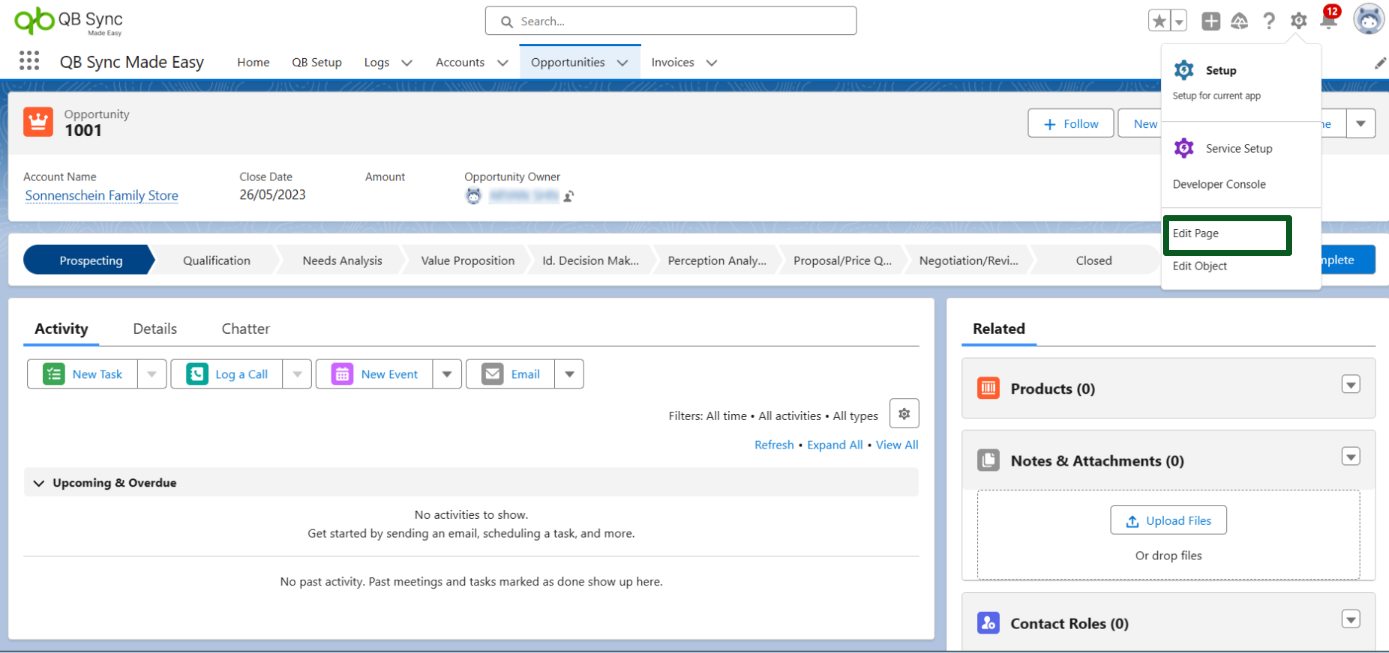
- Scroll down to the Custom section under Components.

- Drag the appropriate custom buttons according to your requirements and place them in a location that is easily accessible to you.
- Under Page > Sync Qb, choose your QuickBooks Company under QuickBooks Company to Sync With.
- Choose QuickBooks Entity to Sync With as Estimate, to sync opportunity as an Estimate.
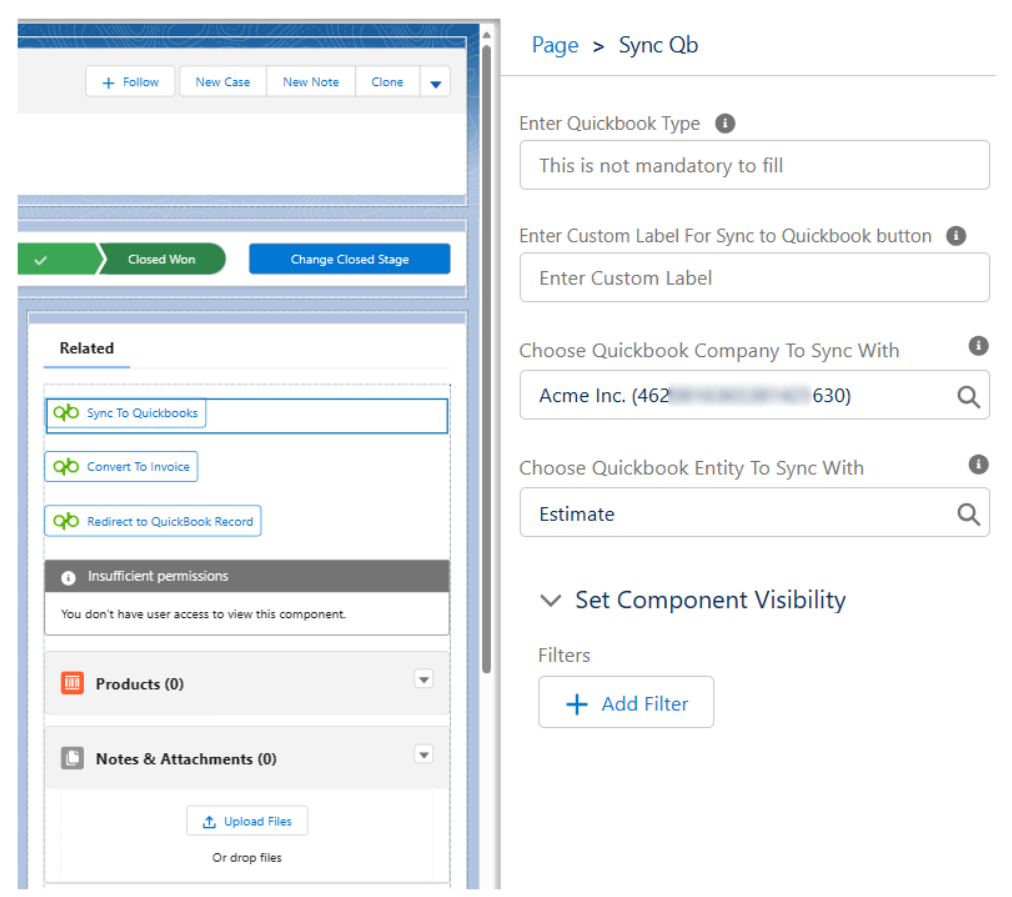
- Click on Save to save all the changes made to the page.
- Activate it by clicking the Activation button in the top right corner of the Lightning Builder App, then proceed to click on Assign as Org Default.
- Select the form factors for which you want your Org Default page to be available (Desktop/Phone/Desktop and Phone). Click Next, and you will be redirected to the Review Assignment Page. Finally, click on Save and exit in the Lightning App Builder.
Implementation
Syncing Salesforce Accounts as QuickBooks Customers
- Visit any Account, and click on Sync to QuickBooks to synchronize the Salesforce Account as QuickBooks Customer in QuickBooks Online.
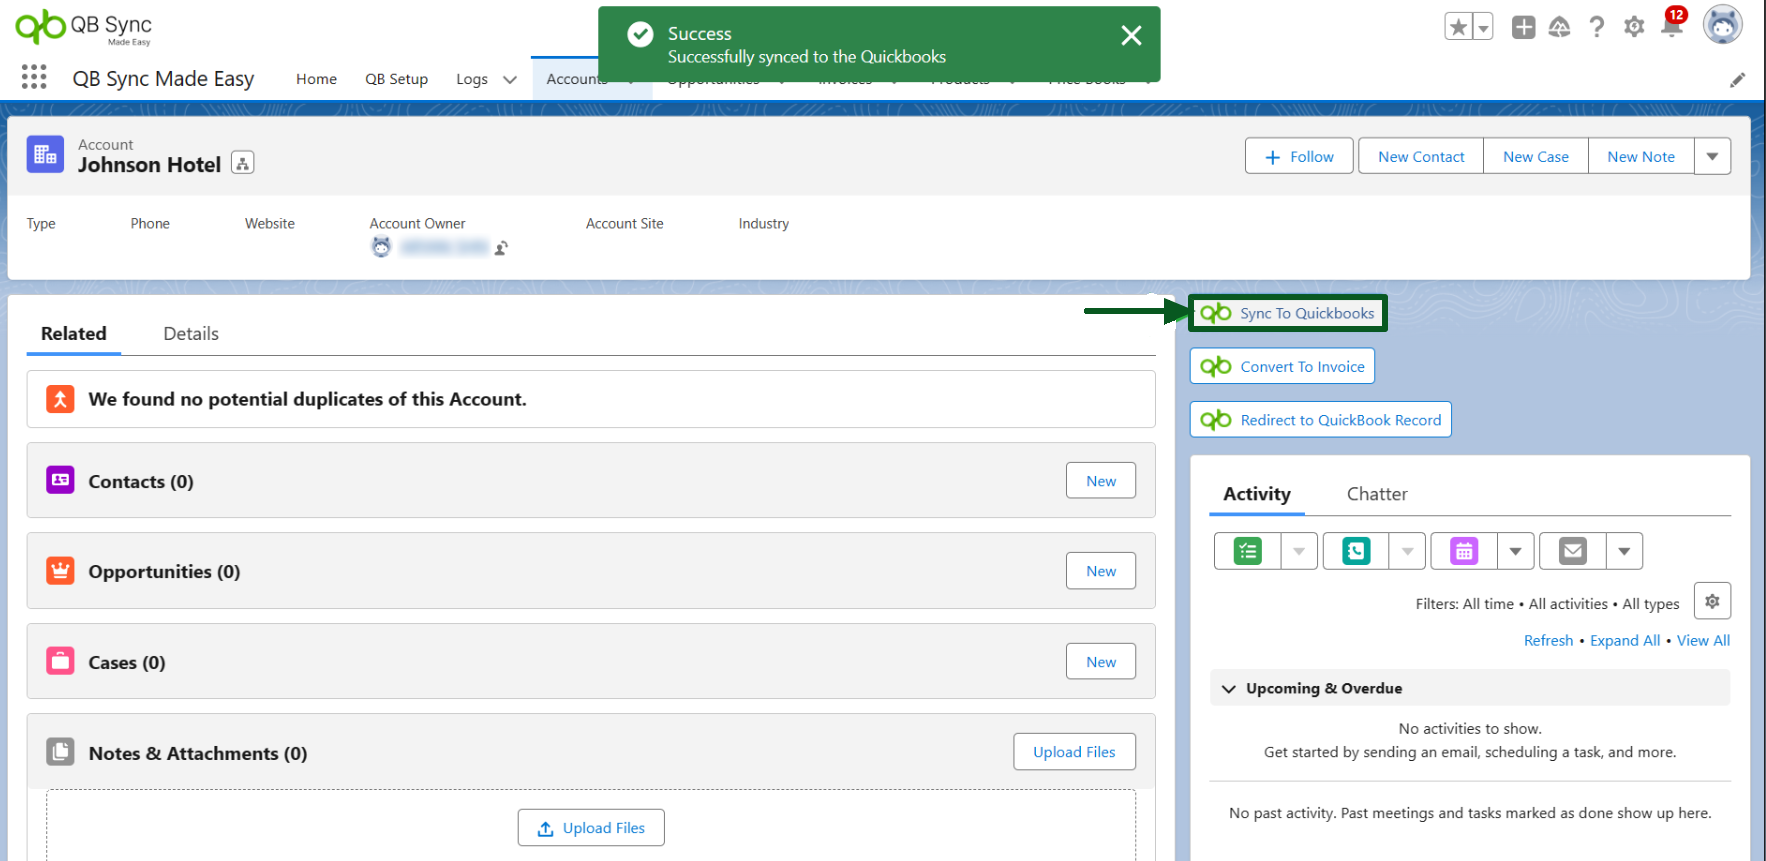
- Navigate to your QuickBooks Company, go to Customers, and you will find your Salesforce Account listed as a QuickBooks Customer.
- Click on Redirect to QuickBook Record, to be redirected to Quickbooks Online to see your Account as Customer.
Generating a New Invoice from Opportunity Products
- Select an Opportunity where products have already been added to it.
- Now, Click on the Sync To Quickbooks button to sync the estimates in QuickBooks.
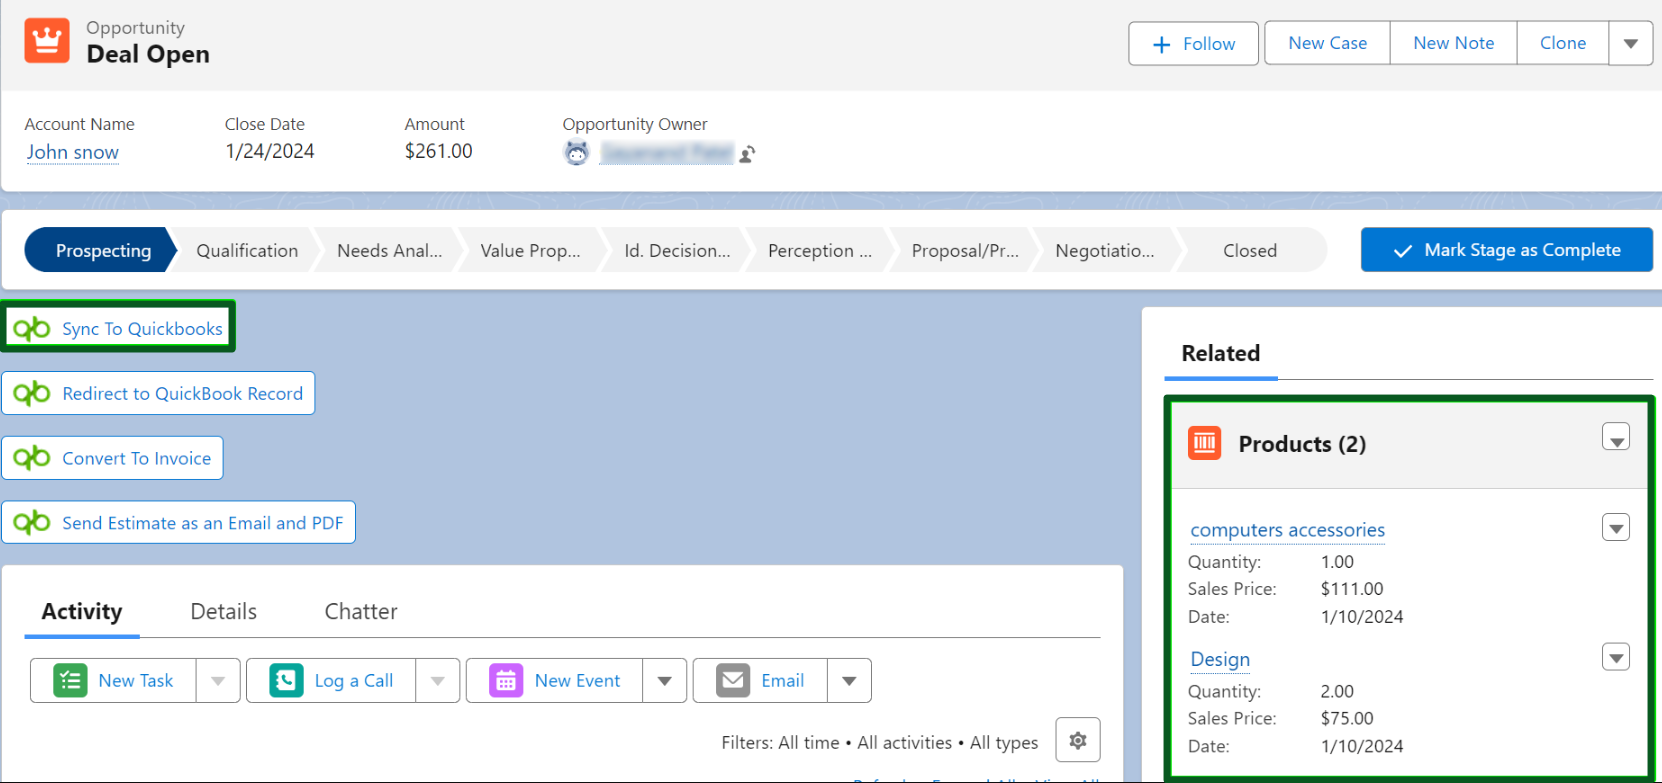
Note: In Object and Fields setup, we are saving estimates as an opportunity, so estimates will be created from opportunities.
- After generating estimates in QuickBooks, it will display the message Successfully synced to QuickBooks.
- Click on the Convert To Invoice button.

- An invoice will be created.
- You will find the QuickBooks invoices under the Invoices tab.

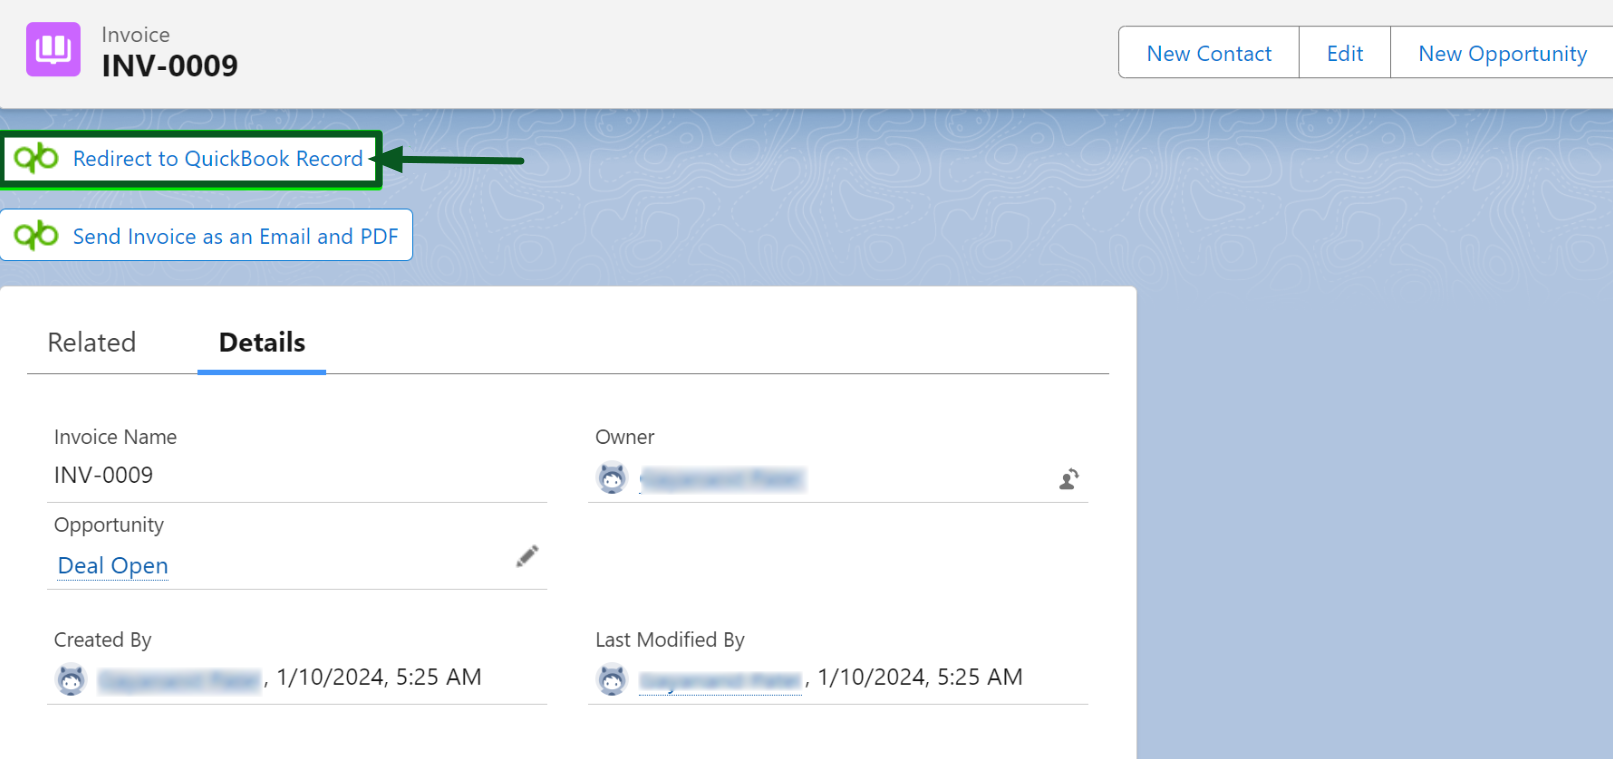
- Under the Invoices tab, click on the invoice to view it.
- Now, click on the Redirect to QuickBook Record button to view the generated invoice in QuickBooks.
Frequently Asked Questions (FAQs)
Can I customize the data fields that QB Sync Made Easy synchronizes between Salesforce and QuickBooks?
Yes, QB Sync Made Easy assists in dynamically mapping data fields, enabling you to customize the integration according to your specific business needs.
Does QB Sync Made Easy Support for Multiple QB Environments?
Yes, QB Sync Made Easy allows you to manage integration with multiple QuickBooks environments, providing enhanced flexibility.
Can I monitor the synchronization process in QB Sync Made Easy? Are there logs or reports available for tracking synced data?
Yes, QB Sync Made Easy has a tab of logs that provides insights into the synchronization process. Users can track synced data, and view sync history.

