Breadwinner: Integration for Quickbooks and Salesforce

Table Of Content
Overview
Breadwinner for QuickBooks is a Salesforce app designed to streamline integration between Salesforce CRM and QuickBooks Online accounting software. This tool minimizes manual data entry, emphasizing the importance of connecting financial platforms with Salesforce, by facilitating data transfers that ensures timely updates of customer information, opportunities, and invoices, and promoting efficient collaboration between sales and finance departments.
Video Guide for Breadwinner
Here is a video guide demonstrating the setup and generation of invoices from Accounts and Opportunity Products in Breadwinner for QuickBooks.
Entity Relationship Diagram for Breadwinner
Below is an Entity Relationship Diagram (ERD) to visualize the objects and data flow from Salesforce to QuickBooks via Breadwinner.
Installation
- Please navigate to the AppExchange, search for QuickBooks Integration with Salesforce – Breadwinner for QuickBooks, and click on Get it Now to begin the installation process.

- Follow the steps requested by AppExchange to install.
- After installation, determine which users can access it based on your specific requirements and grant all the third-party permissions for Breadwinner.
Note: Breadwinner offers a 14-day free trial that includes all the features such as Report on Invoices, Line Items and Payment data in Salesforce, Create Invoices from Opportunities & Orders with Products as Line Items provided in the Breadwinner Professional Plan. After the trial period concludes, Breadwinner provides a free plan with limited features
- Access Breadwinner through the App Launcher, and then proceed to navigate to the Breadwinner Tab.
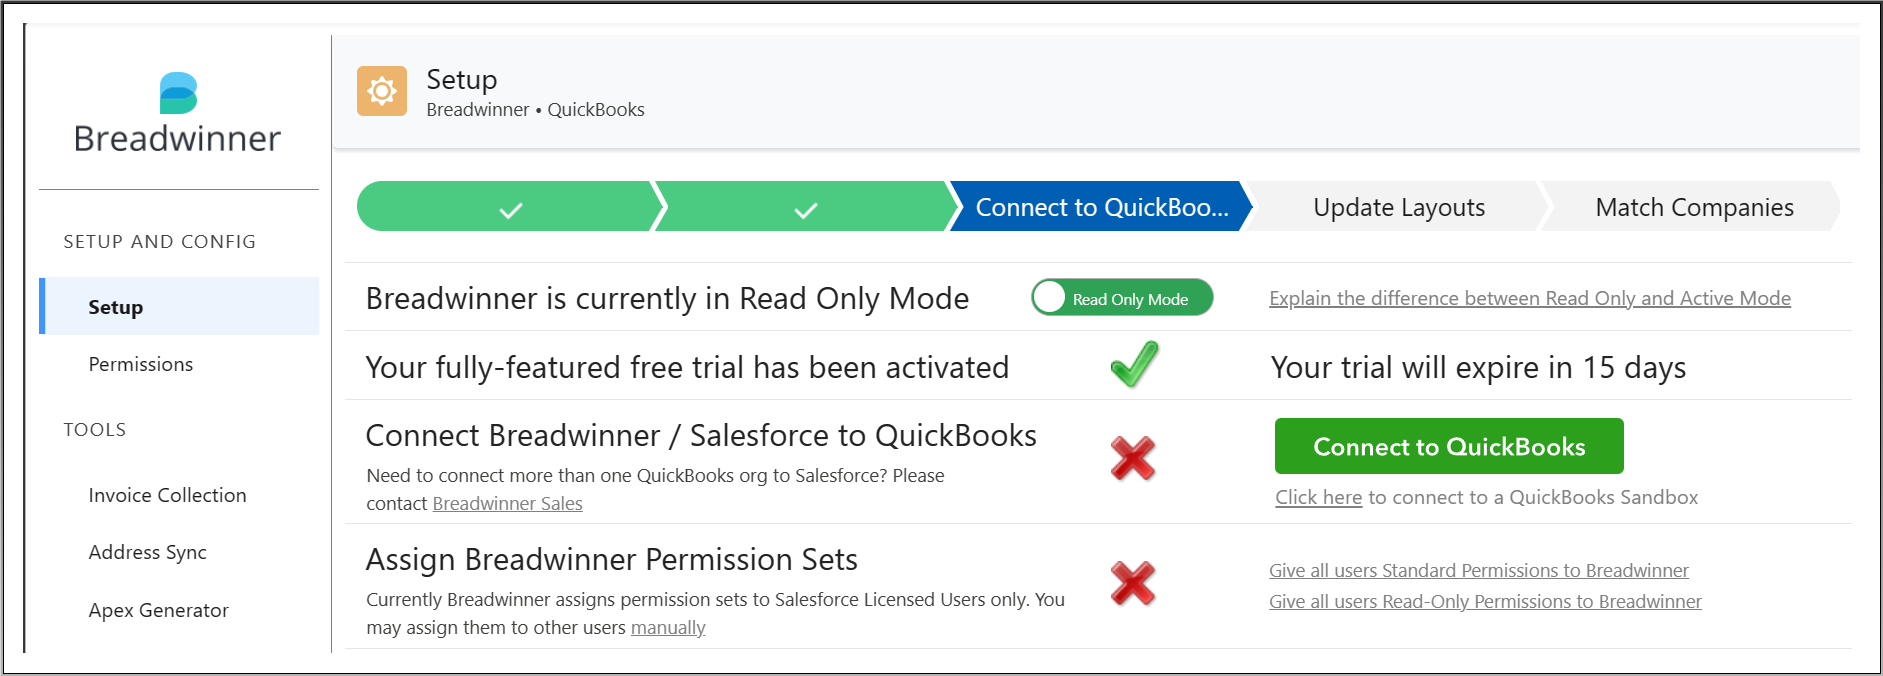
Step 1 – Deciding between Read-Only Mode and Active Mode
- The initial configuration option involves selecting the mode in which you want Breadwinner to operate. There are two available modes:
- In Read-Only Mode, Breadwinner restricts any modifications to QuickBooks. This includes preventing the creation of new invoices from Salesforce to QuickBooks, disallowing the creation of companies on QuickBooks, and restricting the editing of QuickBooks customers.
- In Active Mode, Breadwinner allows modifications to QuickBooks. This includes allowing the creation of new invoices from Salesforce to QuickBooks, allowing the creation of companies on QuickBooks, and even editing QuickBooks customers.
- Select the mode that aligns best with your specific requirements.
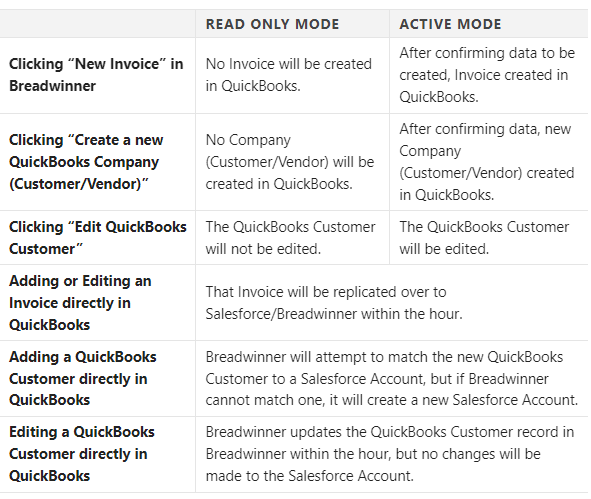
Step 2 – Connecting Salesforce to QuickBooks
- The second configuration option involves connecting your QuickBooks to Salesforce:
- Click on the Connect to QuickBooks button to allow Breadwinner to establish a connection between Salesforce and your QuickBooks Org in the Production Environment.
- Click on the Click here to connect to QuickBooks Sandbox button to allow Breadwinner to establish a connection between your Salesforce Org and your QuickBooks Org in the Sandbox Environment.

Step 3 – Assigning Breadwinner Permission Sets
- The third configuration option involves assigning Breadwinner Permission Sets to all users, with the choice between Standard Permission and Read-Only Permission. Alternatively, you can manually assign specific users with the Permission Sets in Breadwinner.

Step 4 – Matching QuickBooks Company Details to Salesforce Accounts
- The fourth configuration option includes updating Account and Opportunity Page Layouts with Breadwinner making the necessary changes to help users make QuickBooks Invoices with a new layout.
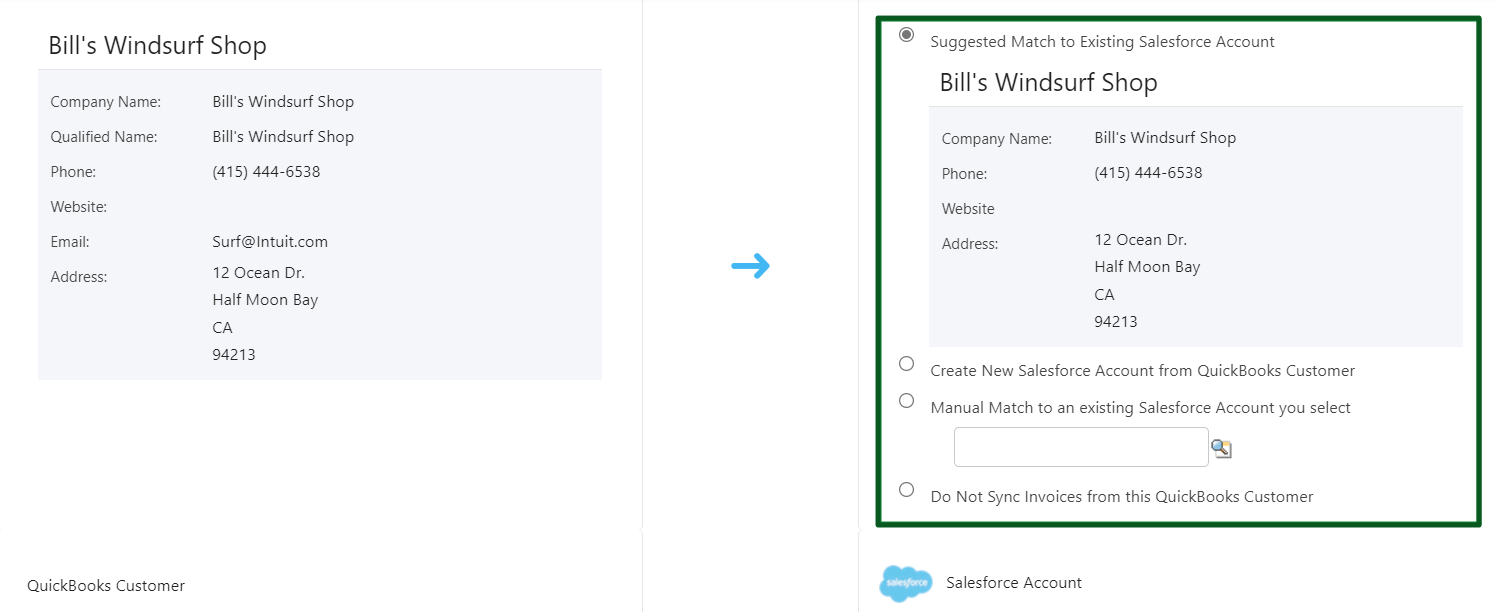
- The fifth configuration option involves matching your Salesforce Accounts to QuickBooks Companies by clicking on Preview Customer Match.

- Breadwinner gathers all the QuickBooks Company Details and searches for matches in Salesforce accounts based on customer name, company name, phone, and address.
- If there are no matches with the auto-match, then you can choose from the three options:
- You can create a new Salesforce Account, which will be automatically generated by Breadwinner, filling in all the details using QuickBooks Customer details.
- You can manually map it to existing Salesforce Accounts that do not have similar details with QuickBooks Customers.
- You can choose not to match with a Salesforce Account.
Generating new Invoices from the Account
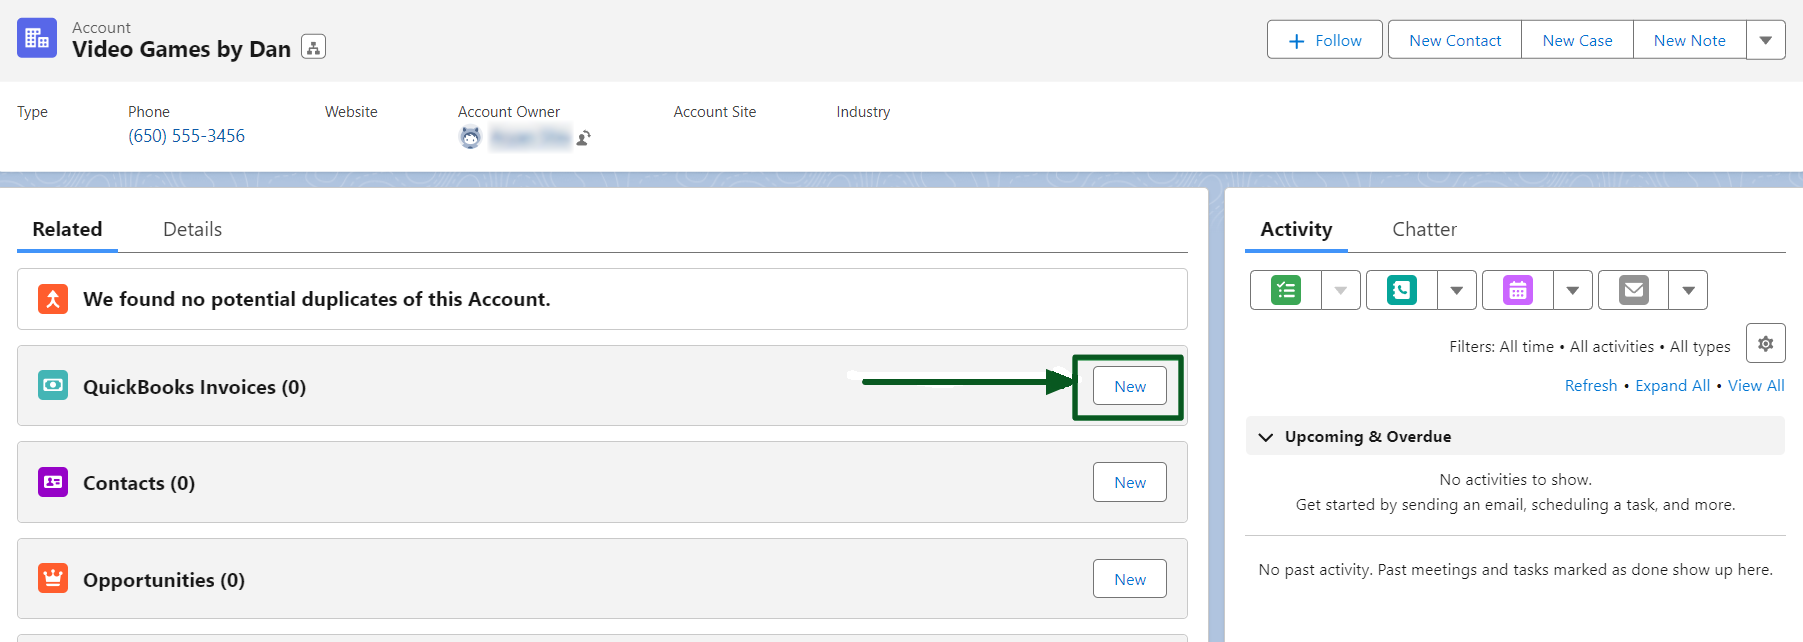
- Navigate to your Salesforce Account.
- Click on New in the QuickBooks Invoices section.
-
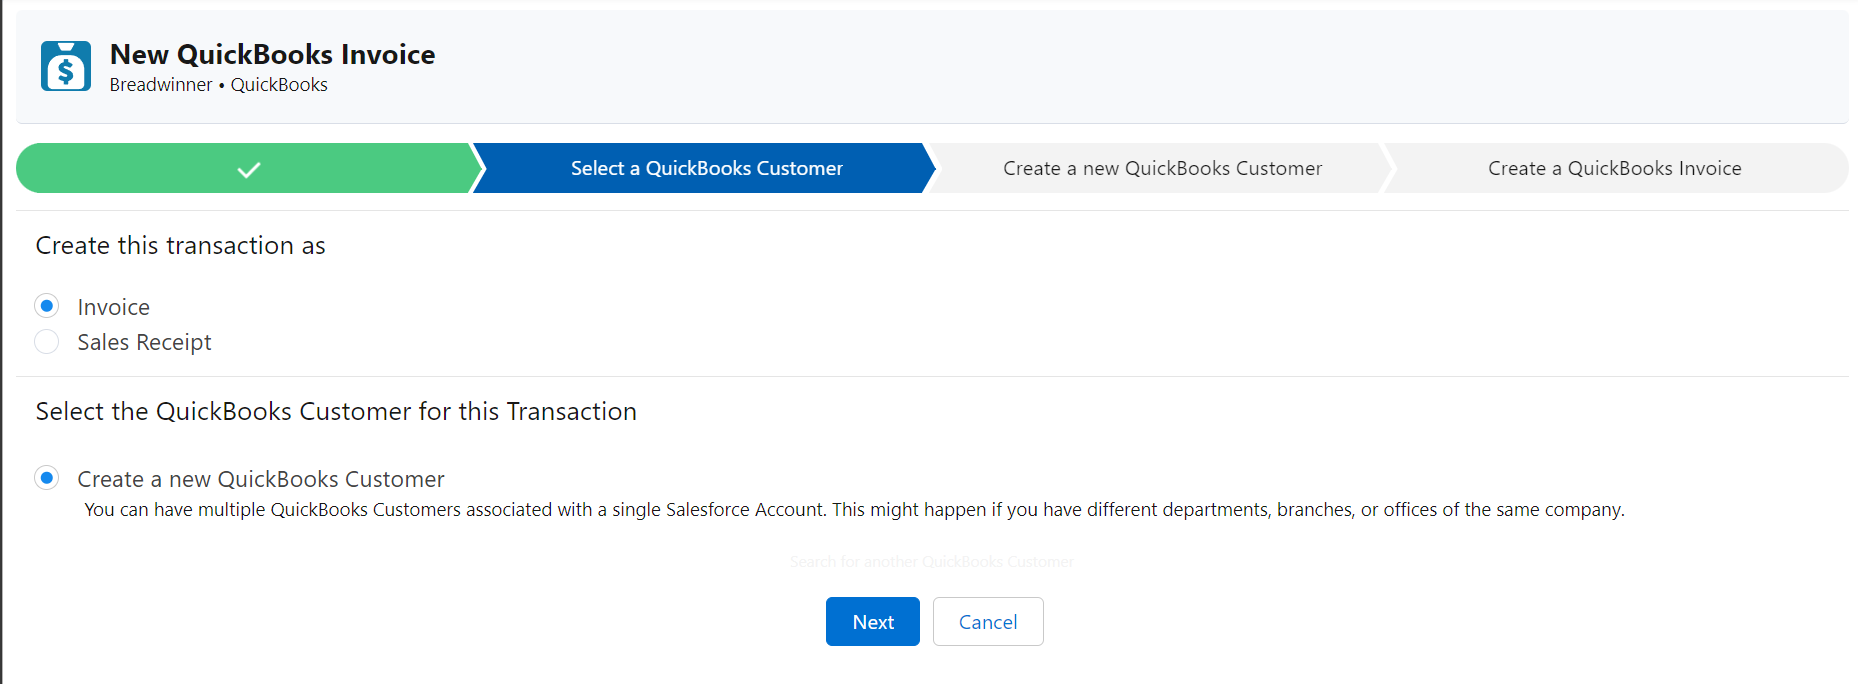
The transaction is automatically set as an Invoice by default.
-
A new QuickBooks Customer is generated for the Salesforce Account in the absence of any existing association between a QuickBooks customer and the Salesforce Account. If a QuickBooks Customer already exists, you have the option to associate it with the corresponding Salesforce Account.
-
You can associate multiple QuickBooks Customers with a single Salesforce Account. This scenario may arise when managing different departments, branches, or offices within the same company.
- Click on Next to proceed.
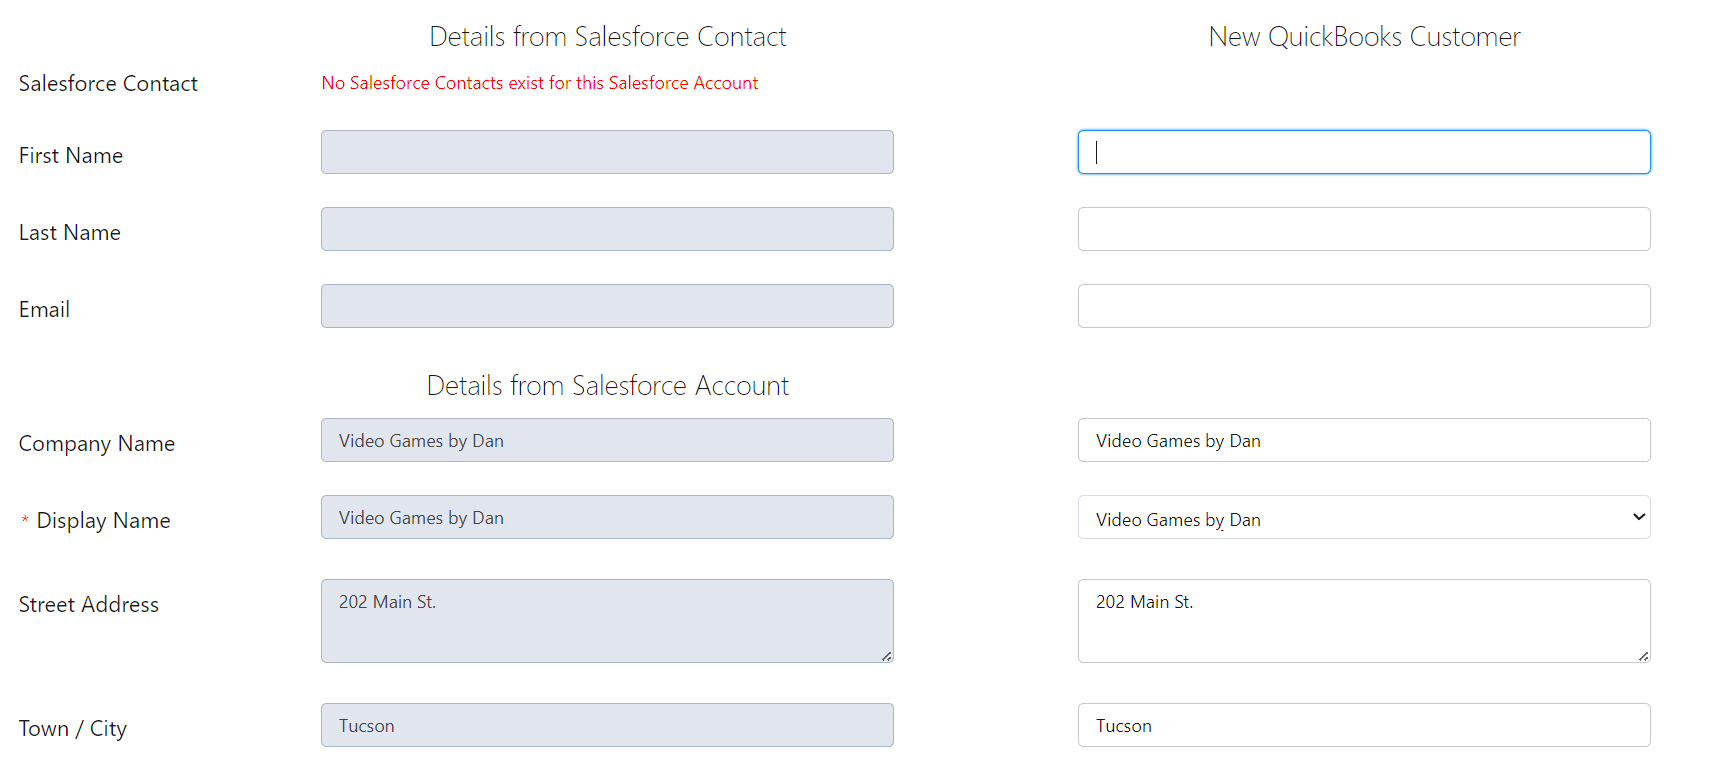
- Breadwinner automatically maps all Salesforce Account details and Salesforce Contact details to QuickBooks. You also have the option to manually edit the details that will be displayed in QuickBooks Customer.
- Scroll down to the bottom and click on Create QuickBooks Customer.
- In the Invoice Details Section, you can manually edit the auto-mapped fields as per your requirement. In the Invoice Details Section, you can manually edit the auto-mapped fields as per your requirement

- Breadwinner automatically maps the Billing Details. Alternatively, you can manually edit the changes.

- In the Product/Service section, you can only fill the fields with QuickBooks Items that already exist in Salesforce as Salesforce Products.
- Breadwinner automatically populates the Description, Account(Income Account), Quantity, Rate, Amount, and Tax fields using QuickBooks Item information.
- You have the flexibility to manually edit the Quantity and Rate fields according to your specific requirements.
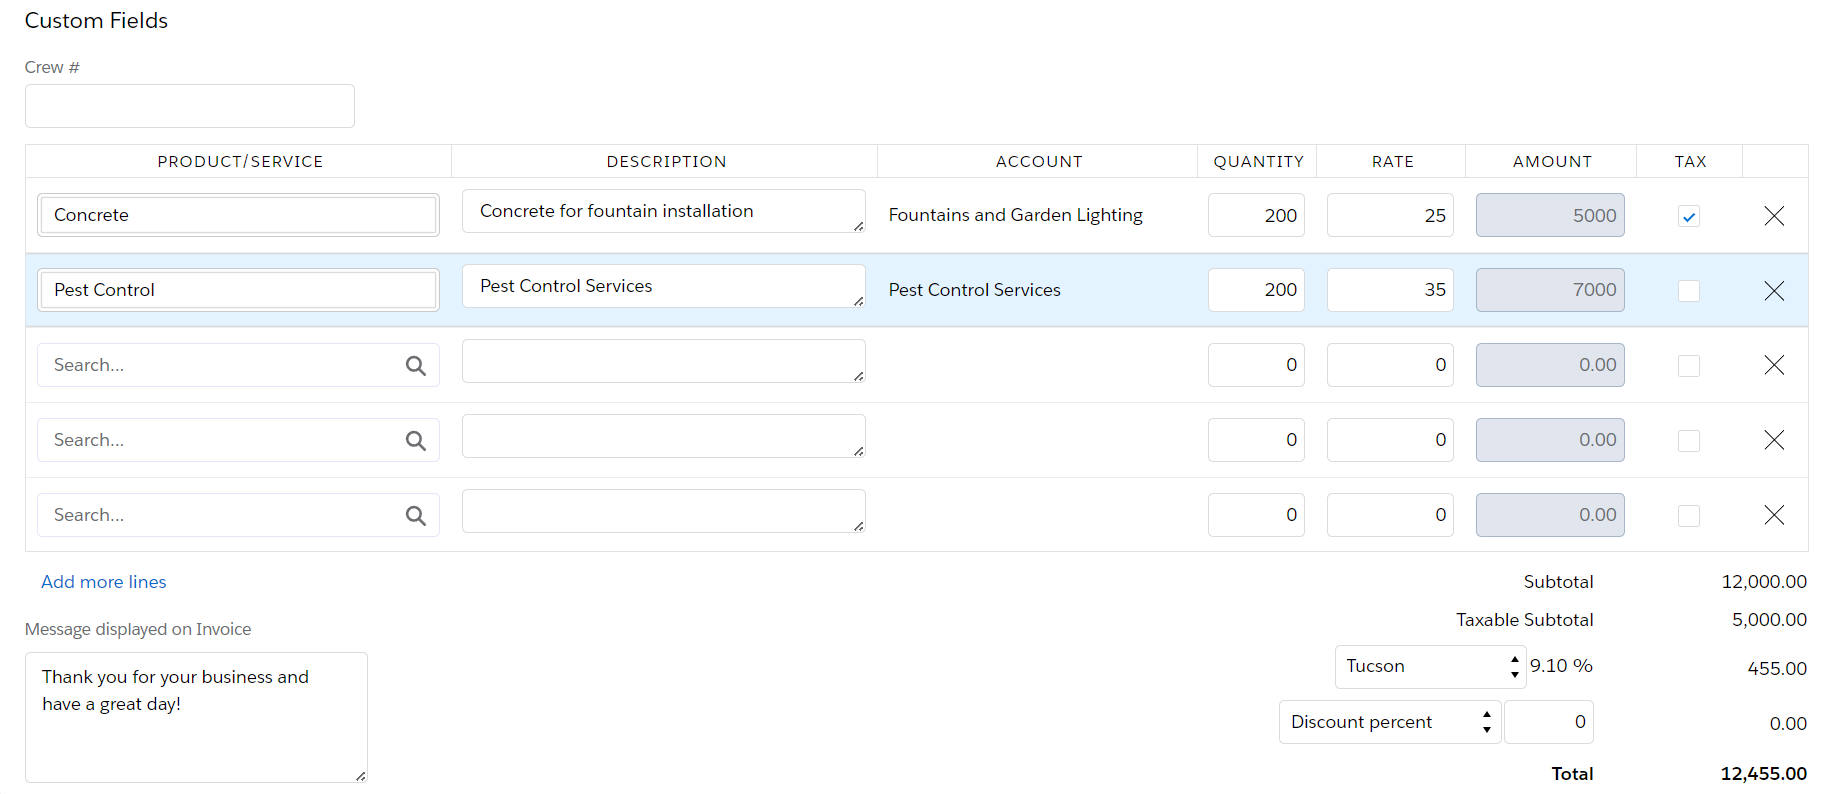
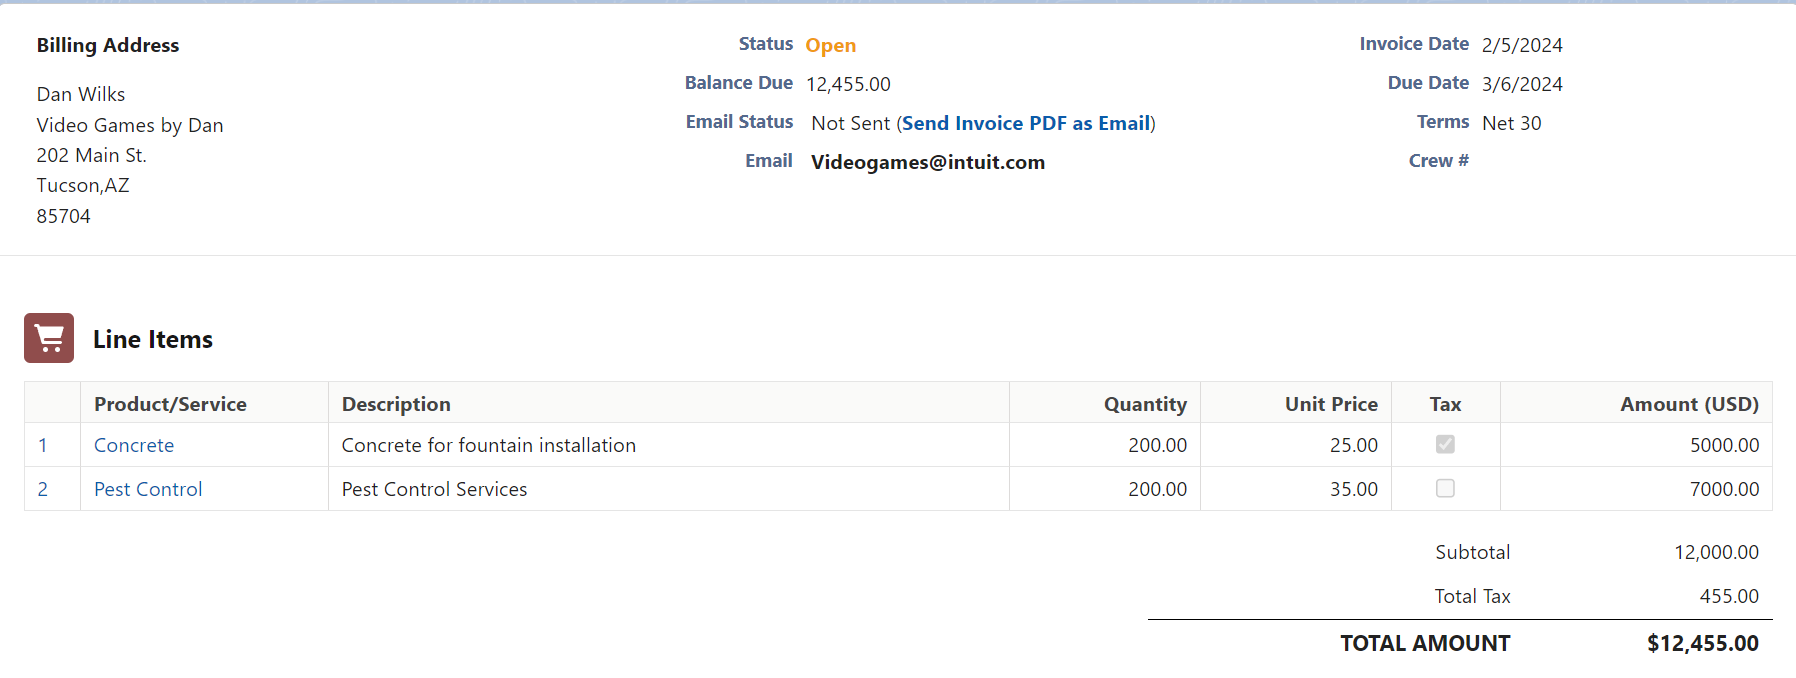
- Scroll down to the bottom and click on Create Invoices in QuickBooks. Breadwinner will redirect you to the generated invoice, providing the link to the invoice on QuickBooks in the Invoice Information section.
Generating Invoices with Opportunity Products
- Navigate to your Salesforce Opportunity with Opportunity Products.
- Click on New in the QuickBooks Invoices section.
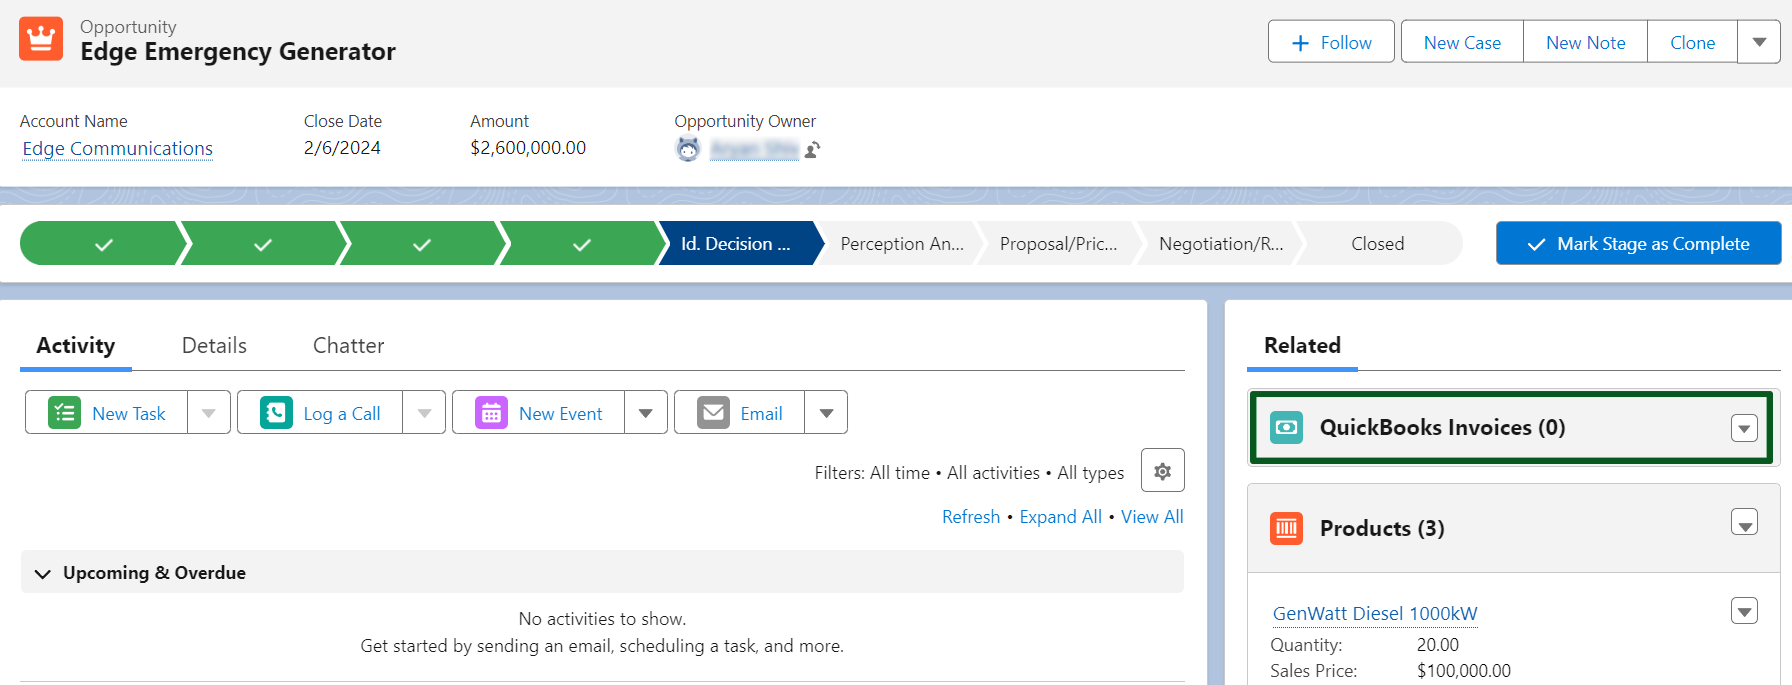
- Select Pre-Populate Invoice with Opportunity Products.
- Create this transaction as an Invoice.
- By default, Breadwinner selects an existing QuickBooks Customer associated with the Salesforce Account. If there is no existing association, you have the option to create a new QuickBooks Customer for the Salesforce Account.

- In this process, you must either select an existing QuickBooks item that matches with the Opportunity Products, or you can create a new QuickBooks item to link with, but you need to specify the Income Account and the type of item associated with it.
- Fill in all the Inventory Item details, as it is mandatory to have these fields filled.
Note: The type of item is categorized as:
- Inventory items are represented as products that your business buys or sells, and track in quantities
- Non-inventory items are represented as products that your business buys or sells but don’t need to track in quantities.
-

- In the Invoice Details Section, you can manually edit the auto-mapped fields as per your requirements.

- Breadwinner automatically maps the Billing Details. Alternatively, you can manually edit the changes.

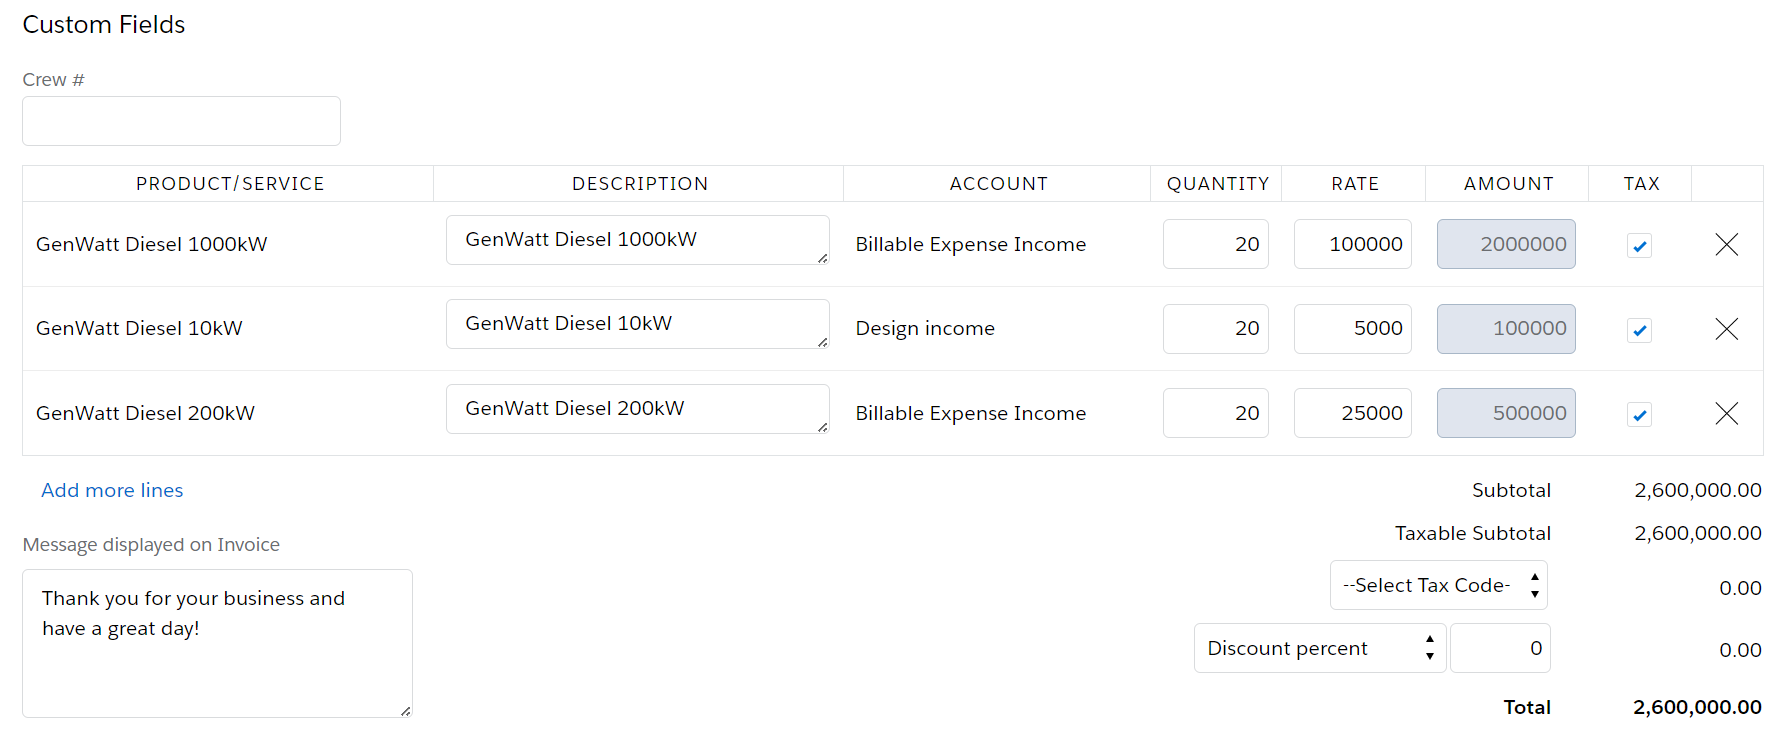
- In the Product/Service section, Opportunity Items are pre-populated as shown below.
- Breadwinner automatically populates the Description as OpportunityProductName – Description.
- The Income Account, Quantity, and Rate are pre-populated by the Breadwinner.
- Click on Create Invoice in QuickBooks to finish creating an invoice.
- Breadwinner will redirect you to the generated invoice.
- Scroll down and go to the Invoice Information section, where you can click the link to access your generated invoice in QuickBooks.
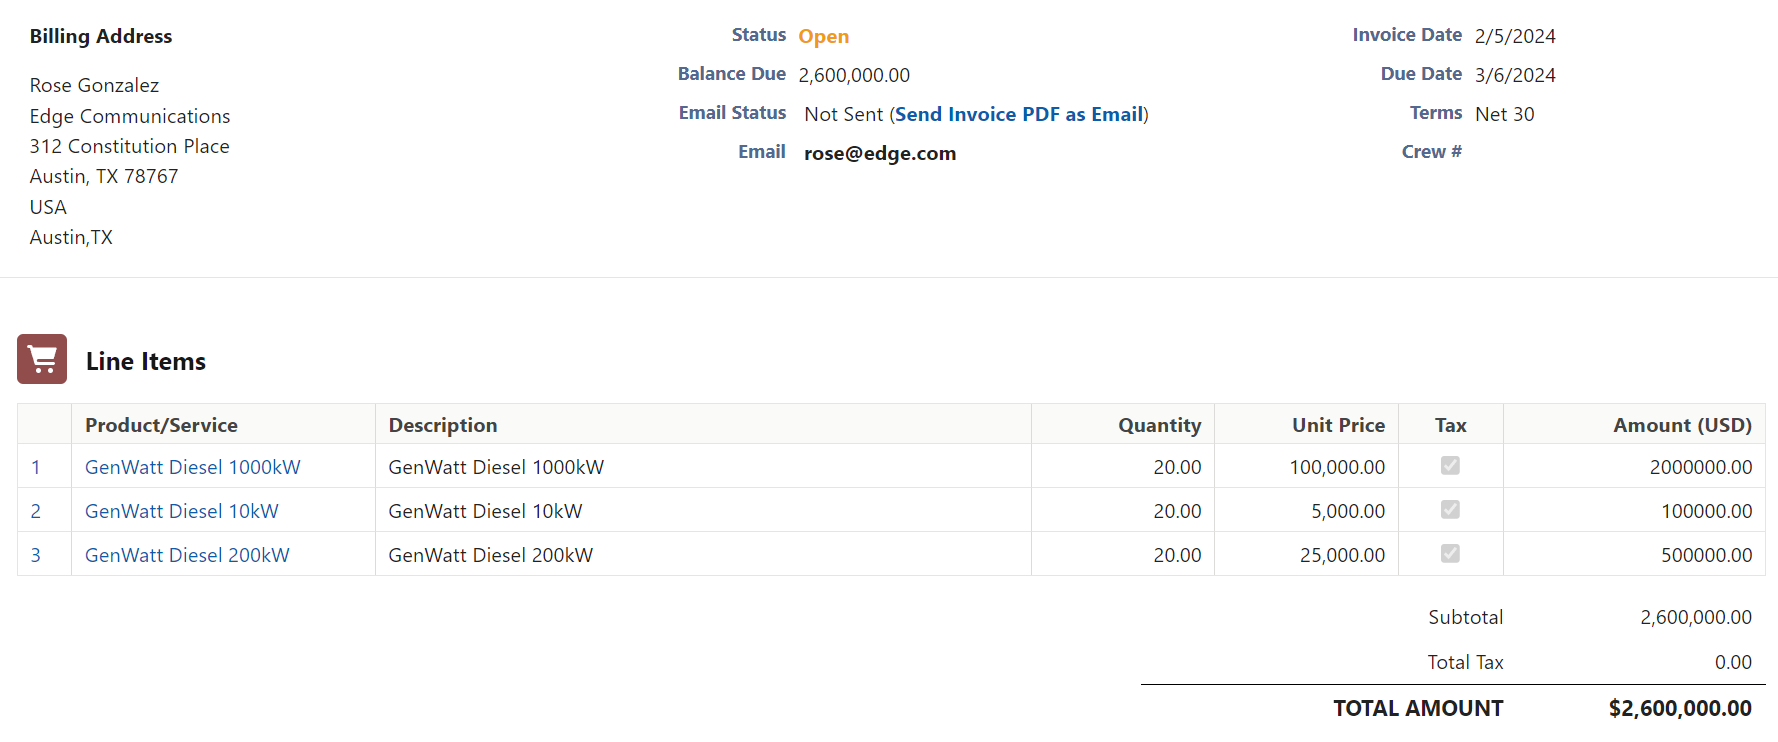
NOTE: You can review all your created invoices, whether from QuickBooks to Salesforce or vice versa, in the QuickBooks Invoices Tab within the Breadwinner for QuickBooks App.
Frequently Asked Questions (FAQs)
Can I email an Invoice to Customers using Breadwinner for QuickBooks?
Yes, you can do it in two ways:
- Sending it directly from Salesforce
- Download the invoice to your system and send it through email
What types of data can be synchronized between Salesforce and QuickBooks using Breadwinner for QuickBooks?
Breadwinner for QuickBooks can synchronize various types of data, including customer information, sales data, and financial transactions. The goal is to create a unified view of customer relationships and financial activities.
Is it necessary to have programming knowledge to use Breadwinner?
No, it can be used without any programming knowledge.

